| In Chapter 5, you learned about Flash's capability to create mask layers that hide and reveal objects on lower layers . Sometimes, the best way to create the illusion of movement is to animate a mask so that it gradually hides or reveals objects. Imagine a line that starts at the left edge of the Stage and goes all the way to the right edge. If you create a mask that reveals the line bit by bit, you create the illusion of a line that draws itself. Reverse the process, and you have a line that gradually erases itself. Creating rotating and shape-tweened mask graphics can give you some interesting effects. The more familiar you are with using animated masks to reveal stationary items, the better sense you'l have of when to use this technique. For practice, try animating a mask that creates a growing rainbow. To create a stationary graphic and a moving mask that reveals it: -
Open a new Flash document, and add a second layer. -
In the Timeline, rename the bottom layer Rainbow, and rename the top layer Rotating Rectangle. -
In Frame 1 of the Rainbow layer, on the Stage, use the oval tool to draw a perfect circle with a radial-gradient fill. To create a rainbow effect, use a gradient that has distinct bands of color . -
Erase the bottom half of the circle (Figure 11.39). Figure 11.39. An easy way to create a rainbow object is to fill a circle with a multiple-color radial gradient and then delete the bottom half of the circle. Here, bisecting the circle by drawing a line through it (middle) makes deletion easy; just select the line and the bottom half of the circle (bottom), and press Delete.  What's left is your rainbow graphic. For safety, convert the graphic to a symbol (select the graphic, choose Insert > Convert to Symbol, Choose Graphic behavior, name the symbol, and click OK) so that you'll have a copy of the rainbow in case you accidentally delete the original. -
In the Timeline, Control-click (Mac) or right-click (Windows) the Rotating Rectangle layer. The contextual menu for layers appears. -
Choose Mask. Flash converts the layer to a mask, links the Rainbow layer to the mask, and locks both layers (Figure 11.40). Figure 11.40. When you create a mask layer, Flash automatically links the layer directly below the mask layer in the Timeline and locks both layers.  -
In the Timeline, click the padlock icons in the Rotating Rectangle and Rainbow layers to unlock them. -
On the Stage, in Frame 1 of the Rotating Rectangle layer, use the rectangle tool to draw a rectangle just below the bottom of the rainbow (Figure 11.41). Figure 11.41. To create a mask that reveals the entire rainbow, draw a rectangle that's wider and taller than the rainbow graphic. Positioning the rectangle below the rainbow graphic hides the rainbow completely. 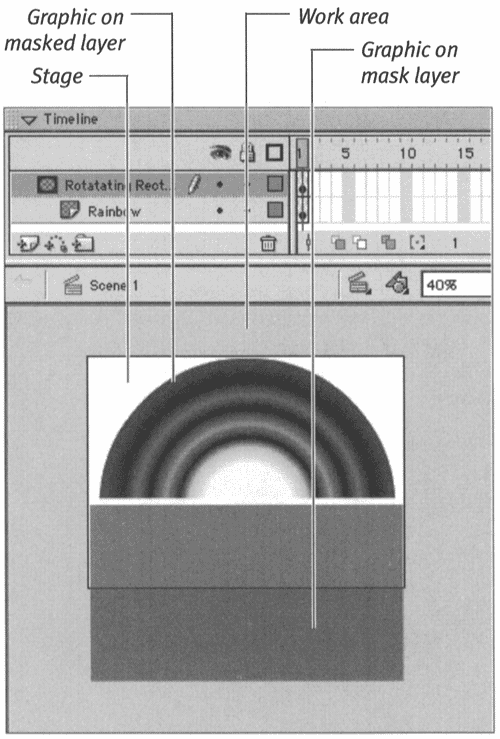 The rectangle is your mask. Any items that lie below the rectangle on a linked layer appear; everything else is hidden. Make the rectangle a bit larger than the rainbow so that the mask covers the whole rainbow. Using a transparent fill color lets you see the rainbow graphic through the mask graphic and helps you verify the mask's position. (To make the rectangle's fill color transparent, select it and then, in the Color Mixer panel, assign it a low Alpha percentage.)  Tip Tip -
You can use any of the three types of animation on a mask layer: frame-by-frame, motion tweening, or shape tweening. You can also use ActionScript to tell one movie clip symbol to mask another. (You'll learn about using ActionScript to manipulate objects in Chapters 13 and 15.)
To prepare the mask for rotational animation: -
Select the rectangle, and choose Insert > Convert to Symbol. Because you want to create rotational animation, you must use a motion tween for the mask, which means that the mask graphic must be a symbol or a grouped element. The Convert to Symbol dialog box appears. -
In the Name field, enter a name for the symbol; then click OK. -
Using the free-transform tool, select the rectangle on the Stage, and position the pointer over the white circle that indicates the center point of the object. A small white circle appears next to the arrow pointer, indicating that you can move the selected object's center point. -
Drag the center-point circle straight up until it rests in the middle of the top edge of the rectangle (Figure 11.42). Figure 11.42. Use the free-transform tool to reposition the point around which a symbol (or grouped item) rotates. Drag the circle that indicates the center point to a new position. A small circle previews the new center-point location. 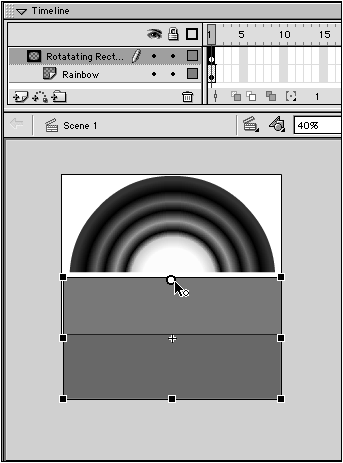 Now you can rotate the rectangle so that it swings up and over the rainbow. To complete the rotating-mask animation: -
In the Timeline, in the Rainbow layer, select Frame 15, and choose Insert > Frame. -
In the Timeline, in the Rotating Rectangle layer, select Frame 15, and choose Insert > Keyframe. -
In Frame 15, with the rectangle selected on the Stage, use the Rotate and Skew modifier of the free-transform tool to reposition the rectangle; click and drag the bottom-left corner of the rectangle and rotate it so that the rectangle completely covers the rainbow. The mask that covers the rainbow in authoring mode will reveal the rainbow in the final movie. -
In the Timeline, in the Rotating Rectangle layer, select any of the frames in the Keyframe 1 span ( frames 1 through 14). -
From the Frame Property Inspector's Tween pop-up menu, choose Motion. -
From the Rotate pop-up menu, choose CW. -
Enter in the Times field. This step sets up the motion tween that rotates the rectangle, swinging it up and over the rainbow until it fully covers the rainbow (Figure 11.43). Figure 11.43. In the final keyframe with the completed motion tween for the mask object, the mask covers the rainbow. Giving the mask a transparent fill lets you see the objects to be revealed through it as you work. The transparency of objects on the mask layer doesn't appear in the final movie. 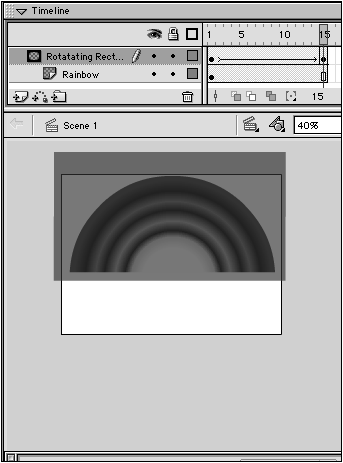 To preview the animation: -
Choose Control > Test Movie or Control > Test Scene. or -
In the Timeline, click the lock icon to lock both layers; then play the movie. If the rainbow is not fully revealed during the tween, you may need to enlarge or reposition the rectangle. Unlock both layers, and move the playhead through the movie to see where the rectangle is in each in-between frame (Figure 11.44). Figure 11.44. As you play the movie with the layers unlocked (left), you can see the in-between positions of the mask graphic. When you lock the layers (right), you see the masking as it will appear in the final exported movie. 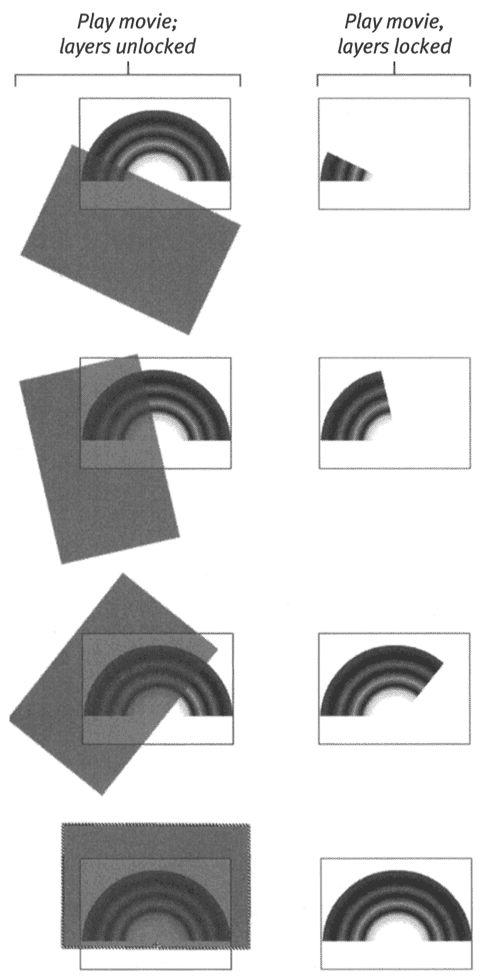 Tip -
To make the rainbow appear to fade in gradual y, create a keyframe for it in Frame 15 and tween a change in transparency for the rainbow symbol. In Frame 1, select this instance of the rainbow symbol and use the Property Inspector to modify it. From the Color menu, choose Alpha; in the Value field, enter a low percentage.
 |