| Mask layers are special layers that allow you to hide and show elements on underlying layers. In the final movie, shapes on the Mask layer become holes that let items on linked layers show through. To create a mask layer 1. | Do either of the following:
- Create a new layer in the Timeline (for example, by clicking the Insert Layer button). Flash selects the new layer.
- Select a layer that already exists.
In general, you should create (or select) a layer directly above the layer containing content you want to mask, although you can always create the mask separately and link the masked layers to it later.
| 2. | Right-click (Windows) or Control-click (Mac) the layer to access the contextual menu for layers, and choose Mask (Figure 6.30).
Figure 6.30. Select Mask from the contextual menu for layers to define a layer as a mask. 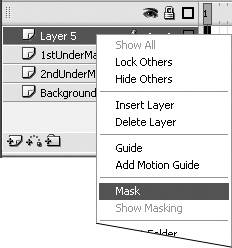
Flash automatically defines the layer as a mask, links the layer beneath the selected layer to the mask, and locks both layers so that masking is in effect (Figure 6.31). You can also rename the layer to identify it as a mask, if you wish.
Figure 6.31. The mask-layer icon imitates the masking effect with a dark mask shape over a checkerboard pattern. Masked layers are indented and have a checkerboard pattern on the layer icon in the Timeline, indicating that the layer is masked. 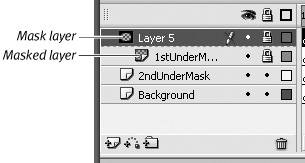
|
 Tips Tips
To link existing layers to a mask layer quickly, drag them in the Timeline so they sit directly below the mask or one of its linked layers. Once you have linked a layer to the mask, you can create additional new linked layers for that mask quickly. Select the linked (masked) layer; and then follow the steps for creating a new layer. Flash adds the new layers as masked layers directly above the selected layer. Positioning a layer beneath a list of masked layers can be tricky. When you position a layer's preview line after the last layer in the masked set, you have the choice of adding the layer to the masked set or placing it at the main level of the Timeline. Use the preview line's subtle clues to place the layer where you want it. Position the layer directly beneath the last masked layer. To add the layer to the masked set, drag slightly to the right; the bump on the top of the preview bar moves over to the right. To add the layer to the main level of the Timeline, drag slightly to the left; the bump follows suit.
To create the mask 1. | Create one or more layers containing graphic elements you want to reveal only through a mask.
| 2. | Create a mask layer above your masked-content layers, and make sure that it's selected, visible, and unlocked.
The layer should be highlighted in the Timeline, and the eye and padlock columns should contain bullets (not X or padlock icons).
| 3. | Use the drawing tools to create a merge-shape fill on the mask layer (Figure 6.32).
Figure 6.32. The content for the layers that the mask will reveal is just like any other content. You create a hole in the mask from a fill shape. All the mask elements must be on the same sublevel of the layer. In other words, you must either use only merge-shapes or combine all your shapes into a single drawing-object, group, or symbol. 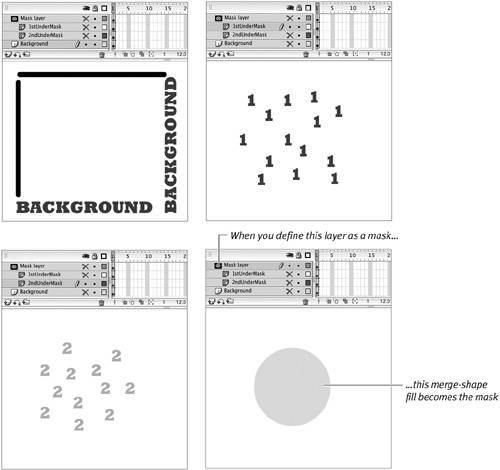
Flash uses only fills to create the mask and ignores any strokes on the mask layer.
|
Tips It's best to limit your mask to a single merge-shape or a single graphic-object (a drawing-object, a group, a symbol, or a static text box). If the mask layer contains multiple merge-shapes, the mask may work initially. Move one of the parts, however, and Flash stops treating that shape as part of the mask. If the mask layer contains a merge-shape and a graphic-object, Flash uses just the merge-shape to create the mask. If the mask layer contains multiple graphic-objects, Flash uses just the bottom-most one. (For more details on stacking order for graphic-objects, see Chapter 5.) If you want to use multiple shapes in a mask, select them and turn them into a single unit: choose Modify > Combine Objects > Union to turn them into a single drawing-object; choose Modify > Group to turn them into a single group. You can also set up mask and masked layers in the Layer Properties dialog (see "Controlling Layers and Folders," earlier in this chapter).
To see the mask's effect - Lock the mask layer and all linked layers.
or
1. | Control-click (Mac) or right-click (Windows) a mask (or masked) layer.
| 2. | From the contextual menu, choose Show Masking (Figure 6.33).
Figure 6.33. The Show Masking command in the contextual menu for layers locks all layers linked to the selected mask. 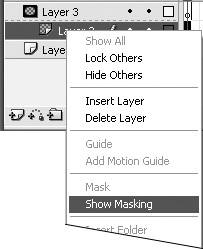
Flash automatically locks the mask layer and all the layers linked to it.
In document-editing mode, you must lock the mask layer and any masked layers beneath it to see the mask effect (Figure 6.34). You can see the effect without locking the layers in one of Flash's test modes (see Chapter 8).
Figure 6.34. After defining the mask and masked layers, you must lock them to see the mask in effect in document-editing mode. 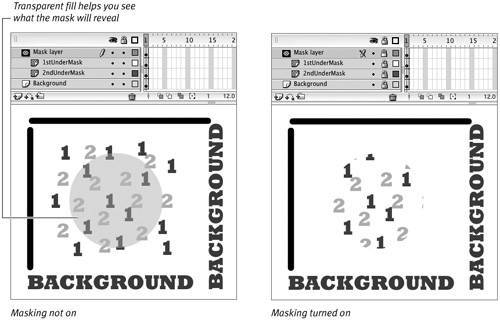
|
To edit a mask 1. | In the Timeline, select the mask layer.
| 2. | Make sure that the layer is visible and unlocked.
| 3. | Use any of the techniques you learned in preceding chapters to create and edit fills.
|
Tips To break the connection between a mask and its linked layers, redefine the layer type for the masked layer in the Layer Properties dialog. If you delete a mask layer, Flash redefines all the layers linked to it as normal layers. Keep in mind that masks use processor power. Using too many masks can slow the frame rate in your final movie. In addition, masked-off areas are published in your final movie and add to file size.
The Mystery of Masks A mask layer is like a window envelope (the ones you get bills in). The envelope may contain whole sheaves of papers covered with numbers, but the outside presents a blank white front with only a little window that lets you see the portion of the bill showing your name and address. The mask layer is the window envelope, and the linked, or masked, layers are the papers inside. In Flash, you create the window in the envelope by drawing and painting on a mask layer. (As you'll learn in Chapter 11, you can animate that window to create special effects.) A merge-shape fill on the mask layer becomes a window in the final movie. That window reveals whatever lies on the linked (or masked) layers inside the envelope. Within that envelope, you can have several layers that act just like any other Flash layers. Here's where it gets a bit tricky. Any areas of the envelope (the mask layer) that you leave blank hide the corresponding areas of all the layers inside the envelope (the masked layers). But the same blank areas of the envelope allow all unlinked layers outside and below the envelope to show through. |
|