| Flash doesn't limit you to a single action for each button script; you can combine multiple actions to make a button carry out several tasks in response to one event. Script Assist and behaviors both help you to do this, but Script Assist is easier to use for this purpose. To add multiple actions using Script Assist 1. | Open a new copy of the ObjectActions-Template that you created earlier in this chapter.
| 2. | Attach a script to the button in keyframe 1 that uses the goto action to send the playhead to keyframe 3. (To review the process, see "To add an action to a button-symbol instance using Script Assist" in the section "Adding Actions to Buttons.")
| 3. | Select the button instance on the Stage.
The button's script appears in the Script pane of the Actions panel.
| 4. | Make sure the Script Assist window is visible in the Actions panel.
If the Actions panel isn't in Script Assist mode, click the Script Assist button.
| 5. | To determine the order of the added action, do either of the following,
- To have the action be carried out before the goto action you added in step 2, select line 1 of the script by clicking anywhere in that line in the Script pane.
- To have the action be carried out after the goto action, select line 2 of the script by clicking anywhere in that line in the Script pane (Figure 13.31).
Figure 13.31. When using Script Assist, to prepare to add new actions, select the line containing the action that you want to happen first. To add an action that that takes place after the goto action in this script, select line 2. 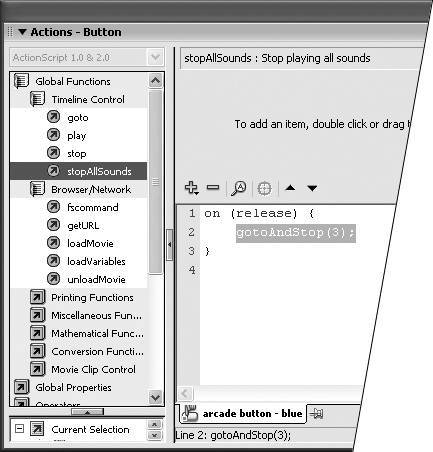
| 6. | Choose Add > Global Functions > Timeline Control > stopAllSounds.
Script Assist adds stopAllSounds () in the line following the one selected in step 5. For example, if you select line 2 in the Script Pane, Script Assist adds stopAllSounds to line 3 of the script (Figure 13.32). The script now contains two actions; both take place in response to the user's clicking the button. The actions happen in the order that they appear in the script. First the movie jumps to frame 3, and then all sounds currently playing stop. (You'll learn more about working with sounds in Chapter 15.) To revise the order in which the actions occur, rearrange them in the Script Pane.
Figure 13.32. When you've selected an action statement in the Script pane, double-clicking an item in the Actions toolbox (or selecting an item from the Add menu) adds a new action statement after the selected line in the script. The actions that appear within the curly braces all take place, in order, in response to the triggering event. 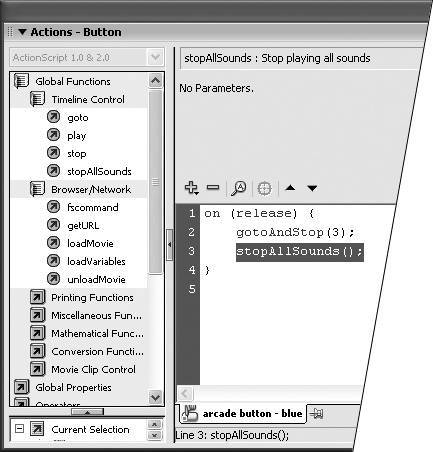
|
 Tip Tip
In the Actions panel, with Script Assist disabled, when you double-click an action in the Actions toolbox (or choose it from the Add menu), Flash inserts the code wherever the insertion point is in the Script pane and adds a return at the end of its insertion. Be sure to place the insertion point at the beginning of the line of code that should follow your addition.
To organize actions using Script Assist 1. | Continuing with the document from the preceding task, select line 3 in the Script pane.
| 2. | To move the selected action up one line, click the upward triangle in the Script pane's toolbar.
Flash rewrites the script to put the stopAllSounds action first (Figure 13.33). Now when you click the button, all sounds stop playing, and then the movie jumps to frame 3. You can also move a selected line of script down a line by clicking the downward triangle.
Figure 13.33. The up and down triangles in the Script Assist toolbar move selected lines of script up or down within the Script pane. 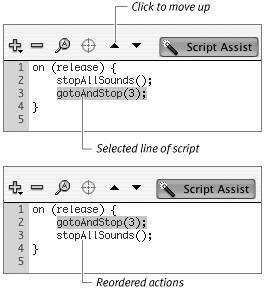
|
Tip When you use Script Assist to insert code into a script, Flash adds the inserted code in a new line after the line you've selected in the Script pane. When Script Assist is inactive, Flash inserts new code where the cursor is and then follows the insert with a return to go to a new line. If you select some text in the Script pane, Flash replaces that text with your new entry. To add a new line of code to your script, be sure to place the cursor at the start of the line you want to follow your new line. It may help you to add an extra return so you can place the cursor in a blank line to be sure your text winds up in the right spot.
To delete actions using Script Assist 1. | Continuing with the document from the preceding task, to delete a single action within the block of code defined by the curly braces, do the following:
- Select line 3 in the Script pane.
- Click the Remove button (the minus sign in the Script Assist toolbar). Flash removes the selected line of code.
| 2. | To delete the entire set of actions, do the following:
- Select a line that contains a curly brace, line 1 or line 3.
- Click the Remove button. Flash removes the entire action scriptevent handler, braces, actions, and all (Figure 13.34).
Figure 13.34. In the Script pane, select the line of code containing the action you want to delete, and then click the Remove button (the minus sign icon) in the Script Assist toolbar (A). Script Assist deletes that line from the script (B). If you select a line containing a curly brace (C), clicking the Remove button removes the whole action statement (D). 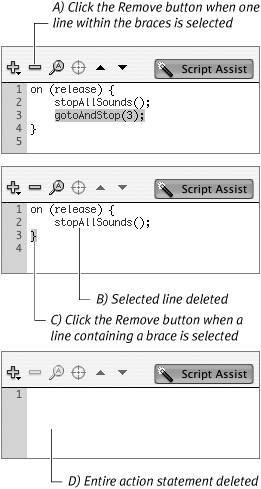
|
Working with Multiple Behaviors You can script multiple actions for a button by adding multiple behaviors to the same object. Select an instance of a button symbol on the Stage. In the Behaviors panel, from the Add menu, choose Movieclip > Goto and Stop at frame or label. In the Goto and Stop dialog, enter the parameters to take you to a different frame. Flash creates the script in the Script pane. With the button instance selected on the Stage, in the Behaviors panel, from the Add menu, choose Sounds > Stop All Sounds. Flash puts the code for the stopAllSounds action at the head of the existing goto script (Figure 13.35). At runtime, Flash will first stop the current sounds and then jump to the specified frame. If you want the actions to take place in a different order, you must rearrange them. Select a behavior in the Behaviors panel. Now use the Move Up and Move Down buttons (the triangle icons in the upper-right corner of the Behaviors panel) to move the selected behavior to a new place in the list. To delete a section of code created by a behavior, select the behavior in the Behaviors panel and then click the Delete Behavior button (the minus sign icon) (Figure 13.36). Figure 13.35. The Behaviors panel lists all the behaviors you've applied to the button. Click the text (in either the Event or Action column) to select the behavior. You can add new actions for the button from the Add menu. The Behaviors panel always adds a new action for the same handler at the beginning of the script, directly under the event handler line. 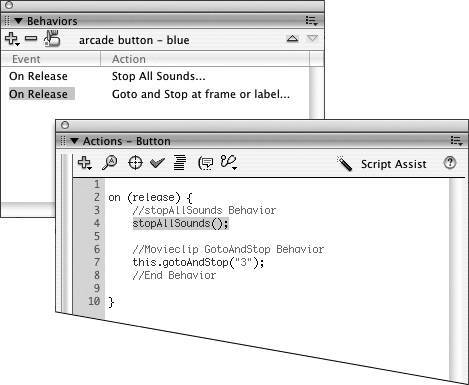
Figure 13.36. To change the order in which Flash carries out the actions created by behaviors, in the Behaviors panel, select an action and move it up or down in the list using the triangle buttons. To delete an action, click the minus sign. 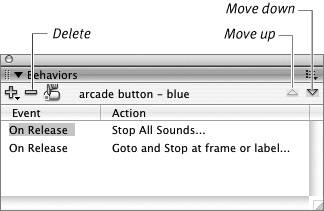
You can use Script Assist to move behaviors up and down within the Script pane of the Actions panel or to delete them entirely, but the task is complex. When you use behaviors, Flash adds beginning and ending comments and extra lines of space in the script; you need to delete them or move them properly. Manual alterations to scripts created by the Behaviors panel may introduce syntax errors that prevent Flash from recognizing a script as a behavior. In that case, you won't be able to use the Behaviors panel to modify or delete the script. Sometimes, using Script Assist to alter the behavior script makes the script unworkable for Flash's scripting assistants. Once you are familiar with ActionScript syntax, you can cut and paste or drag and drop sections of code to reorganize a behavior-created script to make actions occur in any order you want. Until then, it's safest to modify the behaviors only through the Behaviors panel. Or, use Script Assist when you want to create multiple actions for one button. |
|