| You can't create shape tweens that follow a path, but you can move shapes around the Stage in straight lines. To do so, reposition the elements on the Stage from one keyframe to the next. To shape-tween a moving graphic 1. | In a new Flash document, or on a new layer, select frame 20, and choose Insert > Timeline > Frame.
Flash adds blank in-between frames 2 through 20.
| 2. | In the Timeline, select any frame in the span (frames 120).
Note that you must click the frame to select it; you can't just position the playhead in the frame.
| 3. | In the Frame Properties tab of the Property inspector, from the Tween pop-up menu, choose Shape.
Even though you have no shapes on the Stage to tween yet, Flash gives the frames the shape-tween property. In the Timeline, the frames contain a dotted line, indicating that the tween is incomplete (Figure 10.18). Now you can add keyframes and shapes.
Figure 10.18. To save yourself numerous trips to the Tween pop-up menu in the Frame Properties tab of the Property inspector, you can assign the shape-tween property to a range of frames and add keyframes and shapes later. Flash defines a shape tween even though there's no content to tween yet. 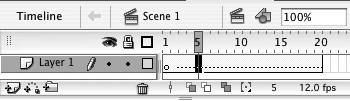
| 4. | In the Timeline, insert a blank keyframe at frames 5, 10, 15, and 20.
Flash creates four shape-tween sequences (Figure 10.19). For the moment, they're broken tweens because the keyframes are empty.
Figure 10.19. When you insert keyframes into a long tween sequence, Flash breaks it into smaller tween sequences. Until you place content in the keyframes, the Timeline displays the dotted line in each span to indicate a broken tween. 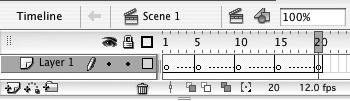
| 5. | To complete the tween sequences, in each keyframe, draw a different shape; place each one in a different corner of the Stage.
In frame 1, for example, draw a circular fill in the bottom-left corner of the Stage. In keyframe 5, draw a rectangular fill in the top-right corner of the Stage. In keyframe 10, draw a flattened oval in the bottom-right corner of the Stage. In keyframe 15, draw a star in the top-left corner of the Stage. And in keyframe 20, duplicate keyframe 1's circle in the bottom-left corner of the Stage. For extra variety, give each object a different color. As you add content to keyframes, Flash fills in the spans in the Timeline with tween arrows.
| 6. | Play the movie.
You see a graphic that bounces around the Stage, morphing from one shape to the next (Figure 10.20).
Figure 10.20. Place a different shape in a different location in each keyframe. Flash creates the intermediate steps necessary to transform the shapes and move them across the Stage. Play the movie or turn on onion skinning to examine the motion and shape changes on the in-between frames. (Here, Edit Multiple Frames is also on, making it easy to see the keyframe shapes.) 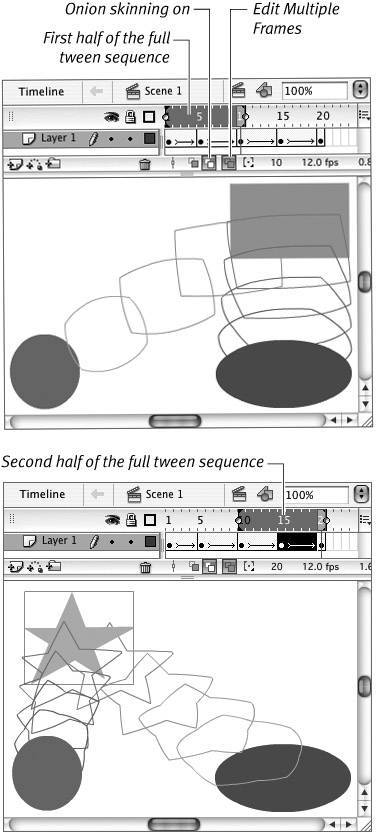
|
 Tip Tip
Although shape-tweened objects can't follow a path the way motion-tweened objects can, you can make Flash do the work of creating the separate keyframes you need to animate shape tweens that move on curved paths. First, create your shape tween. In the Timeline, select the full range of frames in the tween sequence. Choose Modify > Timeline > Convert to Keyframes. Flash converts each in-between frame (with its transitional content) into a keyframe. Now you can position each keyframe object anywhere you like. To simulate a motion guide, create a regular guide layer (see Chapter 6), and draw the path you want your morphing shape to follow. Choose View > Snapping > Snap to Objects. Reposition the shape in each keyframe. When you drag a shape close to the line on the guide layer, Flash snaps the shape to the line.
|