| One subject that any database administrator should be familiar with is that of logs. There are different types of logs MySQL uses; I'll focus on two: the error log, which records server problems, and the tracking log, which keeps a history of queries. MySQL's error log will be located in the data directory and titled hostname.err. Normally this will mean that the file is something like /usr/local/mysql/data/localhost.err or C:\Program Files\MySQL\MySQL Server x. x\data\computername.err. The error log will record every error reported, like those caused by a failure to start the MySQL server. For this reason, checking the error log can greatly facilitate debugging any problems you have with running the server. The second type of log, an update log, will record track all of the SQL statements that have been run. There are two types of tracking logs: The first is a general one that records all queries, whether or not they succeed. The second is a binary log that records only those queries that succeeded and that, in some way, modified a database. The binary log is also in chronological order, meaning that it could be used to restore a database. There are two caveats with using update logs. First of all, they'll eat up space on your hard drive, particularly the general tracking log. Second, as these logs contain lots of information about your database, they can be a security risk. Make sure that the directory where they are stored is not accessible by non-administrative users. I'll demonstrate how to use the MySQL Administrator to both enable and view logs. Option Files An option file, also called a configuration file, is a special text file where you can define values to be used when an application starts. The MySQL software supports two types of options files: Many sections of the MySQL Administrator write to the first kind of option file. The second kind can be created or edited in any text editor. Any parameter that can be added when starting an application from the command line (e.g., --database or --host) can be stored in an option file. For a client file, you would start with something like this: [client] user=username password=password
On Mac OS X and Unix, you would save the file as ~/.my.cnf (where ~ is your Home directory). On Windows, you would want to call this file my.ini and place it in the directory where MySQL is installed (e.g., C:\Program Files\MySQL\MySQL Server x.x). This file likely already exists, so just open it and edit the [client] or [mysql] section. |
To use and view logs: 1. | Open the MySQL Administrator and connect to the MySQL server.
You should connect as an administrative user, as you'll be changing how MySQL runs.
| 2. | Click Startup Variables (Windows) or Options (Mac).
The first step will be to enable logging, which can be done within this area of the application.
| 3. | Click Log Files (Windows) or choose Log Files from the drop-down menu (Mac).
| 4. | In the Activate Logging area (Figures 13.14 and 13.15), enable all the logs you want.
Figure 13.14. The Log Files pane on Windows. 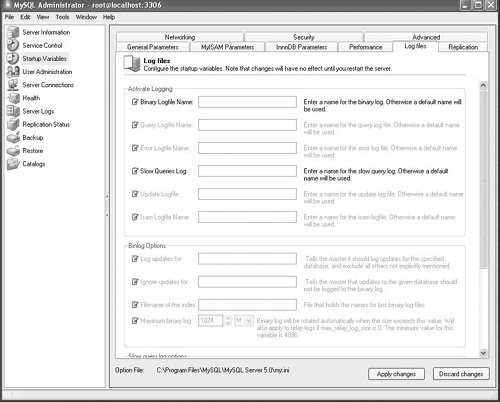
Figure 13.15. The Log Files pane on Mac OS X. 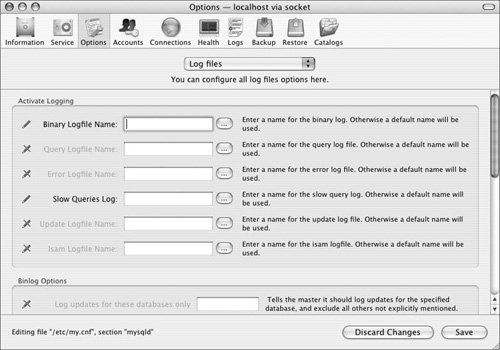
To enable a log, click the little icon to the left of the log's name. This tells the MySQL Administrator to write the change to the MySQL options file. By doing so, you have this change take effect whenever MySQL is started.
You can optionally give the log a name, if you want other than the default. On Mac, you can also use the button on the right of the text box to choose a location where the log should be stored.
Of the available logs, the error log is automatically enabled. I am also opting to enable the binary log (discussed in the introduction to these steps) and the Slow Queries log (to monitor specific performance problems).
| | | 5. | In the Binlog Options area, adjust the binary log's attributes.
This is a nice little feature, letting you log only specific databases, ignore specific databases, and state how large each binary log is allowed to get (in terms of file size on the server). For each attribute, again just click the icon to the left and then enter a value on the right.
| 6. | Repeat for the Slow Queries log (Figure 13.16).
Figure 13.16. Adjusting the behavior of the Slow Queries log within the Advanced log options area. 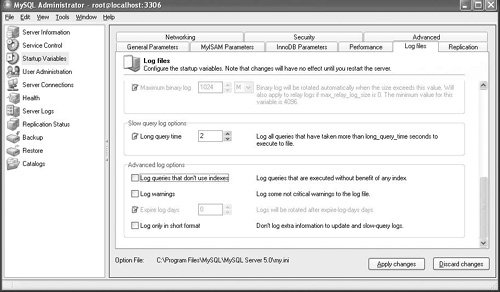
If you enable this log, you can also state what qualifies as a slow query.
| 7. | Click Apply Changes (Windows) or Save (Mac) to enact the changes.
| 8. | Restart the MySQL server.
The logging changes will not take effect until the next time the MySQL server is started. At that time it will use the options that were written to the option file by the MySQL Administrator.
| 9. | Use the Server Logs (Windows) or Logs (Mac) pane to view the logs (Figure 13.17).
Figure 13.17. The MySQL Administrator provides the best interface for viewing any type of MySQL log. 
Each log has its own pane or tab. You can easily scroll and search within each log, making this the best way to view them.
|
 Tip Tip
For extra safety and reliability, you could place the MySQL data directory on one hard drive on your computer and the logs on another (this assumes you have multiple hard drives, of course). Once you have done this, if one drive fails, the other will have a copy of the recorded queries, from which your databases can be resurrected (at least in part).
|