Section 2.7. Adding and Configuring Fonts
2.7. Adding and Configuring FontsAlthough Fedora ships with a good set of basic fonts, many users find it useful to add more fonts. Fortunately, this is very easy to do, either graphically or from the command line. 2.7.1. How Do I Do That?Fonts can be easily added or removed by manually copying the font files or by using the file managers: Nautilus (GNOME) or Konqueror (KDE). 2.7.1.1. Adding and removing fonts using GNOME NautilusGNOME's Nautilus file manager has a special URI for viewing and managing fonts. To access it:
Figure 2-24 shows the Nautilus font display. Figure 2-24. Font display in GNOME's Nautilus file manager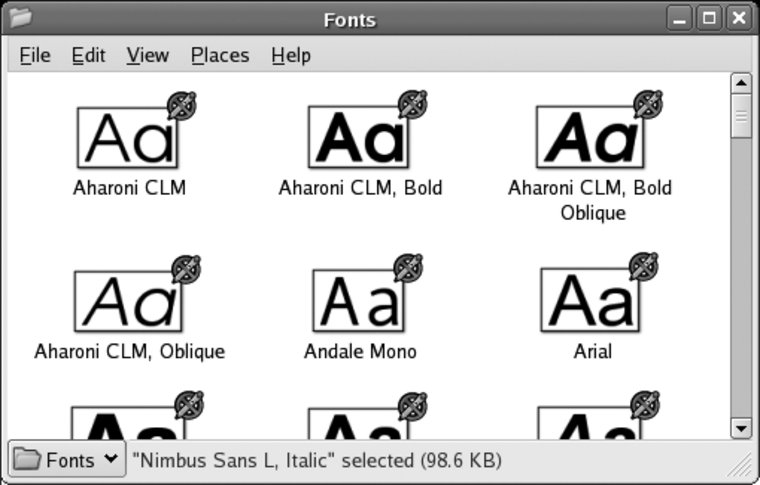 The lower- and uppercase letter A of each font are displayed, if the font has those characters. Double-clicking on a font (or right-clicking and selecting "Open with GNOME Font Viewer") will display some basic information about the fontincluding the license, file size, and font stylealong with an extended font sample, as shown in Figure 2-25. Figure 2-25. GNOME font viewer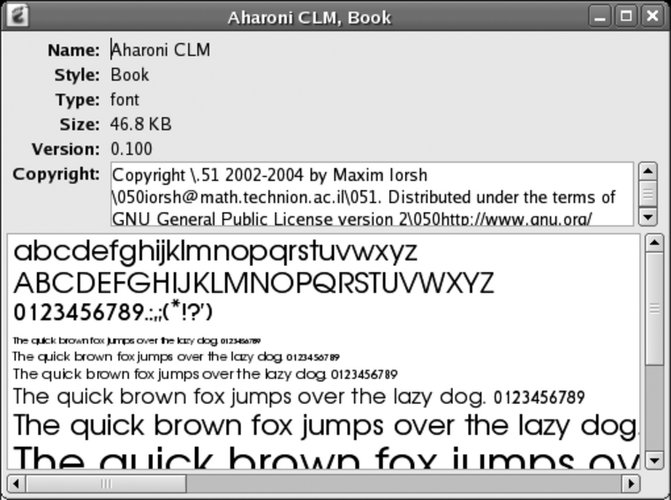 To install fonts into your personal font directory (~/.fonts), simply drag and drop them into the Nautilus font window. The fonts may not show up in the Nautilus display until you log out and log in again, but they will be installed and immediately accessible to applications when they start (if an application is already running, just restart that application to gain access to the new fonts). To install fonts that are in a compressed archive, such as those from http://www.1001freefonts.com, click on the .zip archive link (i.e., for the Windows font) in your web browser, then select "Open with Archive Manager" as the action. You can then drag and drop the file from the Archive Manager window to the Nautilus font window. A personal font can be deleted in the same way that a file is deleted using Nautilus: drag it from the Nautilus window to the trash can, or right-click on it and select "Move to Trash."
2.7.1.2. Adding and removing fonts using KDE KonquerorKDE's Konqueror file and web browser enables you to view, install, and delete fonts from both the system-wide font directories and your personal font directory. To access this mode:
The window will show icons labeled Personal and System; double-click on the group you wish to see, and the display shown in Figure 2-26 will appear (the System group is shown here). Figure 2-26. Konqueror system font display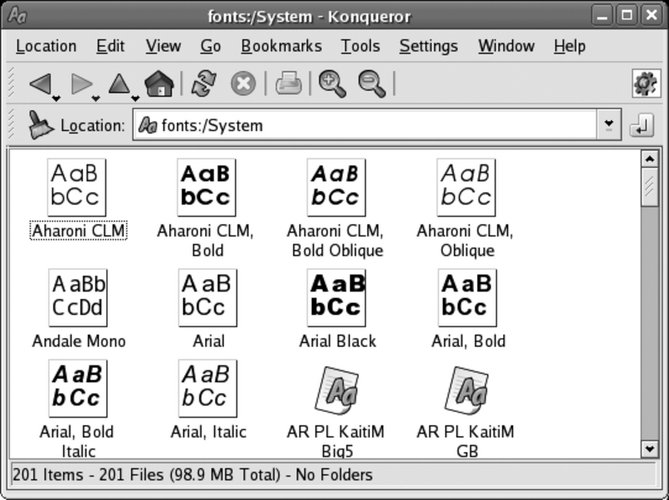 Double-clicking on a font will present the KFontView window shown in Figure 2-27, showing an extended font sample. Clicking on the T icon will enable you to change the sample sentence; the default sentence is same pangram used in the GNOME font viewer. Figure 2-27. KFontView window To add fonts, simply drag and drop them into the font window. If you drop them into the system font window, you will be prompted to enter the root password. To delete a font, treat it like a file: drag and drop it onto the trash can, or right-click and select Delete. As with installation, you will be prompted for the root password if the font is from the system font window.
2.7.1.3. Adding and removing fonts from the command lineWhen an application starts, the font configuration system automatically scans ~/.fonts (your personal font directory) as well as /usr/share/fonts (which is the system-wide font directory). Any changes to the fonts contained in those directories are detected automatically, so adding fonts is simply a matter of placing files into those directories, and removing fonts is simply a matter of deleting them. For example, if you have a compressed tar file named /tmp/newfonts.tgz containing a folder named newfonts full of TrueType fonts and wish to install them for your own private use, you can use these commands: $ cd ~/.fonts $ tar xvzf /tmp/newfonts.tgz "*.ttf" "*.TTF" Or, to install the fonts so that they are accessible to all users system-wide: # cd /usr/share/fonts # mkdir newfonts # cd newfonts # tar xvzf /tmp/newfonts.tgz "*.ttf" "*.TTF" To delete all of your personal fonts: $ rm -rf ~/.fonts/* And to delete the system-wide fonts installed in newfonts: # rm -rf /user/share/fonts/newfonts 2.7.1.4. Installing the Microsoft fontsWeb pages and documents created on Microsoft systems often use fonts that are distributed with Windows. For a time, Microsoft made these fonts available free of charge on its web site; although they are no longer available directly from Microsoft, they are available from fontconfig.org under Microsoft's fairly simple licensing terms, documented in http://fontconfig.org/webfonts/Licen.TXT. Installing these fonts makes it possible to view Word and Excel documents and web pages created under Windows as they were originally designed. Mozilla, Firefox, OpenOffice, and other applications can all use these fonts. In order to install these fonts, you'll need to obtain a copy of the cabextract program to extract the fonts from archives created in Microsoft's proprietary CAB format: # yum install cabextract Once cabextract is installed, you can easily install the Microsoft fonts from the command line: # wget http://fontconfig.org/webfonts/webfonts.tar.gz # tar xvzf webfonts.tar.gz # cd msfonts # cabextract *.exe # mkdir /usr/share/fonts/microsoft # cp *.[tT]* /usr/share/fonts/microsoft # cd .. # rm -rf msfonts # fc-cache 2.7.1.5. Using newly installed fontsApplications load their font lists at startup time, so simply relaunching an application is usually all that is required before you can start using new fonts. The command fc-cache will create an index cache to speed application startup. To use it: $ fc-cache # fc-cache Running fc-cache as a regular user will create the index cache for ~/.fonts, which is not really necessary because the index cache will be created automatically. Running it as root will create the index cache for /usr/share/fonts and is strongly recommended; otherwise, an index of the system-wide fonts will be created for each individual user, wasting time and storage space. 2.7.1.6. Configuring font rendering optionsFont rendering can be tuned to adjust the font appearance to suit user preferences and the display hardware in use. Both GNOME and KDE provide configuration tools to configure font rendering. The GNOME configuration window shown in Figure 2-28 is accessed from the menu item System Figure 2-28. GNOME font-rendering preferences tool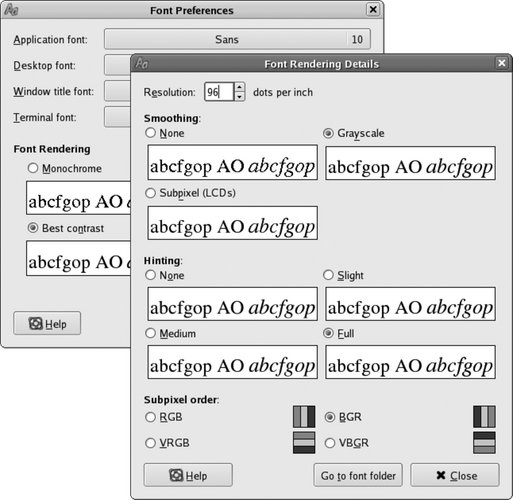 Figure 2-29. KDE font rendering preferences tool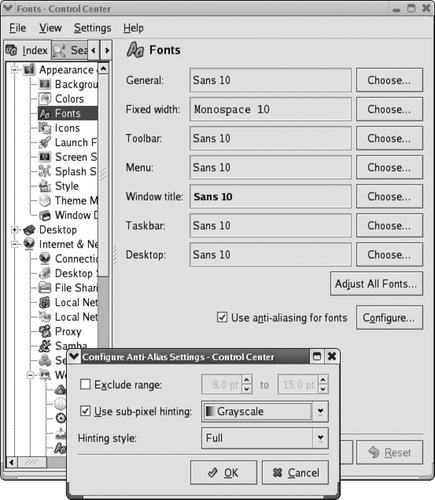 In both cases, you can enable or disable antialiasing, adjust the level of antialiasing hinting, and set subpixel order. On an older system with a slow CPU and/or low memory resources, turning off antialiasing can make enough of a performance difference to turn an unbearably slow system into one that performs reasonably. When antialiasing is enabled, the hinting level can be set according to user preferenceexperiment and see what looks best. If you have an LCD screen, select "Smoothing: Subpixel (LCD)" in GNOME or "Use Subpixel Smoothing" in KDE. You'll also need to select the order of the red, green, and blue elements on your screen; since this information is almost never documented in the hardware specifications, use a large magnifying glass or experiment until you find the setting that looks the best. 2.7.2. How Does It Work?X Window System programs use one of two different font systems. The old system, known as core fonts, is still used by a few applications and is needed to start the X server. Almost all current applications use a system comprising two components: FreeType and fontconfig, two software libraries that provide high-quality font rendering and font matching. Since these are client-side libraries accessed by applications, each application separately handles its own font operations. FreeType's sub-pixel rendering capability is, by and large, useful only on LCDs. It involves treating each of the RGB color elements in a pixel as a partial pixel. Figure 2-30 shows an enlarged diagonal line border between black and white regions on an LCD screen, rendered using subpixel hinting. Figure 2-30. Subpixel rendering on an LCD panel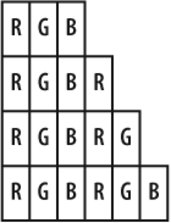 Note that each pixel is comprised of a red, green, and a blue element; on this display, they are arranged horizontally in R-G-B order. In the first row, there is one white pixel. In the second row, there is a white pixel followed by one-third of a white pixelwhich, in this case, means a red pixel. The third row consists of a white pixel followed by two-thirds of a pixela red-plus-green pixel, which displays as yellow. The fourth row contains two white pixels. It seems odd that a color pixel would be perceived as a partial pixel, but it works because of sophisticated algorithms and the fact that the subpixels are a continuation of the R-G-B element pattern on the line. 2.7.3. What About...2.7.3.1. ...getting a list of available fonts?The fc-list program (a utility provided with Fontconfig) will list all of the fonts available through the Xft/Fontconfig system: $ fc-list Luxi Serif:style=Regular MiscFixed:style=Regular Utopia:style=Bold Italic Nimbus Sans L:style=Regular Italic Bitstream Vera Sans Mono:style=Bold Webdings:style=Regular Console:style=Regular URW Palladio L:style=Roman Century Schoolbook L:style=Bold Italic Luxi Serif:style=Bold ...(snip)... The list isn't in any sort of order, and it contains a lot of information about the styles available for each font, so it's not very readable. Using some arguments and the sort command will produce a much more readable list of available font faces: $ fc-list : family|sort -u Andale Mono Arial Arial Black Bitstream Charter Bitstream Vera Sans Bitstream Vera Sans Mono Bitstream Vera Serif Century Schoolbook L Comic Sans MS Console console8x8 Courier ...(snip).. 2.7.3.2. ...specifying a font name?Fontconfig font names are very easy to use: just specify the font face you wish to use. You can optionally include a size (separated by a hyphen) or font attribute name/value pairs (after a colon). For matching purposes, you can specify multiple values for the font name or size, separated by commas. The first matching value will be selected. Table 2-4 lists some font names expressed using this notation.
For a complete list of font properties that can be used in font names, see the documentation on the Fontconfig web site at http://fontconfig.org. Note that many of the properties mentioned in the documentation are not used; on most systems, style is the only property specified for most of the fonts. xterm has support for Fontconfig/Xft and can be used to test a Fontconfig font name. The command-line option to use is -fa (face); if the font name contains spaces, be sure to quote it on the command line. Here are some examples: $ xterm -fa courier $ xterm -fa courier-12 $ xterm -fa courier-18:style=italic $ xterm -fa "Bitstream Vera Sans Mono-16:style=bold" $ xterm -fa foo,bar,baz,utopia,courier,qux-12,18,10:style=italic If the selected font does not use character-cell spacing, xterm will add considerable spacing between characters (the last example demonstrates this). 2.7.4. Where Can I Learn More?
|

 Preferences
 Font. The KDE rendering configuration panel shown in Figure 2-29 is accessed through the KDE Control Panel under Appearance & Themes
EAN: 2147483647
Pages: 115