Monitoring Package Execution and Event Logs
Package execution can be monitored and audited by using three methods, which include active monitoring in SSMS, console reporting in the command window, and viewing execution logs. A number of logging options are available that can be enabled in Execute Package Utility. Logging can be output by using a number of standard logging providers. This requires some planning because this feature requires a connection manager to be defined in the package to handle the logging output. To enable logging, use the logging options to perform the following steps:
-
Enable event logging.
-
Add logging output in the Execute Package Utility dialog box.
-
Set Log Provider.
-
Create a package connection manager to output the log.
-
Select the connection manager in the configuration string.
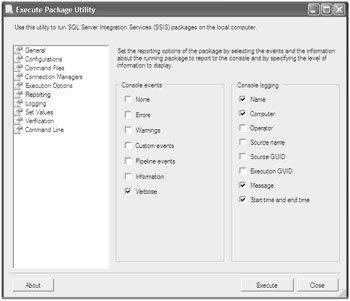
The Reporting options page, as shown in Figure 10-3, controls the logging content and specific detail written to the event logs. In addition to the logging information written to a permanent log, you can also control which event information is displayed in the console window while the package is running. Use the reporting options to select console events and to set up console logging.

Figure 10-3: Reporting options using the Execute Package Utility
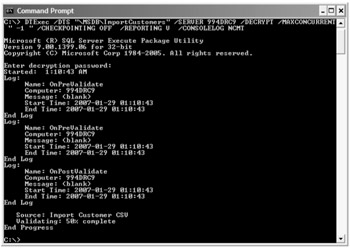
When you run the package from the command line by using DTExec, the selected console logging options are displayed in the console window and can easily be written to a file, as shown in Figure 10-4.

Figure 10-4: Command-line version of the Execute Package Utility
Applying a Configuration
This exercise will lead you through the steps to create a configuration file in which to store alternate property settings. Then you will apply the configuration to a package to control execution under different conditions.
Delete the Existing Package from SSMS
-
In SSMS, verify that you are connected to Integration Services. If not, click the Connect button in the Object Explorer pane, select Integration Services, accept the default local server connection, and then click Connect.
-
If launching SSMS for the first time, choose Integration Services from the Server Type drop-down list and connect by using localhost as the server name.
-
Expand the Stored Packages folder and the MSDB folder within it to expose the
 ImportCustomers.dtsx package created in the previous exercise.
 -
Right-click the
 ImportCustomers.dtsx package in the MSDB folder and select Delete.
Tip For the demonstration, you need to delete the deployed package from the server to redeploy an updated package containing the added configuration information.
Add a Configuration to the ImportCustomers.dtsx Package
-
In BIDS, verify that Chapter 10 Project is open. If not, from the File menu, choose Open, select Project/Solution, and choose the
 SSIS Sample Solution.sln file.
 -
In Solution Explorer, double-click the
 ImportCustomers.dtsx package to open it in the grid.
 -
From the SSIS menu, choose Package Configurations.
-
In the Package Configurations Organizer window, check the Enable Package Configurations check box.
-
Click the Add button to open the Package Configuration Wizard, and then click Next.
-
Ensure that XML Configuration File is selected for the Configuration Type drop-down list.
-
In the Configuration File Name input box, type ImportCustomersConfiguration.
-
Click Next.
This will create a new configuration file with a .dtsxConfig file extension.
-
Maximize the Package Configuration Wizard window to get a better view of the Objects list.
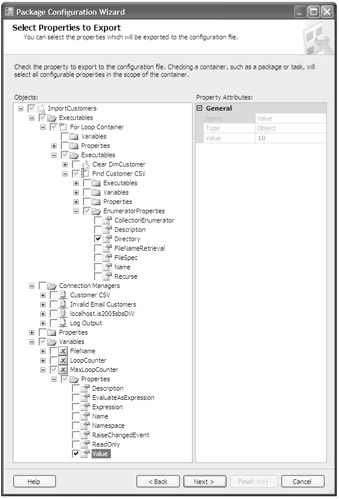
You are choosing which properties to export to the configuration file. You want two properties to export.
-
In the Executables folder, expand the For Loop Container.
-
Expand the Executables folder.
-
Expand the Find Customer CSV object.
-
Expand the Enumeration Properties folder.
-
Select the check box next to Directory.
-
In the Objects list, scroll to the bottom of the list and expand the Variables folder.
-
Expand MaxLoopCounter.
-
Expand the Properties folder.
-
Select the check box next to Value.
Verify that your screen looks like this:

-
Click Next at the bottom of the Package Configuration Wizard dialog box.
-
Accept the default Configuration Name and click Finish to close the Package Configuration Wizard.
-
Click Close in the Package Configuration Organizer window.
-
From the File menu, choose Save All.
Deploy the Package
-
In Solution Explorer, right-click the SSIS Sample Project (first item listed on the tree) and click Build.
-
Close BIDS.
Start the Package Installation Wizard
You will deploy the package to SQL Server in the following steps.
-
In Windows Explorer, navigate to the C:\Documents and Settings\<username>\My Documents\Microsoft Press\is2005sbs\Chapter10 folder.
-
Open the Bin\ Deployment folder.
Here you will see a copy of the configuration file you just created.
-
Double-click the
 SSIS Sample Project.SSISDeploymentManifest file.
 -
In the Package Installation Wizard, click Next.
-
Select the SQL Server Deployment option, and then click Next.
-
Ensure that (local) is listed for the Server Name and click Next.
-
If you are prompted for a package password, type password.
-
Click Next to accept the default Folder path for the installation folder.
-
Click Next to start the installation.
After the package is updated, the Package Installation Wizard will present the configuration settings you exported to the configuration. This is applying the configuration settings.
-
Expand Property to view Loop Counter and Directory Variables. No changes are necessary.
-
Click Next.
-
Click Finish to deploy and apply the configuration settings.
Inspect the Alternate Configuration Files
In this exercise, you will inspect the contents of the two provided configuration files.
-
In Windows Explorer, navigate to the C:\Documents and Settings\<username>\My Documents\Microsoft Press\is2005sbs\Chapter10 folder.
Notice that there are three .dtsConfig files. Two are alternate copies of the configuration file you created in BIDS. You are going to inspect them both by using Notepad.
-
Locate the ImportCustomersConfiguration (DataFolder).dtsConfig file.
-
Right-click the file and choose Open With.
-
Select Choose Program.
-
In the Open With window, select Notepad from the Programs list.
-
Click OK.
This is an XML file that holds the configuration information for your deployed package. Notice the new values between the <ConfiguredValue> and </ConfiguredValue> tags.
-
Close Notepad.
-
Right-click the ImportCustomersConfiguration (Empty DataFolder).dtsConfig file.
-
Click Open With and select Notepad.
Note Notice that the path between the <ConfiguredValue> and </ConfiguredValue> tags points to a folder that doesn't contain the data files. You will use this configuration and view the results.
-
Close Notepad.
Run the Deployed Package
-
In SSMS, verify that you are connected to Integration Services. If not, click the Connect button in the Object Explorer pane, select Integration Services, accept the default local server connection, and then click Connect.
-
If launching SSMS for the first time, choose Integration Services from the Server Type drop-down list and connect by using localhost as the server name.
-
Expand the Stored Packages folder.
-
Right-click the MSDB folder and select Refresh to see the newly deployed package.
-
Right-click the newly deployed ImportCustomers package and select Run Package.
-
In the Execute Package Utility dialog box, click the Execute button at the bottom of the window.
-
If prompted for a password, type password to continue.
Note Note that the Package Execution Progress window shows the real-time execution of the package. Note that this package is valid and completes with no warnings or errors.
Close the Package Execution Progress window when the package finishes running.
-
Close the Execute Package Utility window.
Execute the Package by Using the Configuration Files
-
Run the package with two alternate configurations, one at a time:
You will be prompted for the package password multiple times during this process. In each case, type password and click OK to continue.
-
In the SSMS Object Explorer pane, right-click ImportCustomers under the Stored Packages node and select Run Package.
-
In the Execute Package Utility window, choose Configurations.
-
Click Add.
-
Browse to the project folder and select the
 ImportCustomersConfiguration (Empty Data Folder).dtsConfig file.
When execution is completed, note how quickly it ran and view the output window to reveal warning messages, which indicate that the import file folder was empty.
-
Execute the Package
-
In SSMS, verify that you are connected to Database Engine. If not, click the Connect button in the Object Explorer pane, select Database Engine, accept the default local server connection, and then click Connect.
-
Browse to the is2005sbsDW database and expand the tables.
-
Right-click the DimCustomer table and choose Open Table. A query window opens, revealing no rows in the table.
The DimCustomer table contains no records because the configuration directed the flat file connection manager to a folder with no files to import.
-
Repeat these steps and add the
 ImportCustomersConfiguration (Data Folder).dtsConfig configuration file.
 -
After executing the package, note that it took longer to run and then view the output. No errors or warnings should be reported.
-
In the query window for the DimCustomer table, click in the results window (center pane), and then click the Execute SQL button on the Query Designer toolbar (the red exclamation mark). The query should return 18,484 rows.
EAN: 2147483647
Pages: 152