Failover Clustering Enhancements
Let’s start with improvements to Failover Clustering, as the most significant changes have occurred with this technology. Here’s a quick list of enhancements, which we’ll unpack further in a moment:
-
A new quorum model that lets clusters survive the loss of the quorum disk.
-
Enhanced support for storage area networks and other storage technologies.
-
Networking and security enhancements that make clusters more secure and easier to maintain.
-
An improved tool for validating your hardware configuration before you try to deploy your cluster on it.
-
A new server paradigm that sees clustering as a feature rather than as a role.
-
A new management console that makes setting up and managing clusters a snap.
-
Improvements to other management tools, including the cluster.exe command and WMI provider.
-
Simplified troubleshooting using the Event logs instead of the old cluster.log.
But before we look at these enhancements in detail, let me give you some insight into why Microsoft has implemented them in Windows Server 2008.
Goals of Clustering Improvements
Why is Microsoft making all these clustering improvements in Windows Server 2008?
For their customers.
I know, you’re IT pros and you want to read the technical stuff. And you probably wish the Marketing Police would step in and put me in jail for making a statement like that. But think about it for a moment-it’s you who are the customer! At least, you are if you are an admin for some company. So what have been your complaints with regard to Microsoft’s current (Windows Server 2003 R2 Enterprise and Datacenter Edition) version of server clustering technology?
Well, perhaps you’ve said (or thought) things similar to the following:
“Why do I have to assign one of my 26 available drive letters to the quorum resource just for cluster use? This limits how many instances of SQL I can put on my cluster! And why does the quorum in the Shared Disk model have to be a single point of failure? I thought the whole purpose of server clusters was to eliminate a single point of failure for my applications.”
“Why do we as customers have to be locked in to a single vendor of clustering hardware whose products are certified on the Hardware Compatibility List (HCL) or Windows Server Catalog? I found out I couldn’t upgrade the firmware driver on my HBA because it’s not listed on the HCL so it’s unsupported, argh. So I called my vendor and he says I’ll have to wait months for the testing to be completed and their Web site to be updated. Maintaining clusters shouldn’t be this hard!”
“Why is it so darned hard to set up a cluster in the first place? I was on the phone with Microsoft Premier Support for hours until the support engineer finally helped me discover I had a cable connected wrong-plus I forgot to select the third check box on the second property sheet of the first node’s configuration settings on the left side of the right pane of the cluster admin console.”
“We had to hire a high-priced clustering specialist to implement and configure a cluster solution for our IT department because our existing IT pros just couldn’t figure this clustering stuff out. They kept asking me questions like, “What’s the difference between IsAlive and LooksAlive?”, and I kept telling them, “I don’t understand it either!” Why can’t they make it so simple that an ordinary IT pro like me can figure it out?”
“I want to create a cluster that has one node in London and another in New York. Is that possible? Why do you say, ‘Maybe’?”
And here’s my favorite:
“All I want to do is set up a cluster that will make my file share highly available. I’m an experienced admin who’s got 100 file servers and I’ve set up thousands of file shares in the past, so why are clusters completely different? Why do I have to read a 50-page whitepaper just to figure out how to make this work?”
OK, I think I’ve probably got your attention by now, so let’s look at the enhancements. I’m assuming that as an experienced IT pro you already have some familiarity with how server clustering works in Windows Server 2003, but if not you can find an overview of this topic on the Microsoft Windows Server TechCenter. See the “Server Clusters Technical Reference” found at http://technet2.microsoft.com/WindowsServer/en/library/1033.mspx?mfr=true.
Understanding the New Quorum Model
For Windows Server 2003 clusters, the entire cluster depends on the quorum disk being alive. Despite the best efforts of SAN vendors to provide highly available RAID storage, sometimes even they fail. On Windows Server 2003, you can implement two different quorum models: the shared disk quorum model (also sometimes called the standard quorum model or the shared quorum device model), where you have a set of nodes sharing a storage array that includes the quorum resource; and the majority node set model, where each node has its own local storage device with a replicated copy of the quorum resource. The shared disk model is far more common mainly because a very high percentage of clusters are 2-node clusters.
In Windows Server 2008, however, these two models have been merged into a single hybrid or mixed-mode quorum model called the majority quorum model, which combines the best of both these earlier approaches. The quorum disk (which now is referred to as a witness disk) is now no longer a single point of failure for your cluster as it was in the shared disk quorum model of previous versions of Windows server clustering. Instead, you can now assign a vote to each node in your cluster and also to a shared storage device itself, and the cluster can now survive any event that involves the loss of a single vote. In other words-drum roll, please-a two-node cluster with shared storage can now survive the loss of the quorum. Or the loss of either node. This is because each node counts as one vote and the shared storage device also gets a vote, so losing a node or losing the quorum amounts to the same thing-the loss of one vote. (Actually, technically the voting thing works like this: Each node gets one vote for the internal disk where the cluster registry hive resides and the “witness disk” gets one vote because a copy of the cluster registry is also kept there. So not every disk a node brings online equates to a vote. Finally, the file share witness gets one vote even though a copy of the cluster registry hive is not kept there.)
Or you can configure your cluster a different way by assigning a vote only to your witness disk (the shared quorum storage device) and no votes for your nodes. In this type of clustering configuration, your cluster will still be operational even if only one node is still online and talking to the witness. In other words, this type of cluster configuration works the same way as the shared disk quorum model worked in Windows Server 2003.
Or if you aren’t using shared storage but are using local (replicated) storage for each node instead, you can assign one vote to each node so that as long as a majority of nodes are still online, the cluster is still up and any applications or services running on it continue to be available. In other words, this type of configuration achieves the same behavior as the majority node set model worked on the previous platform and it requires at least three nodes in your cluster.
In summary, the voting model for Failover Clustering in Windows Server 2008 puts you in control by letting you design your cluster to work the same as either of the two cluster models on previous platforms or as a hybrid of them. By assigning or not assigning votes to your nodes and shared storage, you create the cluster that meets your needs. In other words, in Windows Server 2008 there is only one quorum model and it’s configurable by assigning votes the way you choose.
There’s more. If you want to use shared storage for your witness, it doesn’t have to be a separate disk. (The file share witness can’t be a DFS share, however.) It can now simply be a file share on any file server on your network (as shown in Figure 9-1) and one file server can even function as a witness for multiple clusters. (Each cluster requires its own share, but you can have a single file server with a number of different shares, one for each cluster.) This approach is a good choice if you’re implementing GeoClusters (geographically dispersed clusters), something we’ll talk about in a few moments.
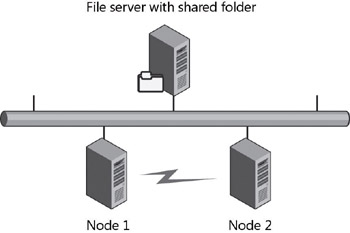
Figure 9-1: Majority quorum model using a file share witness
A few quick technical points need to be made:
-
If you create a cluster of at least two nodes that includes a shared disk witness, a \Cluster folder that contains the cluster registry hive will be created on the witness.
-
There are no longer any checkpoint files or quorum logs, so you don’t need to run clussvc –resetquorumlog on startup any longer. (In fact, this switch doesn’t even exist anymore in Windows Server 2008.)
-
You can use the Configure Quorum Settings wizard to change the quorum model after your cluster has been created, but you generally shouldn’t. Plan your clusters before you create them so that you won’t need to change the quorum model afterwards.
Understanding Storage Enhancements
Now let’s look at the storage technology enhancements in Windows Server 2008, many of which result from the fact that Microsoft has completely rewritten the cluster disk driver (clusdisk.sys) and Physical Disk resource for the new platform. First, clustering in Windows Server 2008 can now be called “SAN friendly.” This is because Failover Clustering no longer uses SCSI bus resets, which can be very disruptive to storage area network operations. A SCSI reset is a SCSI command that breaks the reservation on the target device, and a bus reset affects the entire bus, causing all devices on the bus to become disconnected. Clustering in Windows 2000 Server used bus resets as a matter of course; Windows Server 2003 improved on that by using them only as a last resort. Windows Server 2008, however, doesn’t use them at all-good riddance. Another improvement this provides is that Failover Clustering never leaves your cluster disks (disks that are visible to all nodes in your cluster) in an unprotected state that can affect the integrity of your data.
Second, Windows Server 2008 now supports only storage technologies that support persistent reservations. This basically means that Fibre Channel, iSCSI, and Serial Attached SCSI (SAS) shared bus types are allowed. Parallel-SCSI is now deprecated.
Third-and this might seem like a minor point-the quorum disk no longer needs a drive letter because Failover Clustering now supports direct disk access for your quorum resource. This is actually a good thing because drive letters are a valuable commodity for large clusters. You can, however, still assign the quorum a drive letter if you need to do so for some reason.
Fourth, Windows Server 2008 supports GUID Partition Table (GPT) disks. These disks support partitions larger than 2 terabytes (TB) and provide improved redundancy and recoverability, so they’re ideal for enterprise-level clusters. GPT disks are supported by Failover Clustering on all Windows Server 2008 hardware platforms (x86, x64, and IA64) for both Enterprise and Datacenter Editions.
Fifth, new self-healing logic helps identify disks based on multiple attributes and self-heals the disk if found by any attribute. There’s a sidebar coming up in a moment where an expert from the product team will describe this feature in more detail. And in addition, new validation logic helps preserve mount point relationships and prevent them from breaking.
Sixth, there is now a built-in mechanism that helps re-establish relationships between physical disk resources and logical unit numbers (LUNs). The operation of this mechanism is similar to that of the Server Cluster Recovery Utility tool (ClusterRecovery.exe) found in the Windows Server 2003 Resource Kit.
Seventh (and probably not finally) there are revamped chkdsk.exe options and an enhanced DiskPart.exe command.
Did I mention the improved Maintenance Mode that lets you give temporary exclusive access to online clustered disks to other applications? Or the Volume Shadow Copy Services (VSS) support for hardware snapshot restores of clustered disks? Or the fact that the cluster disk driver no longer provides direct disk fencing functionality (disk fencing is the process of allowing/disallowing access to a disk), and that this change reduces the chances of disk corruption occurring?
Oh yes, and concerning dynamic disks, I know there has been customer demand that Microsoft include built-in support for dynamic disks for cluster storage. However, this is not included in Windows Server 2008. Why? I would guess for two reasons: first, there are already third-party products available, such as Symantec Storage Foundation for Windows, that can provide this type of functionality; and second, there’s really no need for this functionality in Failover Clusters. Why? Because GPT disks can give you partitions large enough that you’ll probably never need to worry about resizing them-plus if you do need to resize a partition on a basic disk, you can do so in Windows Server 2008 using the enhanced DiskPart.exe tool included with the platform, which now allows you to shrink volumes in addition to being able to extend them.
The bottom line for IT pros? You might need to upgrade your storage gear if you plan on migrating your existing Windows server clusters to Windows Server 2008. That’s because some hardware will simply not be upgradable and you can’t assume that what worked with Windows Server 2003 will work with Windows Server 2008. In other words, there won’t be any grandfathering of storage hardware support for qualified Windows server clustering solutions that are currently listed in the Windows Server Catalog. But I’ll get to the topic of qualifying your clustering hardware in a few moments.
Now here’s the sidebar I mentioned earlier.
The storage stack and how shared disks are managed as well as identified has been completely redesigned in Windows Server 2008 Failover Clustering. In Windows Server 2008, the Cluster Service still uses the Disk Signature located in the Master Boot Record of the disk to identify disks, but in addition it also now leverages SCSI Inquiry data to identify disks as well. The Disk Signature is located in sector 0 of the disk and is actually data on the disk, but data on the disk can change for a variety of reasons. SCSI Inquiry data is an attribute of the LUN provided by the storage array. The new mechanism in 2008 is that if for any reason the Cluster Service is unable to identify the disk based on the Disk Signature, it then searches for the disk based on the SCSI Inquiry data. If the disk is found, the Cluster Service then self-heals and updates its entry for the disk signature. In the same respect, if the disk is found by the Disk Signature and the previously known SCSI Inquiry data has changed, the Cluster Service self-heals, updates its known value, and brings the disk online. The big win in the end is that disks are now identified based on multiple attributes, the service is flexible enough to deal with a variety of failures of modifications, and such failures will not result in downtime. This is a big win and will resolve one of the top supportability issues in previous releases.
There might be extreme situations where both the Disk Signature and the SCSI Inquiry data for a LUN change-for example, in the case of a complete disaster recovery. To handle this situation, a new recovery tool has been built into the product in 2008. If a disk is in a Failed or Offline state because it cannot identify the disks (which is a condition that is identified by Event ID 1034 in the System event log), perform the following steps. Open the Failover Cluster Management snap-in (CluAdmin.msc), right-click the Physical Disk resource, and select Properties. At the bottom of the General tab, find and click the Repair button. A list is displayed of all the disks that are shared but not clustered yet. The Repair action allows you to specify which disk this disk resource should control, and it allows you to rebuild the relationship between logical disks and the cluster physical disk resources. Once you select the newly restored disk, the properties are updated and you can bring the disk online so that it can be used again by highly available services or applications.
–Elden Christensen
Program Manager, Windows Enterprise Server Products
Understanding Networking and Security Enhancements
If you’ve picked up a copy of the Microsoft Windows Vista Resource Kit (Microsoft Press, 2007), you’ll have already read a lot about the new TCP/IP networking stack in Windows Vista. (If you haven’t picked up a copy of this title yet, why haven’t you? How am I supposed to retire if the books I’ve been involved with don’t earn royalties?) Windows Server 2008 is built on the same TCP/IP stack as Windows Vista, so all the features of this stack are present here as well. The Cable Guy has a good overview of these features in one of his columns, found at http://www.microsoft.com/technet/community/columns/cableguy/cg0905.mspx.
One implication of this is that Failover Clustering in Windows Server 2008 now fully supports IPv6. This includes both internode network communications and client communications with the cluster. If you’re thinking of migrating your IPv4 network to IPv6 (or if you have to do so because of government mandates or for industry compliance), there’s a good overview chapter on IPv6 deployment in the Windows Vista Resource Kit. (Did I mention royalties?)
Another really nice networking enhancement in Failover Clustering is DHCP support. This means that cluster IP addresses can now be obtained from a DHCP server instead of having to be assigned manually using static addressing. Specifically, if you’ve configured the servers that will become nodes in your cluster so that they receive their addresses dynamically, all cluster addresses will also be obtained dynamically. But if you’ve configured your servers with static addresses, you’ll need to manually configure your cluster addresses as well. At the time of this writing, this works only for IPv4 addresses, however, and I don’t know if there are any plans for IPv6 addresses to be assigned dynamically to clusters before RTM-though DHCPv6 servers are supported in Windows Server 2008. (See Chapter 12, “Other Features and Enhancements,” for more information on DHCP enhancements in Windows Server 2008.)
Another improvement in networking for Failover Clusters is the removal of all remaining legacy dependencies on the NetBIOS protocol and the standardizing of all name resolution on DNS. This change eliminates unwanted NetBIOS name resolution broadcast traffic and also simplifies the transport of SMB traffic within your cluster.
Another change involves moving from the use of RPC over UDP for cluster heartbeats to more reliable TCP session-oriented protocols. And IPSec improvements now mean that when you use IPSec to safeguard communication within a cluster, failover is almost instantaneous from the client’s perspective. And now Network Name resources can stay up if only one IP address resource is online-in previous clustering implementations, all IP address resources had to be online for the Network Name to be available to the client.
Finally-and this can be a biggie for large enterprises-you can now have your cluster nodes reside in different subnets. And that means different nodes can be in different sites-really different sites that are geographically far apart! This kind of thing is called Geographically Dispersed Clusters (or GeoClusters for short) and although a form of GeoClusters was supported on earlier Windows server platforms, you had to use technologies such as Virtual LANs (VLANs) to ensure that all the nodes in your cluster appeared on the same IP subnet, which could be a pain sometimes. In addition, support for configurable heartbeat time-outs in Windows Server 2008 effectively means that there are no practical distance limitations on how far apart Failover Cluster nodes can be. Well, maybe you couldn’t have one node at Cape Canaveral, Florida, and another on Olympus Mons on Mars, but it should work if one node is in New York while another is in Kalamazoo, Michigan. In addition, the cluster heartbeat, which still uses UDP port 3343, now relies on UDP unicast packets (similar to the Request/ Reply process used by “ping”) instead of less reliable UDP broadcasts. This also makes Geo-Clusters easier to implement and more reliable than before. (By default, Failover Clustering waits five seconds before considering a cluster node as unreachable, and you can view this and other settings by typing cluster . /prop at a command prompt.)
Let’s hear an expert from Microsoft add a few more insights concerning GeoClusters.
One of the restrictions placed on previous versions of Failover Clusters (in Windows NT 4.0, Windows 2000 Server, and Windows Server 2003) was that all members of the cluster had to be located on the same logical IP subnet-for example, communications among all the cluster nodes could not be routed across different networks. Although this was not much of a restriction for clusters that were centrally located, it proved to be quite different for IT professionals who wanted to implement geographically dispersed clusters that were stretched across multiple sites as part of a disaster recovery scenario.
As described later in this chapter in the “From the Experts: Validating a Failover Cluster Configuration” sidebar, cluster solutions were required to be listed in the Windows Server Catalog. A subset of that listing is the Geographically Dispersed category. Geographically dispersed cluster solutions are typically implemented by third-party hardware vendors. With the exception of Microsoft Exchange Server 2007 deployed as a 2-Node Cluster Continuous Replication (CCR) cluster, there is no “out-of-the-box” data replication implementation available from Microsoft for geographic clusters.
In addition to the storage replication requirement, there were networking requirements as well. Because of the restriction previously stated regarding the nodes having to reside on the same logical subnet, organizations implementing geographic clusters had to configure VLANs that stretched between geographic sites. These VLANs also had to be configured to guarantee a maximum round-trip latency of no more than 500 milliseconds. Allowing Windows Server 2008 Failover Cluster nodes to reside on different subnets now does away with this restriction.
Accommodating this new functionality required a complete rewrite of the cluster network driver and a change in the way cluster Network Name resources were configured. In previous versions of Failover Clusters, a Network Name resource required a dependency on at least one IP Address resource. If the IP address resource failed to come online or failed to stay online, the Network Name resource also failed. Even if a Network Name resource depended on two different IP Address resources, if one of those IP Address resources failed, the Network Name resource also failed. In the Windows Server 2008 Failover Cluster feature, this has changed. The logic that is now used is no longer an AND dependency logic but an OR dependency logic. (This is the default, but it can be changed.) Now a Network Name resource that depends on IP Address resources that are supported by network interfaces configured for different networks can come online if at least one of those IP Address resources comes online.
Being able to locate cluster nodes on different networks has been one of the most highly requested features by those using Microsoft high-availability technologies. Now we can accommodate that request in Windows Server 2008.
–Chuck Timon, Jr.
Support Engineer, Microsoft Enterprise Support, Windows Server Core Team
Other Security Improvements
Failover Clustering also includes security improvements over previous versions of Failover Clusters. The biggest change in this area is that the Cluster Service now runs within the security context of the built-in LocalSystem account instead of a custom Cluster Service Account (CSA), a domain account you needed to specify in order to start the service on previous versions of Windows Server. This change means you no longer have to prestage user accounts for your cluster, and also that you’ll have no more headaches from managing passwords for these accounts. It also means that your cluster is more protected against accidental account changes-for example, when you’ve implemented or modified a Group Policy and the CSA gets deleted or has some of its privileges removed by accident.
Another security enhancement is that Failover Clustering relies exclusively on Kerberos for authentication purposes-that is, NTLM is no longer internally leveraged. This is because the cluster nodes now authenticate using a machine account instead of a user account. There are other security enhancements, but let’s move on.
Validating a Clustering Solution
A significant change in Microsoft’s approach to qualified hardware solutions for clustering is that it is moving away from the old paradigm of certifying whole cluster solutions in the HCL or the Windows Server Catalog. Microsoft is now providing customers with tools that enable them to self test and verify their solutions. Not that you should try to mix and match hardware from different vendors to build your own home-grown Failover Cluster solutions-Microsoft is just trying to make the model more flexible, not to encourage you to start duct-taping your clusters together. Anyway, what this means is that Failover Clustering solutions are now defined by “best practices” and self testing, not by static listings on some Web site. Of course, you still have to buy hardware that has been certified by the Windows Logo Program, but you no longer need to buy a complete solution from a single vendor (although it’s still probably a good idea to do this in most cases). So what you would generally now do when implementing a Failover Clustering solution would be the following:
-
Buy your servers, storage devices, and network hardware, and then connect everything together the way you want to for your specific clustering scenario. (Note that all components must have a Designed For Windows logo.)
-
Enable the Failover Clustering feature on each server that will function as a node within your cluster. (See Chapter 5, “Managing Server Roles,” for information on how to enable features in Windows Server 2008. Note that Failover Clustering is a feature, not a role- this is because Failover Clustering is designed to support roles such as File Server, Print Server, DHCP Server, and so on.)
-
Run the new Validate tool (shown in Figure 9-2) to verify whether your hardware (and the way it’s set up) is end-to-end compatible with Failover Clustering in Windows Server 2008. Note that depending on the type of clustering solution you’ve set up, it can sometimes take a while (maybe 30 minutes) for all the built-in validation tests to run.
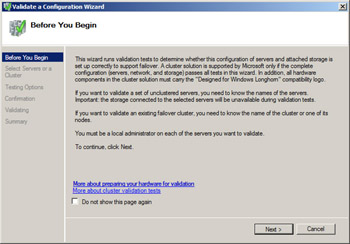
Figure 9-2: Initial screen of Validate A Configuration Wizard
Here’s a sidebar, written by an expert at Microsoft, that provides detailed information about this new Validate tool. Actually it’s not so new-it’s essentially the same ClusPrep.exe tool (actually called the Microsoft Cluster Configuration Validation Wizard) that’s available from the Microsoft Download Center, and it can be run against server clusters running on Windows 2000 Server SP4 or later to validate their configuration. However, the tool is now integrated into the Failover Clustering feature in Windows Server 2008.
Microsoft high-availability (HA) solutions are designed to provide applications, services, or both to end users with minimal downtime. To achieve this, Microsoft requires the hardware running high-availability solutions be qualified that they have been tested and proven to work correctly. Hardware vendors are required to download a test kit from the Microsoft Windows HCL and upload test results for their solutions before they are listed as Cluster Solutions in the Windows Server Catalog. Users depend on the vendors to test and submit their solutions for inclusion in the Windows Server Catalog. A user can request that a vendor test and submit a specific solution for inclusion in the catalog, but there are no guarantees this will be done. This sometimes leaves users with little choice for clustering solutions on current Windows platforms.
Beginning with Windows Server 2008 Failover Clustering, however, the qualification process for clusters will change. Microsoft will still require that the hardware or software meet the requirements set forth in the Windows Logo Program for Windows Server 2008, but users will have more control over the choices they can make.
Once the hardware is properly configured in accordance with the vendor’s specifications, all the user has to do is install the correct version of the server software (Windows Server 2008 Enterprise or Datacenter Edition), join the servers to an Active Directory–based domain, and add the Windows Server 2008 Failover Clustering feature. With the feature installed on all nodes that will be part of the cluster, connectivity to the storage verified, and the disks properly configured, the first step is to open the Failover Cluster Management snap-in (located in Administrative Tools) and select Validate A Configuration located in the Management section in the center pane of the MMC 3.0 snap-in.
The Validate A Configuration process is wizard-based, as are most of the configuration processes in Windows Server 2008 Failover Clustering. (See the “From the Experts: Simplifying the User Experience” sidebar later in this chapter.) After entering the names for all the servers in the Select Servers Or A Cluster screen and accepting all the defaults in the remaining screens, the validate process runs and a Summary report is presented once the process completes. This report can be viewed in the last screen of the Validate A Configuration Wizard, or it can be viewed inside Internet Explorer as an MHTML file by selecting View Report. Each time Validate is run, a copy of this report is placed in the %systemroot%\cluster\reports directory on all nodes that were tested. (All cluster configuration reports are stored in this location on every node of the cluster.)
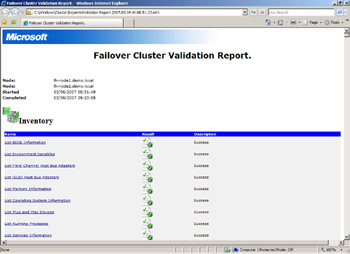
The cluster validation process consists of a series of tests that verify the hardware configuration, as well as some aspects of the OS configuration on each node. These tests fall into four basic categories: Inventory, Network, Storage, and System Configuration.
-
Inventory These tests literally take a basic inventory of all nodes being configured. The inventory tests collect information about the system BIOS, environment variables, host bus adapters (HBAs), memory, operating system, PnP devices, running processes and services, software updates, and signed and unsigned drivers.
-
Network The network tests collect information about the network interface card (NIC) configuration (for example, whether there is more than one NIC in each node), IP configuration (for example, static or DHCP assigned addresses), communication connectivity among the nodes, and whether the firewall configuration allows for proper communication among all nodes.
-
Storage The storage area is probably where most failures will be observed because of the more stringent requirements placed on hardware vendors and on the restrictions on what will and will not be supported in Windows Server 2008 Failover Clustering. (For example, parallel SCSI interfaces will no longer be supported in a cluster.) The storage tests first collect data from the nodes in the cluster and determine what storage is common to all. The common storage is what will be considered potential cluster disks. Once these devices have been enumerated, tests are run to verify disk latency, proper arbitration for the shared disks, proper failover of the disks among all the nodes in the cluster, the existence of multiple-arbitrations scenarios, file system, the use of the MS-MPIO standard (if multipath software is being used), that proper SCSI-3 SPC3 commands are being adhered to (specifically Persistent Reservations, or PR, and Unique Disk IDs), and simultaneous failover scenarios.
-
System Configuration This final category of tests verifies the nodes are members of the same Active Directory domain, the drivers being used are signed, the OS versions and service pack levels are the same, the services that the cluster needs are running (for example, the Remote Registry service), the processor architectures are the same (note that you cannot mix X86 and X64 nodes in a cluster), and that the processor architectures all have the same software updates installed.
The configuration tests report a status of Success, Warning, or Failed. The ideal scenario is to have all tests report Success. This status indicates the configuration should be able to run as a Windows Server 2008 Failover Cluster. Any tests that report a status of Failed have to be addressed and the validation process needs to be run again; otherwise, the configuration will not properly support Windows Server 2008 Failover Clustering (even if the cluster creation process completes). Tests that report a status of Warning indicate that something in the configuration is not in accordance with cluster best practices and the cluster should be evaluated and potentially fixed before actually deploying the cluster in a production environment. An example is if one or more nodes tested had only one NIC installed. From a clustering perspective, that arrangement equates to a single point of failure and should be corrected.
An added benefit of having a validation process incorporated into the product is that it can be used to assist in the troubleshooting process should a problem arise. The cluster validation process can be run against an already configured cluster. Either all the tests can be run or a select group of tests can be run. The only restriction is that for the storage tests to be run, all physical disk resources in the cluster must be placed in an Offline state. This will necessitate an interruption in services to the clients.
Incorporating cluster validation functionality into the product empowers the end user not only by allowing them to verify their own configuration locally, but by also providing them a set of built-in troubleshooting tools.
–Chuck Timon, Jr.
Support Engineer, Microsoft Enterprise Support, Windows Server Core Team
Tips for Validating Clustering Solutions
Here are a few tips on getting a successful validation from running this tool:
-
If you’re going to use domain controllers as nodes, use domain controllers. If you’re going to use member servers instead, use member servers. You can’t do both for the same cluster or validation will fail. (Note that Microsoft generally discourages customers from running clustering on domain controllers.)
-
All the servers that will be nodes in your cluster need to have their computer accounts in the same domain and the same organizational unit.
-
All the servers in your cluster need to be either 32-bit systems or 64-bit systems; you can’t have a mix of these architectures in the same cluster (and you can’t combine x64 and IA64 either in the same cluster).
-
All the servers in your cluster need to be running Windows Server 2008-you can’t have some nodes running earlier versions of Windows.
-
Each server needs at least two network adapters, with each adapter having a different IP address that belongs to a separate subnet on which all the servers reside.
-
If your Fibre Channel or iSCSI SAN supports Multipath I/O (MPIO), a validation test will check to see whether your configuration is supported. (See Chapter 12 for more information about MPIO.)
-
Your cluster storage needs to use the Persistent Reserve commands from the newer SCSI-3 standard and not the older SCSI-2 standard.
And here are a couple of best practices to follow as well. If you ignore these, you might get warnings when you run the validation tool:
-
Make sure all the servers in your cluster have the same software updates (including service packs, hotfixes, and security updates) applied to them or you could experience unpredictable results.
-
Make sure all drivers on your servers are signed properly.
Setting Up and Managing a Cluster
Once you’ve added the Failover Cluster feature on the Windows Server 2008 servers that you’re going to use as your cluster nodes and you have validated your clustering hardware and network and storage infrastructure, you’re ready to create your cluster. Creating a cluster is much easier in Windows Server 2008 than in previous versions of Windows Server. For example, in Windows Server 2003 you had to create your cluster first using one node and then adding the other nodes one at a time. Now you can add all your nodes at once when you create your cluster.
To create your new cluster, you open the Failover Clustering Management console from Administrative Tools, right-click on the root node, and select Create A Cluster. Then you simply follow the steps presented in the Create A Cluster Wizard by specifying your server names, typing a name for your cluster (following standard naming conventions) to define the Client Access Point (CAP) for your cluster, specifying static IP address information (which is needed only if DHCP is not being used by your nodes), and then clicking Finish. An XML report is generated after you’ve finished, and you can view it later from the %windir%\cluster\reports directory if you need to. (The report is saved on every node in the cluster.) Note that when you’re specifying the names of servers for your cluster, the number of nodes you can specify depends on your processor architecture. Specifically, clusters on x64 hardware support up to 16 nodes, while only 8 nodes are supported on both x86 and IA64 architectures. This is true whether you’re using the Enterprise or Datacenter edition of Windows Server 2008. (Failover Clustering is not supported on the Standard or Web Edition.)
Once you’ve created your cluster, you’re ready to manage it. Figure 9-3 shows the Failover Cluster Management console for a cluster of two nodes. You can use this tool to change the quorum model, make applications and\or services highly available, configure cluster permissions (including a new feature that lets you audit access to your cluster if auditing has been enabled on your servers), and perform other common cluster management tasks. In fact, you can now use this new MMC console to manage multiple clusters at once-something you couldn’t do with the previous version of the tool, which looked like an MMC console but really wasn’t. (But you can’t manage server clusters running on earlier versions of Windows using the new Failover Cluster Management console.) In addition, you can use the cluster.exe command to manage your cluster from the command line (but again you can’t use the new cluster.exe command to manage clusters running on previous Windows platforms). And finally, you can use the clustering WMI provider to automate clustering management tasks using scripts.
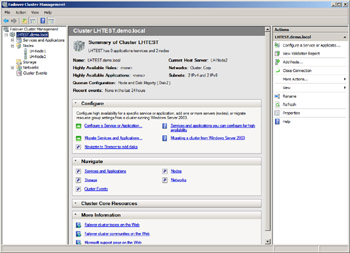
Figure 9-3: Managing a cluster using the Failover Cluster Management snap-in
Of course, the real purpose of setting up a cluster is to be able to use it to provide high availability for your network applications and services. But before we look at that, let’s hear what an expert at Microsoft has to say about the new MMC snap-in for managing clusters.
Failover Clusters in previous versions of the Windows operating system were difficult for many users to configure and maintain. A primary design goal for Windows Server 2008 Failover Clustering was to make it easier for the IT generalist to implement high availability. To achieve this goal required that changes be made to both the user interface (UI) and to the process for configuring the cluster and the associated highly available applications and services.
The Cluster Administration tool in previous versions of the operating system was a pseudo-MMC snap-in. You could not open a blank MMC console and add it as a valid snap-in. Once the Cluster Administration console was open, it was not very intuitive. It was not easy to understand the default resource group configuration (with the possible exception of the default Cluster Group), and it took a little bit of trial and error to figure out how to configure high availability. This level of complexity has changed in Windows Server 2008. The Failover Cluster Management interface is a true MMC 3.0 snap-in. When the feature is installed, the snap-in is placed in the Administrative Tools group. It can also be added into a blank MMC snap-in along with other tools. The Windows Server 2008 Failover Cluster manager cannot be used to manage clusters in previous versions of Windows and vice versa.
The Failover Cluster Management snap-in consists of three distinct panes. The left pane provides a listing of all the managed clusters in an organization if they have been added in by the user. (All Windows Server 2008 clusters can be managed inside one snap-in). The center pane displays information based on what is selected in the left pane, and the right pane lists actions that can be executed based on what is selected in the center pane. If the Failover Cluster Management snap-in has been added to a noncluster node (must be added as a feature called “Remote Server Administration Tools”), the user needs to manually add each cluster that will be managed. If the Failover Cluster Management snap-in is opened on a cluster node, a connection is made to the cluster service if it is running on the local node. The cluster that is hosted on the node is listed in the left pane.
The cluster configuration processes have also changed significantly in Windows Server 2008. One of those processes, cluster validation, has already been discussed. (See the “From the Experts: Validating a Failover Cluster Configuration” sidebar.) Once a cluster configuration has passed validation, the next step is to create a cluster. Like the cluster validation process, the process for creating a cluster is also wizard-based. All major configuration changes in a Windows Server 2008 Failover Cluster are made using a wizard-based process. Users are stepped through a process in an orderly fashion. Information is requested and information is provided until all the required information has been gathered, and then the requested task is executed and completed in the background. Administrators can now accomplish in simple three-step wizards what used to be very long, complex, and error-prone tasks in previous versions. For each wizard-based process, a report is generated when the process completes. As with other reports, a copy is placed in the %systemroot%\cluster\reports subdirectory of each node in the cluster.
Incorporating the innovative features listed here should make deploying and managing Windows Server 2008 Failover Clusters much easier for IT shops of any size.
–Chuck Timon, Jr.
Support Engineer, Microsoft Enterprise Support, Windows Server Core Team
Creating a Highly Available File Server
A common use for clustering is to provide high availability for file servers on your network, and you can now achieve this goal in a straightforward manner using Failover Clustering in Windows Server 2008. Let me quickly walk you through the steps, and if you’re testing Windows Server 2008 Beta 3 you can try this on your own. (See Chapter 13, “Deploying Windows Server 2008,” for more information on setting up a test environment for Windows Server 2008.)
Here’s all you need to do to configure a two-node file server cluster instance on your network:
First, add the Failover Clustering feature to both of your servers, which must of course be running Windows Server 2008. See Chapter 5 for information about how to add features and roles to servers.
Now run the Validation tool to make sure your cluster solution satisfies the requirements for Failover Clustering in Windows Server 2008. Make sure you have a witness disk (or file share witness) accessible by both of your servers.
Now open the Failover Cluster Management console, and click Configure A Service Or Application in the Actions pane on the right. This starts the High Availability Wizard. Click Next, and select File Server on the Select Service Or Application screen of the wizard.
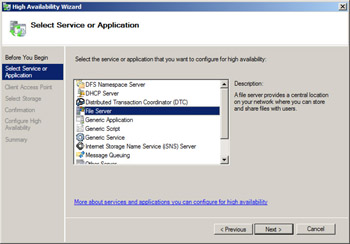
Click Next, and specify a Client Access Point (CAP) name for your cluster (again following standard naming conventions). Then specify static IP address information if DHCP is not being used by your servers. If your servers are connected to several networks and you’re using static addressing, you need to specify an address for each subnet because the wizard assumes you want to ensure that your file server instance will be highly available for users on each connected subnet.
Click Next again, and select the shared disks on which your file share data will be stored. Then click through to finish the wizard. Now return to the Failover Cluster Management console, where you can bring your new file server application group online.
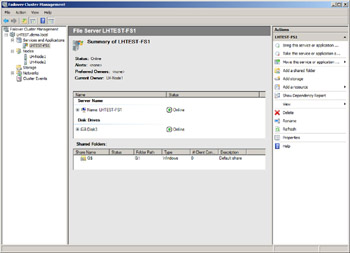
The middle pane displays the CAP name of the file server instance (which is different from the CAP name of the Failover Cluster itself that you defined earlier when you created your cluster) and the shared storage being used by this instance. The Action pane on the right gives you additional options, such as adding a shared folder, adding storage, and so on. If you click Add A Shared Folder, the Create A Shared Folder Wizard starts. In this wizard, you can browse to select a folder on your shared disk and then share this folder so that users can access data stored on your file server. And in Windows Server 2008, you can also easily create new file shares on a Failover Cluster by using Explorer-something you couldn’t do in previous versions of Windows server clustering.
And that’s basically it! You now have a highly available two-node file server cluster that your users can use for centrally storing their files. Who needs a dedicated clustering expert on staff when you’ve deployed Windows Server 2008?
Here are a few additional tips on managing your clustered file share instance. First, you can also manage your cluster using the cluster.exe command-line tool. For example, typing cluster . res displays all the resources on your cluster together with the status of each resource. This functionality includes displaying your shared folders in UNC format-for example, \\<file_server_instance>\<share_name>. In addition, typing cluster .res < file_server_instance > /priv displays the Private properties of your file server instance (for example, your Network Name resource), while cluster .res < file_server_instance > /prop displays its Public properties.
Another new feature of clustered file servers in Windows Server 2008 is scoping of file shares. This feature is enabled by default, as can be seen by viewing the ScopedName setting when you display the Private properties of your Network Name resource. Scoping restricts what can be seen on the server via a NetBIOS connection-for example, when you type net view \\<CAP_name> at the command prompt, where CAP_name is the Network Name resource of your Failover Cluster, not one of your file server instances. On earlier Windows clustering platforms, running this command displayed all the shares being hosted on your cluster. However, in Windows Server 2008 you don’t see anything when you run this command because shared folders are scoped to your individual file server instances and not to the Failover Cluster itself. Instead, you can see the shares that have been scoped against a specific file server instance by typing net view \\<file_server_instance> at your command prompt.
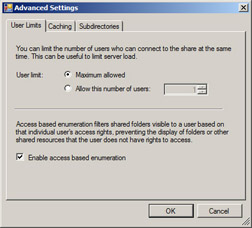
Finally, you can also enable Access Based Enumeration (ABE) on the shared folders in your file server cluster. ABE was first introduced in Windows Server 2003 Service Pack 1, and it was designed to prevent domain users from being able to see files and folders within network shares unless they specifically had access permissions for those files and folders. (If you’re interested, ABE works by setting the SHARE_INFO_1055 flag on the shared folder using the NetShareSetInfo API, which is described on MSDN.) To enable ABE for a shared folder on a Windows Server 2008 file server cluster, just open the Advanced Settings dialog box from the share’s Properties page and select the Enable Access Based Enumeration check box.
One final note concerning creating a highly available file server: One of the really cool things that was added in Beta 3 is Shell Integration. This means you can now just open up Explorer and create file shares as you normally would, and Failover Clustering is smart enough that it will detect if the share is being created on a clustered disk. And if so, it will then do all the right things for you by creating a file share resource on your cluster. So admins who are not cluster savvy don’t need to worry-just manage file shares on clusters as you would for any other file server!
Performing Other Cluster Management Tasks
You might need or want to perform lots of other management tasks using the management tools (snap-ins, the cluster.exe command, and WMI classes) for Failover Clustering. The following paragraphs provide a quick list of a few of these tasks, and I’m sure you can think of more.
First, you’ll probably need to replace a physical disk resource when the disk fails. This task can be done as follows: Initialize the new disk using the Disk Management snap-in found under the Storage node in Server Manager. (See Chapter 4, “Managing Windows Server 2008,” for more information on Server Manager.) Then partition it and assign it a drive letter. Now open the Failover Cluster Management console, right-click on the failed disk resource, select Properties, click Repair, and specify the replacement disk. Then bring the disk online and change the drive letter back to the original one. Now you can bring your cluster back online. And this process works even if the disk being replaced is your shared quorum disk!
Second, if you’re already running server clusters on Windows Server 2003 and you’re thinking of migrating them to Windows Server 2008, a new Cluster Migration Tool will be included in Failover Clustering that can help you to migrate a cluster configuration from one cluster (either Windows Server 2008 or an earlier platform) to another (running Windows Server 2008). This tool copies both resources and cluster configurations and is fairly easy to use, but you can’t perform a rolling upgrade-for example, you can’t migrate one node at a time from the old cluster to the new one. And you can’t have a Failover Cluster that contains a mix of nodes running Windows Server 2008 and nodes running earlier Windows platforms.
Finally, you’ll also want to know how to monitor and troubleshoot cluster issues. On earlier clustering platforms, you had to use a combination of the standard Windows event logs (Application, System, and so on) together with the cluster.log file found in the %systemroot%\cluster folder. Plus there were some additional configuration logs under %systemroot%\system32\LogFiles\Cluster that you could use to try and diagnose cluster problems. In Windows Server 2008, however, cluster logging has changed significantly. Let’s listen now to one of our experts at Microsoft as he explains these changes:
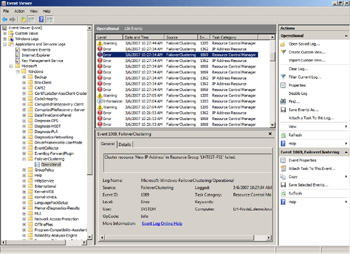
In Windows Server 2008, cluster logging has been changed. The cluster log implemented in previous versions of server clustering, which was located in the %windir%\cluster directory, is no longer there. As a result of the new Windows Eventing model implemented in Windows Server 2008, the cluster logging process has evolved. Critical cluster events will still be registered in the standard Windows System event log; however, a separate Operational Log has also been created. This log will contain informational events that pertain to the cluster, an example of which is shown here:
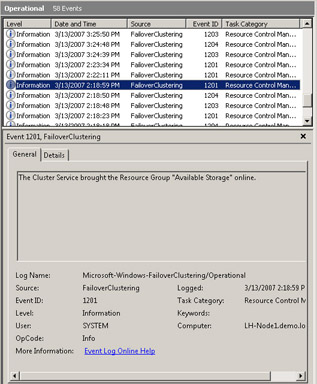
The Operational Log is a standard Windows event log (.evtx file format) and can be viewed in the Windows Event Viewer. In the Event Viewer, the log can be found under Applications and Services Logs\Microsoft\Windows\FailoverClustering:
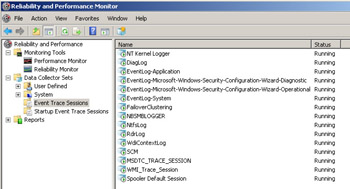
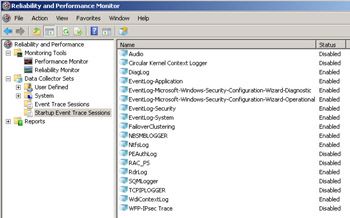
The “live” cluster log, on the other hand, cannot be viewed inside the Windows Event Viewer. As a result of the new Eventing model implemented in Windows Server 2008, and the requirement for the cluster log to be a “running” record of events that occur in the cluster, the cluster log has now been implemented as a “tracing” session. Information about this tracing session can be viewed using the “Reliability and Performance Monitor” snap-in as shown in these two screen shots:
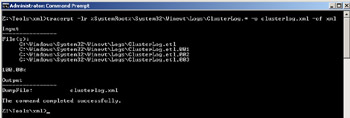
The log is in Event Trace Log (.etl) format and can be parsed using the tracerpt command-line utility that comes in the operating system. The ClusterLog.etl.xxx file(s) are located in the same directory as the Operational Log i.e. %windir%\system32\ winevt\logs. There can be multiple ClusterLog.etl files in this location. Each log, by default, can grow to 40 MB in size (configurable) before a new one is created. Additionally, a new log will be created every time the server reboots. As mentioned, the tracerpt command-line utility can be used to parse these log files as shown here:
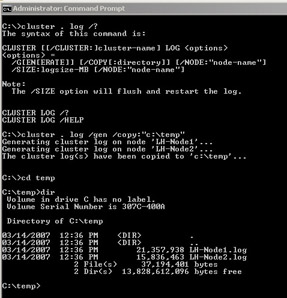
Additionally, the cluster.exe CLI has been modified so the cluster log can be generated for all nodes in the cluster or a specific node in the cluster. Here is an example:
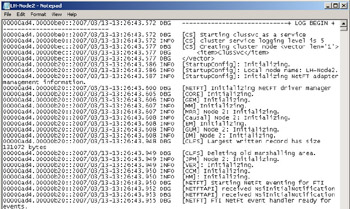
These logs can be read using Notepad:
–Chuck Timon, Jr.
Support Engineer, Microsoft Enterprise Support, Windows Server Core Team
EAN: 2147483647
Pages: 138