| Pop-up menus are currently very popular on Web pages. A pop-up menu on a Web page is a navigation tool that is hidden until the user rolls over a button or an image on the page. Because the menus are initially hidden, you can pack a lot of links into a small space. You can also include submenus to add even more navigational links to your page. Hand-coding the JavaScript needed to create pop-up menus is tedious, but Fireworks makes the process as easy as entering names and links in a dialog box. In this exercise, you will create a new page for the pop-up menus. 1. | Open the template.png file you created earlier in this lesson. Choose File > Save As, name the new file facts.png, and save it in the Projects folder.
Select the Specials layer on the Layers panel and then import the recipe_box.png file from the Media folder in the Lesson10 folder. Import the clipboard file you created in Lesson 5.
You can use the clipboard.png file in the Media folder within the Lesson10 folder if you did not create one of your own. Rotate and scale the clipboard to fit on the page.
| 2. | Draw a small rectangle and add the text Chocolate Recipes.
You can add a bevel to the rectangle to make it look more like a button. You don't need to use the Button Editor, as this button will not be a rollover button.
| 3. | Group the text and the rectangle. Move the button over the image of the recipe box.
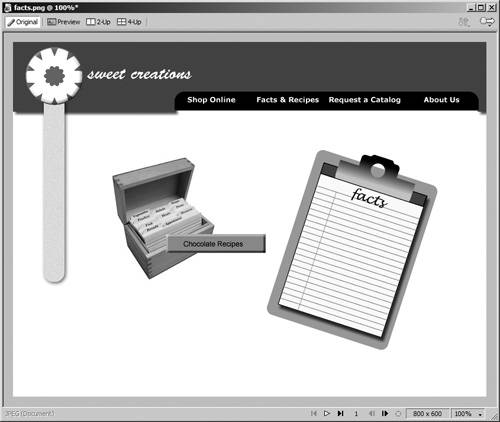 | 4. | Select the button and then choose Edit > Insert > Rectangular Slice. Name the slice.
To add the pop-up menu, you need to have a slice on the button object.
Note Pop-up menus can be added to slices, hotspots, and button symbols. | 5. | With the slice selected, choose Modify > Pop-up Menu > Add Pop-up Menu.
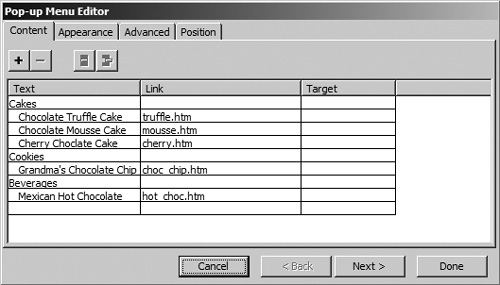
In the Pop-up Menu Editor, you enter the content for the menu: the text, the link, and the target for the link.
For this pop-up menu, you will have three categories of recipes: Cakes, Cookies, and Beverages. Then you will have submenus for each category.
Tip You can also click the behavior handle on the slice and choose Add Pop-up Menu instead of choosing the option from the menu bar. | 6. | Type Cakes in the Text column and then press Enter (Windows) or Return (Macintosh) to add a new line.
Cakes is the first category in your pop-up menu. It will not have a link.
| 7. | Type Chocolate Truffle Cake in the Text column of the second row. Press Tab and then type truffle.htm as the link. Select the text column for this line and then click the Indent Menu button to make this entry a submenu of Cakes.
 Note The target setting is used when you have frames on your page or when you want to open the linked page in a new browser window; it is not needed for this exercise. | 8. | Press Enter or Return again to add a new row. Type Chocolate Mousse Cake in the Text column, press Tab, and then type mousse.htm in the Link column. Continue in this fashion, adding text for the menus and submenus and adding links for the submenus. Enter text as shown in the following figure.
 If you need to make changes to the text or the links, double-click the text to display the insertion bar and then make your changes. If you need to make changes to the text or the links, double-click the text to display the insertion bar and then make your changes.
Note The Pop-up Menu Editor works like a spreadsheet. You press Tab to move to the next column. When you are in the last column, press Tab again to add a new row. | 9. | Click Next (or click the Appearance tab) when you have entered all of the text and links.
On the Appearance tab, you can choose the look of the menus.
| 10. | From the Up State options, choose the color of the text and cell when the item is initially displayed. From the Over State options, choose the color of the text and cell when the pointer is over the item.
The dialog box displays a preview of the pop-up menu.
Note If you select Image for the Cells option, you create a GIF background image for the cells in the pop-up menu. If you select HTML for the Cells option, the Pop-up Menu is created with text and a background color for the table cell in the Up and Over states. For this exercise, use the HTML option. 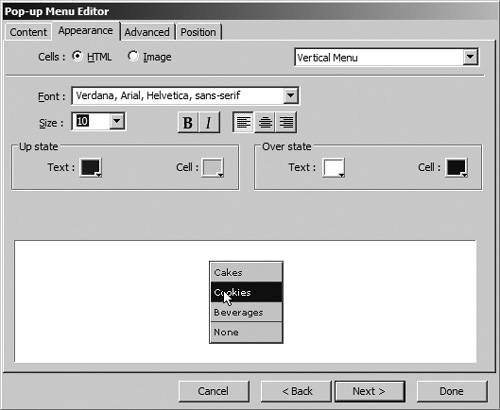 | 11. | Click Next (or click the Advanced tab).
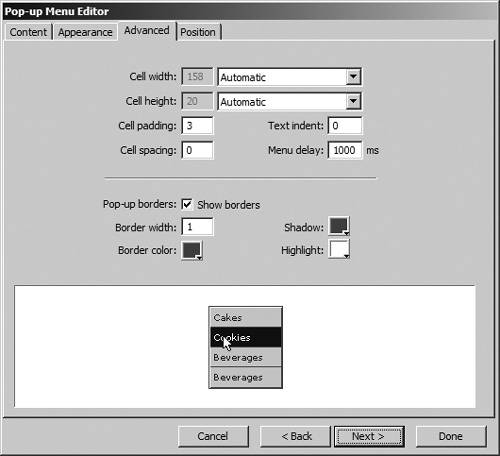
In this area, you can adjust the look of the text in the pop-up menu. For this exercise, you can leave the default options.
 | 12. | Click Next (or click the Position tab).
In this area, you can select the positions for the menu and submenu.
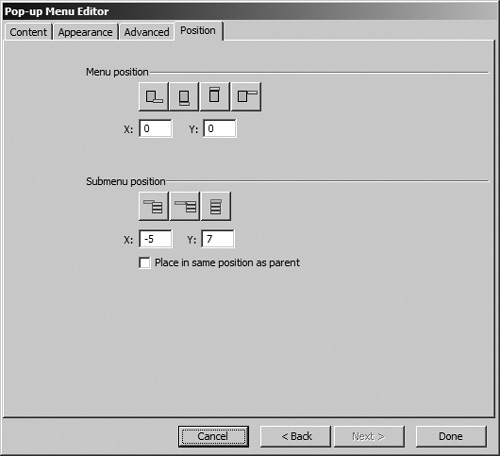 | 13. | Click the first button for both the menu and submenu positions to set their positions to the bottom right of the slice, and then click Done.
You'll see a blue line and a series of three blue rectangles that represent the pop-up menu. The position of the menu is based on the option you selected in this step.
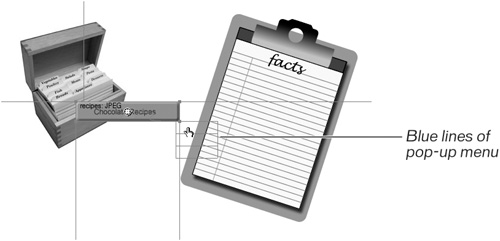 If you don't like the placement now that you see it on the page, you can move the menu. Move the pointer over one of the blue rectangles. The pointer changes to the pointing hand. When you see the hand pointer, you can drag the rectangle to place the pop-up menu where you want it to appear on the page. If you don't like the placement now that you see it on the page, you can move the menu. Move the pointer over one of the blue rectangles. The pointer changes to the pointing hand. When you see the hand pointer, you can drag the rectangle to place the pop-up menu where you want it to appear on the page.
| 14. | Repeat from step 2 and add another button over the clipboard. Add the text Chocolate Facts. For the pop-up menu, add the text Benefits and History, with benefits.htm and history.htm, respectively, as the links.
You don't need a submenu for the Facts pop-up menu.
| 15. | Save your file.
|
|