Part I Exercises
|
Mailing Label Report
See the companion files (www.wordware.com/files/crystal) for an example of this report. Create this report with the Mailing Labels Report Creation Wizard and the xtreme.mdb database.
| Table(s) | Fields |
|---|---|
| Customer | Customer Name |
| Address 1 | |
| Address 2 | |
| City | |
| Postal Code | |
| Country |
When you get to the Label screen, choose User-Defined Label. In the Label Size section, define your labels with Width=2 and Height = 2. Leave all other options as default. Figure P1-1 displays how your screen should look.
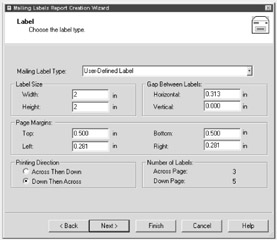
Figure P1-1: The Label screen of the Mailing Labels Report Ceation Wizard
Press the Finish button in the Mailing Labels Report Creation Wizard. The Report Design area displays.
Once in the Report Design area, perform the following:
-
Right-click in the Details a section.
An options menu displays.
-
Select the Insert Section Below option.
A new section is created.
-
Move the Customer Name field from the Details a section to the Details b section.
-
Holding down the Ctrl key, left-click all report objects in the Details a through Details g sections.
All objects should be selected.
-
With all objects selected, move them to the .5" mark.
Figure P1-2 displays the results of your work so far.
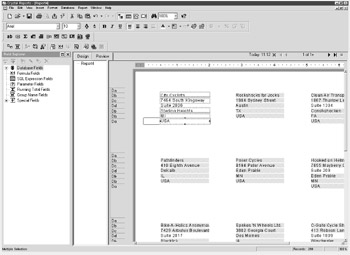
Figure P1-2: Moving all report objects at once -
Select Insert, Box from the menu bar.
Your cursor turns into a pencil.
-
Draw a rectangle from the 0" mark to the .5" mark.
-
Right-click on your rectangle.
An options menu displays.
-
Select the Format Box option.
The Format Editor displays.
-
In the Format Editor, check the Color check box (located in the Fill section), and select Navy from the drop-down box next to this check box.
Your screen should look like Figure P1-3.
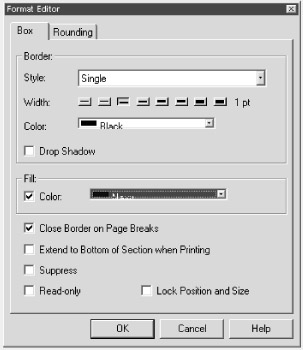
Figure P1-3: Filling in a box using the Format Editor -
Once you've done these steps, press the OK button.
You're returned to the Report Design area.
-
In the Report Design area, select the Design tab.
-
Use your cursor to stretch the Details a section.
-
Select Insert, Text Object from the menu bar.
A text object is attached to your cursor.
-
Place this text object in the middle of the Details a section. Then, press the Bold button in the Formatting toolbar.
Once you've done these steps, type the following into the text object: Attn: Receiving.
Select the Preview tab. The final result of your work should look like Figure P1-4.
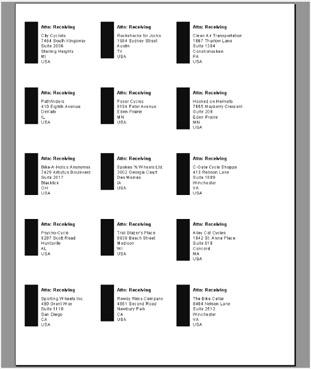
Figure P1-4: A mailing label report
|
EAN: 2147483647
Pages: 177