6.3 Paging through the view
|
| < Day Day Up > |
|
6.3 Paging through the view
Now let's consider that you have added some extra customers to the CustomerByName view and you can't present them all since the presentation of your portlet will be ruined. You can't include the Domino custom JSP tags that would handle the pagination because of the JavaScript code that gets inserted. Instead, you can write some Java code to manage paging. Again, you will work with the Customer List portlet.
At a high level, the process is: enable the portlet to accept two new actions, called previous and next; define two required variables (number of rows per page and counter for paging); and, on the actionPerformed() method handle the previous and next actions by increasing or decreasing the counter.
Use the following detailed steps to implement this functionality:
-
Open the CustomerList.java portlet file.
-
Insert the following actions in the doView() method:
PortletURI previousURI = response.createURI(); DefaultPortletAction previousAction = new DefaultPortletAction("previous"); previousURI.addAction(previousAction); request.setAttribute("pageNo", previousURI.toString()); PortletURI nextURI = response.createURI(); DefaultPortletAction nextAction = new DefaultPortletAction("next"); nextURI.addAction(nextAction); request.setAttribute("pageNo", nextURI.toString()); -
Include the following code at the beginning of the doView() method:
if(request.getPortletSession().getAttribute("pageNo")==null){ request.getPortletSession().setAttribute("rows","5"); request.getPortletSession().setAttribute("pageNo","1"); }This code will create two attributes on the initial rendering: number of rows and a counter page. Both will be stored on the session.
-
In the actionPerformed() method add the handlers of the two newly created actions by inserting the following code:
if(action.getName().equals("previous")) { request.getPortletSession().setAttribute( "pageNo",""+String.valueOf(Integer.parseInt( request.getPortletSession().getAttribute("pageNo").toString())-1)); } if(action.getName().equals("next")) { request.getPortletSession().setAttribute( "pageNo",String.valueOf(Integer.parseInt( request.getPortletSession().getAttribute("pageNo").toString())+1)); } -
Open the /jsp/CustomerList/View.jsp file and insert after the <Domino:view> tag a new <Domino:page> tag which will be in charge of paging through the view. Don't forget to close the tag just before the </Domino:view> tag. The tag inserted should be similar to the following:
<Domino:page start='<%=(String)request.getSession().getAttribute("pageNo")%>' rows='<%=(String)request.getSession().getAttribute("rows")%>'> ... </Domino:page>
-
Just after you close the table that displays the customer view, insert the following code that will insert the Previous and Next buttons and display the page in which you are currently:
<table> <tr> <td> <% if(mypage.getPage() > 1){%> <a href="#" onClick="window.location.href=' <%=(String)request.getAttribute("previous")%>'"> Previous </a> <% } else {%> Previous <% } %> </td> <td> <% for(int i=1;i<=mypage.getPageCount();i++){ if(i==mypage.getPage()){ out.println("<b>"+i+" </b>"); } else { out.println(i+" "); } } %> </td> <td> <% if(mypage.getPage() < mypage.getPageCount()){%> <a href="#" onClick="window.location.href=' <%=(String)request.getAttribute("next")%>'"> Next </a> <% } else {%> Next <% } %> </td> </tr> </table>This code inserts three columns to the table. The first one will display the previous link (which is aware of the position, so there won't be any link on the first page). The next column will display the different pages available and will display in bold the current page. The final column will display the next link (which is also aware of the position, avoiding presenting a link on the last page).
Perform a standard deployment as described in previous examples.
Your Customer List portlet should look similar to the one in Figure 6-3.
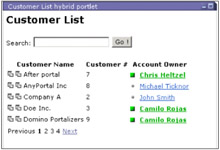
Figure 6-3: Customer List portlet enabled with search and paging
|
| < Day Day Up > |
|
EAN: 2147483647
Pages: 103