Chapter 3: Word s Application Window
|
| < Day Day Up > |
|
In this chapter, I discuss Word's application window and how to navigate through Word while you use it.
Word's application window is similar to that of most Windows programs. Refer to Figure 3-1.
Menus and Toolbars
Understanding the menus and toolbars in Word, how they work and the choices they contain, is crucial for learning Word completely.
Default Menu, Toolbar and Keyboard Settings
Before I begin discussing how-tos and problems, let's set your Word up to keep it from interfering with what you want to accomplish.
The toolbars in Word 2000 are, by default, displayed on one line. Also by default, the menus show only the most recently used commands. I don't want you to read instructions in this book and not be able to find your menu items or toolbars because they’re not set to be visible.
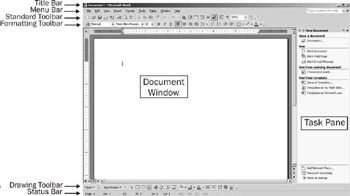
Figure 3-1: Word 2002/XP's Application Window
To change both of these settings at the same time, go to Tools Customize and hit the Options tab. Uncheck the top two checkboxes. That's it!
In Office 2002/XP, it's a little bit different. In Word 2002/XP, you will want to have both options checked.
Learn Word's Menus Quickly
Figure 3-2 shows Word’s Menu Bar. Note the slightly darker vertical gray bar to the left of the File menu. Clicking and dragging it is a method you can use to move toolbars around in your application window.
![]()
Figure 3-2: Word's Menu Bar
Knowing that a program has a feature or capability is half the battle of truly learning an application. If you're a new Word user and want to learn quickly, you can perform the simple exercise described in the Tip on the next page.
Create a list of each of the Menu Bar items and their options. Then, describe each of the choices in your own words. You might be able to describe a lot of them from experience with other applications or just from common sense.
If you don’t know what a menu item does, then find out. If you use Word a lot, you may find that you did not know about features you’d been wishing were available!
You don't need to keep the document you create. The intent of the exercise is to make you aware of most of the features available in Word. I find that by writing or typing something, I remember it more easily.
Learn Word's Toolbars Quickly
Word shows the Standard toolbar and the Formatting toolbar by default. I dragged them down into my document window, resized them and then captured them with SnagIt so that I could easily show the entire toolbar at once. When I was done capturing, I simply double-clicked each of their title bars to have them automatically replace themselves where they belong—at the top of my document window.
Refer to Figure 3-3 and Figure 3-4 on the following page.
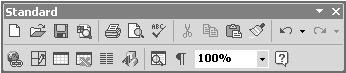
Figure 3-3: Word 2002/XP's Standard Toolbar
![]()
Figure 3-4: Word 2002/XP's Formatting Toolbar
If you're a new Word user and want to learn quickly, you can perform these simple steps:
The purpose of many toolbar buttons can be found simply by hovering the mouse pointer over top of it and reading the Tool Tip. Under Word's Help menu is an option called What's This? See Figure 3-5 on the following page.
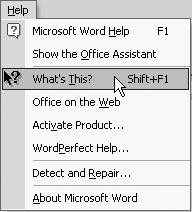
Figure 3-5: Choose "What's This?"
You can also access this option by using the keyboard shortcut Shift+F1. Once you have invoked the What's This? tool, left-click on any toolbar button to learn its purpose. See Figure 3-6 below.
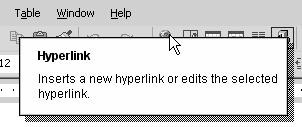
Figure 3-6: Display of the "What's This?" Feature
Customizing Menus, Toolbars and Shortcut Settings
Depending on the types of documents you'll be creating in Word, you may want to customize your menus and toolbars to provide quick access to the features you use the most. Menus are much less likely to be customized, so I won't describe that process specifically, as it is very similar to customizing toolbars.
The Commands tab of Word's Customize dialog box is shown in Figure 3-7.
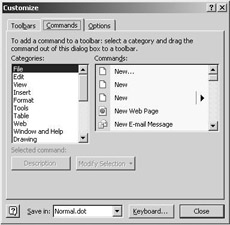
Figure 3-7: Word's Customize Dialog Box
Using Word's menu, select Tools Customize. Choose the Commands tab. Click on one Category item at a time and thoroughly review the toolbar buttons available for that category, which are shown in the right-hand column. If you see a toolbar button you might often use, click and drag it directly out of the dialog box and up onto one of your existing Word toolbars.
Some available toolbar buttons that are commonly used, but not included on the toolbars by default are:
-
Insert → Address book
-
Format →Superscript or Format Subscript
-
File → Close or File → Save as
You can easily remove toolbar buttons by clicking and dragging them down into your document area. If the Customize dialog is NOT open at the time, just hold the Alt key down while you click and drag the button off.
If you share your PC with other users (without a separate login), you may want to create your own toolbar so the custom toolbar doesn’t interfere with the settings the other users are used to.
While dragging toolbar buttons onto the toolbar, your mouse gets a different look to it. Refer to Figure 3-8.
![]()
Figure 3-8: Mouse Buttons
The left-hand graphic depicts what the mouse button looks like while you’re dragging a toolbar button or menu item. The x indicates that you cannot successfully drop the button or menu item at this location. Once you have your toolbar button or menu item positioned in a location where you can drop it, the + sign appears instead.
Customize/Modify Toolbar Buttons
These are the settings you’ll find when you assign buttons to toolbars. You can then customize or modify them as follows by choosing the Modify Selection button from the Customize dialog box shown in Figure 3-7.
Name
Type in the name of the button as it should appear on your toolbar if you are going to use the text style button (described below).
Reset Button Image
Select this only if you have begun to edit an existing button image and you would like to reset it to the default.
Edit Button Image
Select this option to "draw" your own button image.
Change Button Image
Select this option to change the existing button image to one of your choosing from Office's collection of button images.
Default Style
Click this button to make the button on the toolbar show just the icon and no text.
Text Only (always)
Click this button to make the button on the toolbar show just the text as it is shown in the Name box, which you can change.
Image and Text
Click this button to make the button on the toolbar show both the icon and the text.
Copy and Paste Image Buttons
Play with these settings to see how you can copy one toolbar button image and put it onto any toolbar button you like.
Resetting Menus and Toolbars
Strangely enough, people lose toolbar buttons and menu bars, and even all of their toolbars from time to time. Please see the Troubleshooting section on page 24-1 to learn how to reset your toolbars back to Word’s defaults.
|
| < Day Day Up > |
|
EAN: 2147483647
Pages: 130