Writing to the DOM
In addition to accessing the values of certain properties in the DOM, you can also add nodes, prune nodes, and perform other manipulations while the document object is in memory. Let's say we want to create an XML document that has the following structure:
Listing 5-1. The desired structure for a particular XML document.
|
We could create each element using a technique called concatenation in which we link together strings inside our program by building them up with the string-handling features of our programming language. This would require parsing the XML document ourselves. This would be a lot of work. We can save ourselves some effort by taking advantage of the functionality written into the Microsoft DOM object.
In this example, we will create an empty invoice document and use the DOM to add items under program control. Let's use Visual Basic to create the document. This is a fairly simple Visual Basic program. It runs when the form is loaded and opens message boxes that display the output. You can find this project on the companion CD in \Samples\Ch05\Struct.vbp.
First we need to instantiate a copy of the XML document object and load it with the root element. Table 5-7 describes the code in Listing 5-2 line by line.
Once we've instantiated and seeded the document, we can start to add elements and attributes. First let's add a couple of attributes to the root element. These attributes are detailed in Table 5-8.
Listing 5-2. Using loadXML to load a line of XML code.
|
Table 5-7. Creating the objects needed for our program.
| Line | Description |
|---|---|
| 1-2 | Declare the oXMLDoc and rootElementobjects. |
| 4 | Create an instance of the oXMLDoc document object. |
| 5 | Load the root element into the object, creating a single node that we can use as an anchor to add other nodes. |
| 6 | We could refer to the root element as oXMLDoc.documentElement for the rest of the program, but it is easier to create a new object as a reference point, so we instantiate rootElement. |
Listing 5-3. Adding elements to a document object by using createAttribute.
|
Table 5-8. Adding attributes to the root element.
| Line | Description |
|---|---|
| 1-2 | Create a node that will contain all the attributes. This namedNodeMap is an object that will contain all the attribute objects, each of which has a name and a value. |
| 3-5 | Create an attribute object, and give it a name. In this case, we are creating an attribute named poNum with a value of 19982. This is the name-value pair necessary to create an attribute. |
| 6 | The setNamedItem method adds a member to the named node map. |
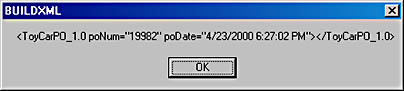
If we were to serialize (output to text) our XML document now, it would look like this:

We'll be creating a lot of attributes, so let's put the logic inside a reusable function:
Public Function addAttribute(oDoc, nodeMap, attrName, attrValue) Dim newAtt Set newAtt = oDoc.createAttribute(attrName) newAtt.Value = attrValue nodeMap.setNamedItem newAtt End Function |
The addAttribute function is called from the application whenever we need to create an attribute with a name and value:
addAttribute oXMLDoc, namedNodeMap, "poNum", "19982" addAttribute oXMLDoc, namedNodeMap, "poDate", Now() |
Our XML document now looks like this:
Now let's add some elements to our document. We create elements by using the createElement method, which creates an element node that stands by itself. We can then use the appendChild method to place that node into our document:
Dim headerNode Set headerNode = oXMLDoc.createElement("header") rootElement.appendChild (headerNode) |
Now we have the following document:
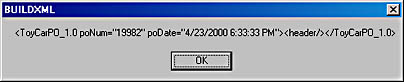
Notice that once we create an element, we must fill it with content or it will be an empty element. We need to add some subelements to the header element and fill them with text content.
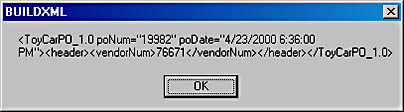
Dim headerNode Set headerNode = oXMLDoc.createElement("header") Dim newChild Set newChild = oXMLDoc.createElement("vendorNum") newChild.Text = "76671" headerNode.appendChild (newChild) rootElement.appendChild (headerNode) |
The newChild object is created just like the headerNode element. It is an element node that is given a name (vendorNum) and a value (76671). The appendChild method adds the node to the headerNode object. This object is then grafted to the rootElement object with another appendChild method. The resulting XML looks like this:
We will be adding many elements with content, so let's place this code into a function:
Public Function addElement(oDoc, node, elementName, elementValue) Dim newChild Set newChild = oDoc.createElement(elementName) newChild.Text = elementValue node.appendChild (newChild) End Function |
The function is called once for each element in the header element:
addElement oXMLDoc, headerNode, "vendorNum", "76671" addElement oXMLDoc, headerNode, "terms", "1/10 net 30" addElement oXMLDoc, headerNode, "shipTo", "Shipto address" addElement oXMLDoc, headerNode, "billTo", "Billto address" |
We follow the same procedure to create the body element and its child elements. Table 5-9 walks you through the code line by line.
Listing 5-4. Building the body using the createElement method.
|
Table 5-9. A description of Listing 5-4, in which we create the body element and its child elements.
| Line | Description |
|---|---|
| 1-2 | The bodyNode and itemNode objects are declared. These objects will hold the element objects as we create them. |
| 3-4 | Instantiate copies of the nodes and use the createElement method to give them names. |
| 7-8 | Add attributes to the item element. Notice that we use the Attributes property to create namedNodeMap as part of the itemNode object. All attributes that we add by using the addAttribute function get attached to that node map. |
| 10-12 | The addElement function adds children to the itemNode element and gives them names and values. |
| 13 | Finally, we use the appendChild method to add the item node and its three child nodes (partNum, qty, and price) to the body node. |
| 15-24 | We use the same techniques described in this table to add another item. |
| 25 | We use the appendChild method to add the body node we built to the root element. |
Now you can see that the document is complete:

Listing 5-5 shows the entire Visual Basic program:
Listing 5-5. An XML document built by using the DOM interfaces and Visual Basic.
|
EAN: 2147483647
Pages: 150