| 
By now, you know a little bit about what arrays are, so let's talk about all the cool stuff you can do with them. LabVIEW has many functions to manipulate arrays in the Programming>>Array subpalette of the Functions palette. To avoid a common pitfall, always keep in mind that arrays (and all other LabVIEW structures) are zero indexedthe first element has an index of zero, the second has an index of one, and so on. Some common functions are discussed here, but you might also want to browse through the Array subpalette, shown in Figure 7.17, just to see what else is built in for you. Figure 7.17. Array palette 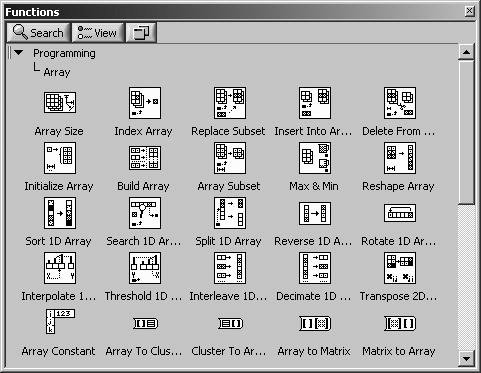
Initialize Array will create and initialize an n-dimensional array with the value of your choice (see Figure 7.18). You can configure it for larger dimensions by "growing" it with the Positioning tool to provide more dimension size inputs. This function is useful for allocating memory for arrays of a certain size or for initializing shift registers with array-type data. Figure 7.18. Initialize Array 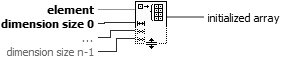 In Figure 7.19, Initialize Array shows how to initialize a ten-element, one-dimensional array of DBL numerics, with each element of the array containing a zero. Figure 7.19. Initialize Array function used to initialize an array 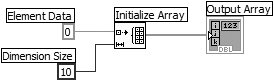 Array Size returns the number of elements in the input array. If the input array is n-dimensional, Array Size returns an n-element, one-dimensional array, with each element containing the size of one of the array's dimensions. Depending on how you configure it, Build Array concatenates, or combines, two arrays into one, or adds extra elements to an array. The function looks like the icon at left when first placed in the diagram window. You can resize or "grow" this function to increase the number of inputs. Build Array has two types of inputs, array and element, so that it can assemble an array from both array and single-valued inputs (see Figure 7.22). 
Build Array Figure 7.20. Array Size  Figure 7.21. Array size used to determine the length of a four-element 1D array  Figure 7.22. Build Array  For example, the Build Array function shown in Figure 7.23 has been configured to concatenate two arrays and one element into a new array. Figure 7.23. Build Array used to concatenate a 1D array, a scalar, and another 1D array 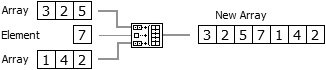 The Build Array function input will automatically adapt to an element or an array input, depending on what you wire to it. 
Pay special attention to the inputs of the Build Array function. Array inputs have two "dotted" squares, while element inputs have a single hollow square. Although LabVIEW will adapt the input type depending on what kind of data you wire to it (elements or arrays), they are NOT interchangeable and can cause lots of confusing bad wires if you're not careful.
As you get more advanced, you'll find that Build Array can also build or add elements to multidimensional arrays. To add an element to a multidimensional array, the element must be an array of one size smaller dimension (i.e., you can add a 1D element to a 2D array). You can also build a 2D array by using the Build Array function and wiring 1D arrays in as "elements" (each 1D array will become one row of the 2D array). Sometimes you'll want to concatenate several 1D arrays together, instead of building a 2D array. In this case, you'll need to pop up on the Build Array function, and choose Concatenate Inputs. Array Subset returns a portion of an array starting at index and containing length elements (see Figure 7.24). Notice that the third element's index is two because the index starts at zero; that is, the first element has an index of zero (see Figure 7.25). Figure 7.24. Array Subset 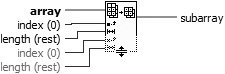 Figure 7.25. Array Subset used to obtain a subset of four elements starting at index two 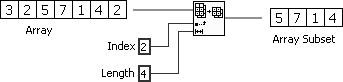 Index Array (see Figure 7.26) accesses a particular element of an array. An example of the Index Array function accessing the third element of an array is shown in Figure 7.27. Figure 7.26. Index Array  Figure 7.27. Index Array used to obtain the third element of a 1D array  You also can use this function to slice off a row, column, or scalar element of a 2D array. To extract a single scalar element, wire the desired element's row index to the top input and its column index to the bottom input. To extract a row or column, you simply leave one of the Index Array function inputs unwired. To slice off a row from the 2D array, wire the row index (the first index input) of the row you want to slice off. To slice off a column from the 2D array, leave the first index input unwired, and wire the column index (the second index input) with the column you want to slice off. Notice that the index terminal symbol changes from a solid to an empty box when you leave its input unwired. The illustration in Figure 7.28 shows how to extract a column or a row from a 2D array. Figure 7.28. Extracting a column and row from a 2D array 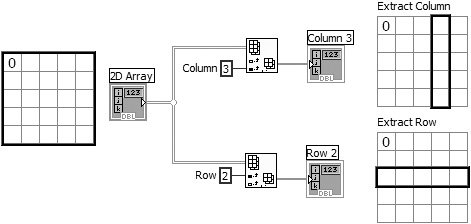 Delete From Array deletes a portion of an array starting at index and containing length elements (see Figure 7.29). Similar to the Array Subset function, Delete From Array returns subset of an array, but it also returns the original array minus the deleted subset (see Figure 7.30). Figure 7.29. Delete From Array  Figure 7.30. Delete From Array used to delete a subset of three elements starting at index two 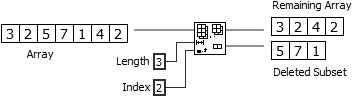
Notice that the length and index terminals are interchanged between the Array Subset and Delete From Array functions.
|