| The ActionScript required for this application is a bit more involved than you've seen. The key difference is that there is more communication between the controller and the subscriber. Messaging between the controller and subscriber movies make up a large part of the script. This is not text messaging between the teacher and student, but one movie controlling the other. As you saw when you built the interface, the teacher has a lot of control over the subscriber interface. Messaging determines the source for the student stream and controls when a student's camera will start and stop. Before jumping into the code, let's first step through some of the elements you will encounter in the script. The Messages This application uses messaging over a nonpersistent SharedObject called lecture. The server creates this SharedObject when the application instance loads, so you know it will never be deleted as long as the application instance is running. Broadcast messages are functions calls invoked remotely using the .send() method by other clients connected to the same SharedObject. Broadcast messages are sent to every client that is connected to the Remote SharedObject. If a client does not have the function defined, it will be ignored. The broadcast messages in this application that are invoked from the client or the server are: -
askQuestion Defined on the teacher interface; invoked from the student interface. Displays a confirm box on the teacher interface invoked by a student requesting the teacher connect to the student's web camera. The teacher accepts or denies the request. Each response invokes a related handler on the clients. Each client receives and handles the request. Because the teacher interface sends the identification of the user making the request, however, the caller is the only one that will respond. -
startPublishClient Defined on the student interface; invoked from the teacher interface. Invoked each time the broadcast is made, but operates only when a matching client ID is found in the parameter. Its primary operations are to publish the web camera and microphone to a stream called student_source. It also sets the current student's name on every client. The student_source stream is connected by the server to the studentStream being received by all subscribers. -
denyRequest Defined on the student interface; invoked from the teacher interface. Triggers a message box on the student's interface informing him that his request was denied by the teacher. -
stopPublishClient Defined on the student interface; invoked from the teacher interface. Stops the publishing streams being sent from the client. -
loadSWF Defined on the student interface; invoked from the teacher interface. Used by the teacher to change presentations. When invoked, it calls the presentationSWF method to load a new SWF movie. -
chat_toggle Defined on the student interface; invoked from the teacher interface. Enables or disables the text chat on the student's interface. This handler is not defined in the teacher interface, and will have no affect to the teacher's Chat window. -
studentRequest Defined on the student interface; invoked from the teacher interface. Called by the teacher to force an unsolicited student's camera to be activated. The student will then be part of the conversation on all connected clients. -
authenticateUser Defined on the server; invoked from the login interface. Uses the NetConnection, not the SharedObject. It is not invoked with a broadcast message and will expect the server to return a result. It is used to determine the role the user will play in the applications. The options are teacher and student. These functions are defined in the following exercises. Before you get into the ActionScript, let's first understand how streaming video will be handled in this application. The Streams There are three streams used in this application. Every student automatically connects to two streams when they connect. By default there is no source for the studentStream. The streams are: -
speakerStream Published by the teacher interface. Subscribed to automatically by every student interface connected. -
studentStream Published by the server. Created by the server upon start up. It retransmits a video stream source determined by the teacher interface. It connects to the student_source stream, which, until the teacher enables it, does not exist. The server waits and then retransmits when the student_source stream becomes available. This is how you will switch what camera the students see. -
student_source Published by the student on the command of the teacher. Once it is published, the server redistributes it to every connected client, including the teacher interface. With the streams and the SharedObject functions sorted out, the last element to review before getting into the code is the structure of the SharedObject. The SharedObject: Lecture When the server loads, it creates a temporary SharedObject called lecture. This SharedObject has two purposes: to store four slots of information and to act as a transport for the broadcast messages. Figure 18.7 shows the structure of the remote SharedObject in the Flash Debugger. The four slots contain the values used for the text objects surrounding the presentation window. They are: -
teacher_info Stores the teacher's contact information just below the teacher's video image. -
course_info Stores the course information for the window just below the presentation controls. -
presentation_info Stores the information about the current presentation just above the Chat window. -
presentation_file Stores the current SWF movie presentation. Figure 18.7. The Debugger tool shows the structure of the data, which is stored as slots inside the remote SharedObject. 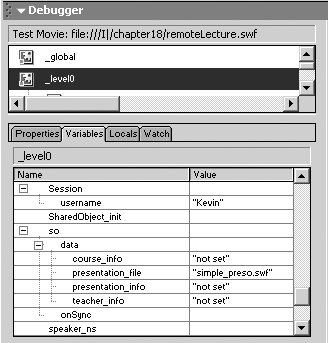 These text objects can be changed at anytime by the teacher by simply clicking the text area and editing the content in place. Because they are connected to SharedObjects, a script listens for changes to the text and synchronizes the data change to the students in real time (so don't make a spelling mistake). Authentication There is no authentication with this application; it will accept anyone who enters a name. It does use the server to determine what role the user plays. Based on the value of the login, it sets the role to either teacher or student. This information is exchanged with the client using a function defined in the client prototype on the server. Because it is transmitted over the NetConnection, it can receive a return variable from the server. So that's your primer. To make it simpler for you to step through this code, it has been encapsulated into functions, which in some cases may not be as efficient as possible. The tutorial is focused more on understanding than on efficiency, however. Exercise 18.3: Building the ActionScript Step 1: The Initialization ActionScript You're ready to start coding now. The best place to begin is the initialization scripts for Frame 1. -
Place your cursor on Frame 1 of the Actions layer. -
Overwrite the onStatus handler prototypes for NetConnection, NetStream, and SharedObject to monitor activity in the Output window. The onStatus template listens for two NetConnection information codes: Success and Closed. When Success is received, the connection has been accepted by the server and the client function, app_init() , is called. If the client becomes disconnected from the server, then the function app_close() is called to clean up. The code you need is: onStatusTemplate = function (info) { trace("StatusChange: "+info.code); if (info.code == "NetConnection.Connect.Success") { app_init(); } else if (info.code == "NetConnection.Connect.Closed") { app_close(); } }; NetConnection.prototype.onStatus = onStatusTemplate; NetStream.prototype.onStatus = onStatusTemplate; SharedObject.prototype.onStatus = onStatusTemplate; -
Initialize a global object called Session. Session will be used to store global properties, such as the username and pending users. Set up the NetConnection object and the connection light with the following code: // // INITIALIZE THE CLIENT Session = new Object(); myConnection_nc = new NetConnection(); connectionLight_mc.connect(myConnection_nc); -
Create the appLogin() function used by the Login button. This function will call the connect() method of the NetConnection and create a username property in the Session object. Add the following code: // // LOCAL APPLICATION FUNCTION HANDLERS appLogin = function () { // Login Button was clicked, make the connection with the server myConnection_nc.connect("rtmp://localhost/chapter18/myInstance"); // setup a session object that will contain information about this user Session = ({username:login_txt.text}); }; -
Create the function called by the onStatus handler when the NetConnection code Success is received. When called, this function, app_init() , calls a function on the server named authenticateUser and defined in the Client object. This method will return a value, so a Result object (serverRet) waits for the server to respond. Add the following code: // // APP_INIT is called when the server returns a "NetConnection.Connect.Success" code app_init = function () { trace(" ** Connected :-)"); trace(" ** User set to: "+Session.username+". Authenticating user..."); // call the authenticateUser function on the server myConnection_nc.call(" authenticateUser ", new serverRet(), Session.username); }; -
Create serverRet() , the Result object to handle the returned values from the server. Create an onResult event method inside the Return object that will be invoked when the server returns the call. The server returns either teacher or student for the value. This value will immediately be used to move the play head to the required position. When the play head moves, the interface changes. Add the following code: // // Global Server method handler serverRet = function () { // Handle server returns this.onResult = function(ret) { trace(" ** :-) Server returned: "+ret); trace("** The User has been assigned"); Session.userRole = ret; _root.gotoAndPlay(ret); }; }; -
Create app_close() , a handler for when the NetConnection terminates unexpectedly. This function is called when the NetConnection onStatus handler receives a connect.Close code. The function returns the user to the login prompt. You could also use this function with a logout button: // // ** APP_CLOSE app_close = function () { if (myConnection_nc.isConnected) { myConnection_nc.close(); } _root.gotoAndStop(1); }; -
Declare the function init_SharedObject() . It will not be invoked until the user enters the specific interface. We wait to connect the SharedObject so that when it connects, the synchronization process updates any changed screen information. The function is responsible for connecting to the remote SharedObject and building the onSync handler. The onSync handler will loop through the information array when it is received and update any data that needs updating. The code for SharedObject_init() is: // // CONNECT THE SHAREDOBJECT // The SharedObject is initiated when the user enters the interface SharedObject_init = function () { this.so = SharedObject.getRemote("lecture", myConnection_nc.uri, false); this.so.onSync = function(info) { trace("syncing"); for (row in info) { trace("** sync["+row+"]: "+info[row].name+"CODE: "+info[row].code); trace("** Value: "+so.data[info[row].name]); if (info[row].code != "success") { trace("set it"); set(info[row].name+".text", so.data[info[row].name]); [info[row].name].text = so.data[info[row].name]; course_info.text = so.data[info[row].name]; } } }; this.so.connect(myConnection_nc); }; -
The last line of code stops the play head from advancing. Add the following code: // // PLAYHEAD CONTROL stop(); That's it for the initialization scripts. Let's move on to the student and teacher scripts. Step 2: Build the Student ActionScript The following student script executes only when the play head passes over it or stops on it. It will not be invoked when ActionScript jumps ( gotoAndPlay ) the play head from the login screen to Frame 20. Like the script on Frame 1, this script has been encapsulated within functions so you can easily follow it. -
Click on Frame 10 on the Actions layer. -
Add the init_Student() function to initialize the Communication UI components , the SharedObject, and the streams. The streams_init function is defined in the next step, and the SharedObject_init function was defined in Frame 1. This function is called from the init_Student() function: // // CONNECT THE UI COMPONENTS AND THE LOCAL CAMERA FEED init_Student = function () { _global.speakerMode = false; PeopleList_mc.connect(myConnection_nc); presentation_mc.connect(myConnection_nc); chat_mc.connect(myConnection_nc); init_SharedObject(); init_Streams(); }; You will notice a _global variable set in this function. The presentationSWF communication component monitors the _global variable speakerMode. The Boolean value of this variable sets the presentationSWF component into a Speaker mode. Speaker mode allows the user to advance the presentation, synchronizing the connected clients. -
Add the code for init_Streams() to initialize two incoming streams to the student application. Also, attach the camera to the local Video object to be used for camera adjustment. The init_Streams() function is called from the init_Student() function: // // ENABLE THE RECEIVING STREAMS // Enable the Speaker feed (from the Teacher) init_Streams = function () { // Attach the local camera feed to the local_video object. local_video.attachVideo(Camera.get()); // Enable the Speaker Feed speaker_ns = new NetStream(myConnection_nc); speaker_video.attachVideo(speaker_ns); speaker_ns.play("speakerStream"); // Enable the Student Feed student_ns = new NetStream(myConnection_nc); student_video.attachVideo(student_ns); student_ns.play("studentStream"); myPublish_ns = new NetStream(myConnection_nc); }; -
Create a function that will be invoked when the user clicks the Ask Question button. When invoked it will broadcast a message to the SharedObject subscribers to call the studentRequest function. The only client that will have this function enabled is the teacher. It will pop up a message box informing the teacher that the student would like to engage the conversation. The code you need is: // SHAREDOBJECT BROADCASTERS askQuestion = function () { so.send("studentRequest", Session.username); }; -
Create a handler for the SharedObject broadcast startPublishClient. This broadcast will contain a property with the student's name who requested to be connected. Use this property to determine if the client should act or not. If the studentName matches the name stored in the session property, then the message is for you. Think of it like a mail carrier. The broadcast has an address and the mail carrier will not let anyone handle the letter unless it is addressed to them. Add the following code: // // THE SHAREDOBJECT BROADCAST HANDLERS so.startPublishClient = function(studentName) { if (studentName == Session.userName) { // Student video connect has been accepted Session.isStreaming = true; trace("I am now streaming "+studentName); // Start the Publish stream myPublish_ns.attachAudio(Microphone.get()); myPublish_ns.attachVideo(Camera.get()); myPublish_ns.publish("student_source"); } else { trace("notMe!"); } student_info_txt.text = studentName; }; If the message engages the process, a session property, isStreaming, is set to true and a new NetStream object is created to publish the student's camera. The stream name will be student_source, which is what the server uses for the outgoing feed, studentStream. As soon as the video is published, the server picks it up and redirects it to the studentStream. -
Create a function to handle the broadcast message stopPublishClient. This function also uses a filter, but this time it will look at the Session.isStreaming property. If it is set to true, then the process continues and closes the stream being published. Remember, only one student can be publishing at any one time. The server script always broadcasts this function before broadcasting the startPublishClient() function. The code is: // stop publishing handler so.stopPublishClient = function(studentName) { if (Session.isStreaming) { trace("I have stopped streaming"); // shutdown the stream myPublish_ns. close(); } }; -
Create a function to handle the broadcast message, loadSWF. This function will control the presentationSWF component on all student interfaces. When the teacher broadcasts this, it passes the value to the presentationSWF function loadSWF() to change the presentation source file. Add the following code: // change SWF movie handler so.loadSWF = function(SWFtoLoad) { presentation_mc.loadSWF(SWFtoLoad); }; -
Create a function to handle the broadcast message, denyRequest. This function will be invoked by the teacher if the request for participation is denied. A message box appears informing the student the request was denied. Add the following code: // Handle a denied question request so.denyRequest = function(studentName) { if (studentName == Session.userName) { studentPopup._visible = true; studentPopup.setMessage = "Your Video Request was Denied"; } }; -
Create a function to handle the broadcast message chat_toggle. This function will serve as two functions in one. The teacher interface will broadcast this call with a Boolean value attached (true or false). This value can be directly used to change the visibility of the chat component. The code you need is: -
// toggle the visibility of the Chat component so.chat_toggle = function(toggle) { chat_mc._visible = toggle; }; -
Finally, your last script will be one that starts a chain reaction that fires the whole thing up. At the bottom of all this script, call the function init_Student() and watch everything light up! Also, place a stop() command to ensure the playhead doesn't move: // // PLAYHEAD CONTROL init_Student(); stop(); Now, on to Frame 20. Step 3: Build the Teacher ActionScript The teacher scripts contain many of the same processes as the student scripts. Where the student has more scripts attached to the SharedObject, the teacher script has more calls to the methods . -
Connect the UI components, and set _global.speakermode to true. Call the functions, enableCamera() , init_SharedObject() , and enableStudentStream() : // // CONNECT THE UI COMPONENTS AND THE LOCAL CAMERA FEED init_Teacher = function () { _global.speakerMode = true; peopleList_mc.connect(myConnection_nc); presentation_mc.connect(myConnection_nc); chat_mc.connect(myConnection_nc); // invoke the initialization methods init_SharedObject(); init_Streams() enableCamera(); }; -
Create the init_Streams() function to subscribe to the incoming studentStream: // // ENABLE THE STUDENT STREAM init_Streams() = function () { student_ns = new NetStream(myConnection_nc); student_video.attachVideo(student_ns); student_ns.play("studentStream"); // Call to enable the local camera during the initialization phase }; -
Create the enableCamera() function to connect the camera and microphone to a NetStream and start publishing them as speakerStream. This function will be called beyond just initialization. It is registered to the disable camera button that will enable and disable the speakerStream. The code you need is: // // PUBLISH THE SPEAKER (TEACHER) STREAM enableCamera = function () { speaker_ns = new NetStream(myConnection_nc); speaker_ns.attachVideo(Camera.get()); speaker_ns.attachAudio(Microphone.get()); speaker_ns.publish("speakerStream"); // Allow the teacher to see a camera monitor for positioning speaker_video.attachVideo(Camera.get()); // Set the camera control button to disable mode camControl_pb.setLabel("Disable Camera"); camControl_pb.setClickHandler("disableCamera"); }; -
The function turns off the publication stream and sets the Camera control button to an enable state. Students who are connected will see a still image of the last frame of transmission. Add the following code: disableCamera = function () { speaker_ns.close(); camControl_pb.setLabel("Enable Camera"); camControl_pb.setClickHandler("enableCamera"); }; -
Create a generic listener for the three text areas of the screen that the teacher can edit: // // SHAREDOBJECT TEXT MONITOR textOnChanged = function () { trace(this._name); so.data[this._name] = this.text; }; The text fields in the teacher's interface are actually input boxes, meaning that the teacher can change the text within them. To make a more fluid interface, with less buttons , this listener will invoke the onChanged handler of the Text object. When the teacher changes any data within the input boxes, the changes will be saved to the SharedObject. Remember what happens when you change data in the SharedObject? The onSync event fires and informs all the connections that the data has changed. The onSync handler you build in Frame 1 updates the text fields at the command of the SharedObject. -
Overwrite the default onChanged handler for the three text fields with the new and improved onChanged handler you just built: teacher_info.onChanged = textOnChanged; course_info.onChanged = textOnChanged; presentation_info.onChanged = textOnChanged; See the power of building dynamic scripts? If the generic handler was coded in such a way that it could not be easily propagated, then you would have three times as much code. -
Create a handler for the studentRequest broadcast. This process will make the messageBox visible and change the message within it. The broadcaster sent the name of its user with the message. This name will be your identifier to send back if the request was accepted or denied. It will also assign the name of the student as the value of the Session.pendingStudent property. The student script did not include this function, so when this message is broadcast over the SharedObject, the only interface that is listening will be the teacher interface. The code you need is: // // SHAREDOBJECT BROADCAST HANDLERS so.studentRequest = function(studentName) { trace("studentRequest: "+studentName); Session.pendingStudent = studentName; myMessageBox._visible = true; myMessageBox.setTitle = "Request from "+studentName; myMessageBox.setMessage = "Please Answer"; }; -
Create two chat functions to broadcast messages ( chat_toggle ) for enabling or disabling the Chat window on the student interface: // // CHAT ENABLERS disableChat = function () { so.send("chat_toggle", false); chatControl_pb.setLabel("Enable Chat"); chatControl_pb.setClickHandler("enableChat"); }; enableChat = function () { so.send("chat_toggle", true); chatControl_pb.setLabel("Disable Chat"); chatControl_pb.setClickHandler("disableChat"); }; -
Create two functions to broadcast the stopPublishClient and the startPublishClient messages. These messages will invoke the respective handlers you created in the student script. The handlers are responsible for starting and stopping the publishing stream on the student's interface. Add the following code: // // STREAM ENABLERS student_start = function (messageBox, buttonIndex) { if (buttonIndex == 1) { // Accept button was pressed trace("mb: "+messageBox+" bi: "+buttonIndex); trace("start Student: "+Session.pendingStudent); so.send("stopPublishClient"); so.send("startPublishClient", Session.pendingStudent); student_info_txt.text = Session.pendingStudent; } else { so.send("denyRequest", Session.pendingStudent); trace("denied Student "+Session.pendingStudent); } }; // // STREAM KILLER student_stop = function () { trace("stop Student"); so.send("stopPublishClient"); }; -
Invoke the init_Teacher method to initialize the teacher interface and place a stop() command to ensure the play head doesn't move: // // PLAY HEAD CONTROL init_Teacher(); stop(); That's it for the Flash scripts. There is a lot going on in this tutorial with plenty of useful techniques you can use to take your applications one step further. Exercise 18.4: Building the Server-Side ActionScript (main.asc) With teacher and student scripts finished, you need the server scripts. The server is not used to process very much with this application. It has four roles: -
Accept all incoming connections -
Initialize the SharedObject -
Publish the studentStream -
Determine the user's role The server scripts are much less complex than the Flash scripts you just worked on. -
Create a new folder in the FlashCom/applications folder; name it makingFaces. -
Create a new main.asc file within the makingFaces folder. -
Load the UI Components server-side file: load("components.asc"); -
Create an onAppStart event to create a SharedObject and publish the studentStream: // INITIALIZE THE APPLICATION application.onAppStart = function() { SharedObject_init(); studentStream_ns = Stream.get("studentStream"); studentStream_ns.play("student_source"); }; -
Create the onConnect event: // // APPLICATION CONNECT application.onConnect = function(theClient) { //Accept the connection from the user. application.acceptConnection(theClient); trace("Room ID List: "+this.name); }; This event will be used to accept the connection and return the status code NetConnection.connect.success , which the script must find before moving forward. -
Create a new Prototype method for the Client object: // // ADD A NEW PROTOTYPE FUNCTION Client.prototype.authenticateUser = function(username) { trace("Called from Client"); if (username == "Kevin") { clientRole = "teacher"; } else { clientRole = "student"; } trace("Role: "+clientRole); //Set the global user name with the user name passed into this function. gFrameworkFC.getClientGlobals(this).username = username+"_"+clientRole; return clientRole; }; After the server accepts the connection, this method will be called by the client. Its primary responsibility is to review the value of the username supplied by the user and determine if the client is a teacher or a student. It makes the decision and passes the value back to the client. The UI component user login also occurs within this script. It is done here because we want to identify the user visually with the suffix (student or teacher). This value will be displayed in the Chat window. -
Add the function called from the onAppStart method to set up the SharedObject: // // SHAREDOBJECTS SharedObject_init = function () { server_so = SharedObject.get("lecture", false); server_so.setProperty("teacher_info", "not set"); server_so.setProperty("course_info", "not set"); server_so.setProperty("presentation_info", "not set"); server_so.setProperty("presentation_file", "simple_preso.swf"); trace("sharedObject inited"); var test = server_so.getProperty("teacher_info"); trace("simpleProperty: "+server_so.getProperty("presentation_file")); }; The SharedObject is created and reset to default values. As a simple test, it reads data from the SharedObject and returns it in a trace. Now you can fully test your complete application. This project was a large one, but I am sure you will be happy with it.  |