| Your next challenge is the interface and ActionScript used to engage a one-on-one session between the customer and the representative. A Live Support Session is actually a new instance of the application LiveSupport. Therefore, throughout this portion of the project, I will refer to application instances of LiveSupport as Live Support Sessions. The server-side part of the LiveSupport application is actually very simple. It handles users connecting and disconnecting, provides a way to end a call, and enables a representative to open a browser window on the client's machine and send the browser to a specified URL. Exercise 16.4: The Server-Side ActionScript (SSAS) The server-side ActionScript will be our first target. This SSAS will determine if the user logging into the system is a representative or a customer. It will also set up special functions that will be called by the Flash player. Listing 16.7 contains the full ActionScript listing for your review. -
Create a folder in your applications directory named LiveSupport. -
Create a file in that folder named main.asc. Open this file in Macromedia Dreamweaver MX or your preferred code editor. -
This application will use the Flash Communication Server UI components, so the Component Framework is required. Load in your components .asc file: load( "components.asc" ); -
You need to handle users requesting a connection to the Application instance. This time when a user connects they will pass a username and a value declaring if they are a Representative. Accept the connection request using application.acceptConnection : application.onConnect = function( newClient, username, isRep ){ trace( "Client Connected" ); /* Accept the connection */ application.acceptConnection( newClient ); -
Register the username in the global storage of the Flash Communication Component Framework: /** * Inform the UI Component Framework of the username * this name will be used by all UI components. */ gFrameworkFC.getClientGlobals( newClient ).username = username; -
Store the user's SSAS Client object in the variable repUser or clientUser depending on the value of the parameter isRep : /* Check to see if they identified themselves as the rep */ if( isRep ){ /* Save as the repUser for later use */ this.repUser = newClient; }else{ /* Save as the clientUser for later use */ this.clientUser = newClient; } } -
In most cases you would define application.onDisconnect next. We're skipping ahead, however, to extend the Client ActionScript object's method for ending a call, because this is all that it will use. The Client object's method will be called endCall and it will take no parameters. It will do three things: notify the users that the call is ending, disconnect the users, and clear all SharedObjects to make sure it cleans up after itself. Extend the Client object prototype with the new endCall method: Client.prototype.endCall = function(){ trace( "Ending Call" ); /* The call has ended, tell both the clientUser and repUser */ application.clientUser.call("endCall"); application.repUser.call("endCall"); /* Make sure to disconnect the users */ application.disconnect(this.clientUser); application.disconnect(this.repUser); /* Clears all the SharedObjects */ application.clearSharedObjects("/"); } This ActionScript notifies both the customer and representative interfaces that the support exchange is over by calling the endCall method on their NetConnection objects. This ActionScript will be created in the next exercise. -
Define the application.onDisconnect method: application.onDisconnect=function(){ /* If anyone disconnects, the call must end */ this.repUser.endCall(); } This method is really simple now because you have implemented endCall . The application.onDisconnect method calls the endCall() method on the repUser object. -
Extend the Client object prototype with the new sendURL method to enable the representative to push a web site's URL to a customer's computer: Client.prototype.sendUrl = function( url ){ trace( "Sending client to url: " + url ); application.clientUser.call( "receiveURL", null, url ); } This "push" method opens a new web browser window on the customer's computer to a given location. You will build the receiveUrl handler later in Flash MX. Overall this application was very simple, but it will be full featured thanks to the Flash Communication components. The LiveSupport application will have full video, voice, and text chat capability, plus it can send a client's browser to locations given by the representative. Next up, you will build upon the Flash interfaces you previously made in Flash MX. You will now add the screens to handle the LiveSupport application. Listing 16.7 shows the complete server-side ActionScript for the LiveSupport application. Listing 16.7 SSAS listing for the Live Support Session application load( "components.asc" ); application.onConnect = function( newClient, username, isRep ){ trace( "Client Connected" ); application.acceptConnection( newClient ); gFrameworkFC.getClientGlobals( newClient ).username = username; if( isRep ){ this.repUser = newClient; }else{ this.clientUser = newClient; } } Client.prototype.endCall = function(){ trace( "Ending Call" ); application.clientUser.call( "endCall" ); application.repUser.call( "endCall" ); application.disconnect( this.clientUser ); application.disconnect( this.repUser ); application.clearSharedObjects("/"); } application.onDisconnect=function(){ this.repUser.endCall(); } Client.prototype.sendUrl = function( url ){ application.clientUser.call( "receiveURL", null, url ); } Exercise 16.5: The Flash Interface Open the file Client_Support_App.fla, that you created when you built the client interface. In this exercise, you will extend this Flash movie with the support application interfaces for the customer. -
Insert empty keyframes on the second frame of the Client screens and Actions layers . On the Connection Light layer, just insert a frame. -
Using Figure 16.5 as a layout guide, add the following Communication UI components on Frame 2 of the Client Screens layer : -
AVPresence Set Instance Name to clientVideo_mc, X to 15, and Y to 10. -
AVPresence Set Instance Name to repVideo_mc, X to 400, and Y to 10. Figure 16.5. The LiveSupport screen of the client application. 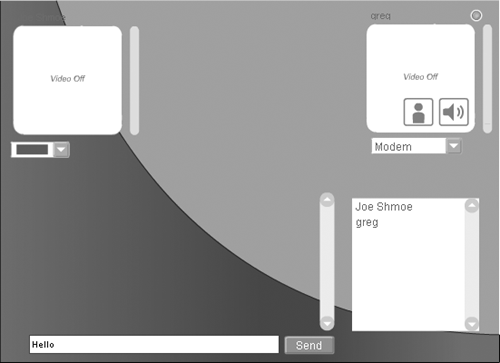 -
Chat Set Instance Name to chat_mc, X to 30, and Y to 210 . -
UserList Set Instance Name to userlist_mc, X to 385, and Y to 220. -
UserColor Set Instance Name to usercolor_mc, X to 10, and Y to 160. -
Bandwidth Set Instance Name to bandwidth_mc, X to 410, and Y to 160. The ConnectionLight component should still be there from the previous screen, because you did not add an empty keyframe. -
Select Frame 2 on the Actions layer, and open your ActionScript panel (F9). Connect all the Flash Communication UI components that you placed on the stage to the NetConnection object: /* Connect our components to our NetConnection object */ chat_mc.connect(nc); userlist_mc.connect(nc); usercolor_mc.connect(nc); bandwidth_mc.connect(nc); connectionLight_mc.connect(nc); clientVideo_mc.connect(nc); repVideo_mc.connect(nc); -
The AVPresence component requires some special attention. Normally, the component requires a user to click to publish their video, but you want the video to start on its own. To accomplish this, you have to call the setUsername method to tell the component the username. You then have to tell the component to start publishing the stream. Because this Flash movie is used by the customer, ActionScript calls these methods . Add the following code to start the AVPresence component publishing: /** * We are a client, so use the clientVideo_mc to represent our video. * To do this, we pass our username to it, and then call the * startPublish method to start the stream. */ clientVideo_mc.setUsername(username); clientVideo_mc.startPublish(); -
We still have to define some methods in the NetConnection object, nc , that are called from the server-side ActionScript: -
nc.startSupport(uri) Called when the application should connect to a LiveSupport instance. -
nc.endCall() Called when a support call has been ended. -
nc.receiveUrl(url) Called when the application should open a browser window with the supplied URL. To get ready to define these, move your play head by clicking on Frame 1 on the Actions layer. This next series of code is placed at the bottom of the ActionScript you previously built, but above the stop() action. -
Create the startSupport method to call the function setUpSupport passing the URI: /** * The command from the server to go ahead and start a support * session, while handing it the URI to connect to for its support session. * We set the statusField's visibility to false since we won't be using it. */ nc.startSupport = function(uri){ setUpSupport(uri); } -
Create the setUpSupport method to receive the URI: function setUpSupport(uri){ -
Call the NetConnection.connect method in the nc variable using the URI argument to establish the connection to the new Application instance: nc.connect(uri,this.username,false); -
Using gotoAndStop() , move the play head to Frame 2, and close the setupSupport() function: gotoAndPlay(2); } When a call ends, the Flash movie returns to Frame 1 and closes the connection updating the statusField text prompt you created in the Lobby application. -
Change the statusField text to read: "Thank you for your call. Please feel free to return if you have further problems." The code you need is: /** * The command that the call has ended. The application then goes to the login * screen and update the statusField to show a new message. Note that we set * its visibility to true. */ nc.endCall = function(){ gotoAndStop(1); this.close(); statusField.text="Thank you for your call. Please feel free to return if you have  further problems." } further problems." } -
Create the receiveUrl method handler: nc.receiveURL = function(url){ getURL(url,"_blank"); } This is a very simple function because all it has to do is execute the getURL action and give it the URL it was passed. That completes the entire Client_Support_App.fla. You can see the complete code for Frame 1 in Listing 16.8. Because you did not add code to Frame 2, it will not be repeated here. Listing 16.8 Full ActionScript of Client_Support_App.fla nc = new NetConnection(); nc.startSupport = function(uri){ setUpSupport(uri); } nc.endCall = function(){ gotoAndStop(1); this.close(); statusField.text="Thank you for your call. Please feel free to return if you have further problems." } nc.receiveURL = function(url){ getURL(url,"_blank"); } onLogin = function(){ username = loginField.text; nc.connect("rtmp:/LiveSupportLobby",username); connectionLight_mc.connect(nc); statusField.text="A Representitive Will be with you shortly. Thank you for your patience." loginField.selectable = false; loginField.background = true; loginField.backgroundColor = 0xCCCCCC; loginField.textColor = 0x999999; login_btn.setEnabled(false); } function setUpSupport(uri){ nc.connect(uri,this.username,false); gotoAndPlay(2); } stop(); Exercise 16.6: The Representative Application Your last task is to create the representative application. You will extend the Representative_Support_App.fla to handle Live Support Sessions, so open it now in Flash MX. -
Insert empty keyframes on the third frame of the Actions and Representative Screens layers. -
Insert a frame on the third frame for the Connection Light layer. -
Right-click on the second frame of Client_Support_App.fla's Client Screens layer and select Copy Frame. Then right-click on the Representative Screens layer's third frame in Representative_Support_App.fla and select Paste Frames . -
Delete the Bandwidth component because the representative won't need it. -
On the third frame of the Actions layer, add the following ActionScript: /* Connect our components to our NetConnection object */ chat_mc.connect(nc); userlist_mc.connect(nc); usercolor_mc.connect(nc); connectionLight_mc.connect(nc); clientVideo_mc.connect(nc); repVideo_mc.connect(nc); -
Because this is the Representative application, you will set up the repVideo_mc this time. Add the ActionScript: /** * We are a rep, so use the repVideo_mc to represent our video. * To do this, we pass our username to it, and then call the * startPublish method to start the stream. */ repVideo_mc.setUsername(username); repVideo_mc.startPublish(); That completes the third frame of ActionScript. -
On the third frame of the Representative Screens layer, you have to add a few things (see Figure 16.6). Start with a PushButton to end the call. Add a PushButton component with the following settings: Figure 16.6. The LiveSupport interface of the representative application. 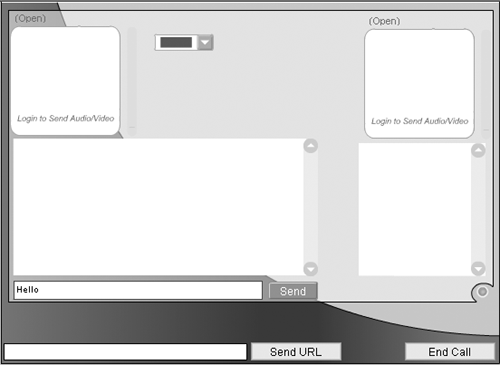 Instance Name: endCall_btn X: 445 Y: 375 Label: End Call Click Handler: onEndCall -
Again, on the same frame and layer, add a second PushButton to send the URL to the server-side method sendUrl . Use the following settings: Instance Name: sendUrl_btn X: 275 Y: 375 Label: Send URL Click Handler: onSendUrl -
On the same frame and layer, add a dynamic text box to the left of the Send URL button. In the Properties panel, give it the instance name of sendUrlField and set the multiline property to false. The representative will use this text box to input the URL. -
Now you're ready to add the new ActionScript this application requires. You will add it to Frame 1 on the Actions layer. Create a startSupport method just like the one you added to the client application: /** * The command from the server to go ahead and start a support * session, while handing it the URI to connect to for its support session */ nc.startSupport = function(uri){ setUpSupport(uri); } -
Define the setUpSupport function: /** * First we connect to the new uri passing our username, and true identifying * ourselves as a rep. We then goto frame 3 which holds the screen for a * support session */ setUpSupport=function(uri){ nc.connect(uri,this.username,true); gotoAndStop(3); } -
Create the handler endCall: nc.endCall = function(){ this.connect("rtmp:/LiveSupportLobby",username,password); /* We must reconnect the connection light when we change connections */ connectionLight_mc.connect(nc); supportUsers.connect(nc); gotoAndStop(2); } This function operates differently from the one in the customer application, because the representative will want to return to the lobby to help another client. The connection light and SharedObject are reconnected, and then the play head is returned to Frame 2. -
Define the Click Handler to spawn a new browser on the customer's computer: /** * This is the handler used by the "Send URL" button. * When pressed the sendUrl is called on the NetConnection object. */ onSendUrl = function(){ var url = sendUrlField.text; if(url!=""){ nc.call("sendUrl",null,url); } } This function will pass the URI to the sendUrl() handler within the server-side ActionScript (main.asc). -
Create the onEndCall Click Handler to close the customer's NetConnection: /** * This is the handler used by the "End Call" button. * When pressed the endCall method is called on the NetConnection object. */ onEndCall = function(){ nc.call("endCall"); } Because you already created the server-side method for ending a call, this handler is very simple. When the endCall method is called on the server, it will do its clean up, invoke the endCall method of the connected clients , and disconnect them. Listing 16.9 shows the complete code for the first frame of the Actions layer, including the original code appended. Listing 16.9 Final ActionScript for Representative_Support_App.fla nc = new NetConnection(); nc.startSupport = function(uri){ setUpSupport(uri); } nc.endCall = function(){ this.connect("rtmp:/LiveSupportLobby",username,password); connectionLight_mc.connect(nc); supportUsers.connect(nc); gotoAndStop(2); } onLogin = function(){ username = this.loginField.text; password = this.passwordField.text; nc.connect("rtmp:/LiveSupportLobby",this.username,this.password); connectionLight_mc.connect(nc); supportUsers = SharedObject.getRemote("supportUsers",nc.uri); supportUsers.onSync = function(args){ user_lsb.removeAll(); for(var i in this.data["userList"]){ user_lsb.addItem(this.data["userList"][i]); } } supportUsers.connect(nc); gotoAndStop(2); } onConnectClient = function(){ var user = this.user_lsb.getSelectedItem().label; if(user!=null){ this.nc.call("connectToClient",null,this.username,user); } } onSendUrl = function(){ var url = sendUrlField.text; if(url!=""){ nc.call("sendUrl",null,url); } } onEndCall = function(){ nc.call("endCall"); } setUpSupport=function(uri){ nc.connect(uri,this.username,true); gotoAndStop(3); } stop(); Now you are ready to test your application. To do so, you should publish both Client_Support_App.fla and Representative_Support_App.fla, and then run the client SWF and log in. Next, open the representative SWF and log in with one of the usernames and passwords you defined on the server-side. You should then see a list box with the other username you used to log in. You can then connect to this user and have fun chatting with yourself! You can send the Client_Support_App.swf to your friends and have them connect while you use Representative_Support_App.swf to pick and choose who to speak with.  |