Chapter 3: Scripting Installations and Updates
In Brief
In the previous chapter, you learned how to automate hard disk setups and images. Throughout this chapter, you will use various scripting methods to create unique scripting solutions to common administrative installations and updates. You will start by learning how to script installations from the command line. You will then learn how to use send keys to install windows and wizards using AutoIt .
Scripting Methods
Not all of us have the luxury of working with a centralized management system such as Systems Management Server (SMS) or Tivoli. With new programs, program updates, service pack updates, and hotfixes constantly coming out, installing all of these manually can consume most of an administrator's day. Scripting provides a way to automate these tasks with little or no user intervention.
Microsoft Command-Line Switches
Microsoft installation and update executables support many different switches to allow for shell scripting and installation customization. Switches are not case-sensitive and, more often than not, they are not standardized. To make matters worse , Microsoft tends not to document some of the most useful switches (as you saw in Chapter 2). Here are some of the most common, and possibly undocumented, switches for Microsoft installation and update executables:
-
/? ”Displays unhidden switches and usage
-
/C ” Extracts files to folder specified with /T switch
-
/C ID ”Used to enter a 20-digit product ID
-
/F ”Forces applications to close at shutdown
-
/K ID ”Used to enter an 11-digit CD key
-
/N ”Does not back up files for uninstall
-
/N name ”Used to enter a username for registration
-
/N:V ” Installs without version checking
-
/O ”Overwrites OEM files without prompting
-
/O organization ”Used to enter an organization name for registration
-
/Q ”Runs in quiet mode, skips all prompts
-
/Q:U ”Runs in user quiet mode, shows some dialog boxes
-
/Q:A ”Runs in admin quiet mode, shows no dialog boxes
-
/R ”Reinstalls the application
-
/R:A ” Always reboots
-
/R:I ”Reboots if necessary
-
/R:N ”Does not reboot, even if necessary
-
/R:S ”Reboots without prompting
-
/T: path ”Specifies or extracts files to a temporary working folder
-
/U ”Runs in unattended mode or uninstalls an application, prompts for shared file removal
-
/UA ”Uninstalls an application and shared files, without prompting
-
/Z ”Does not reboot when installation is complete
Windows and Wizards
Many of the tasks of an administrator involve navigating through interactive windows and wizards. Whether installing a new program or adding a new piece of hardware, these wizards guide the user through a complicated setup process. This process involves scrolling through selections, clicking check boxes, selecting tabs, browsing, entering text, and more. Although these wizards are helpful, they frequently do not support scripting.
In the past, administrators used macro recorders to deal with these unscriptable windows and wizards. The main problem with basic macro utilities is that they are great for performing linear tasks, but they choke when dealing with complex routines that require decisions. The solution is to use a send-keys utility, such as HiddenSoft's AutoIt.
AutoIt
AutoIt (http://www.hiddensoft.com/autoit) is a free automation tool used to send key and mouse commands to Windows objects. AutoIt detects window titles and text and sends commands to specific windows based on that information. AutoIt reads commands stored in a text-based script file and performs the commands on a line-per-line basis. Although you can use other scripting send-keys methods, such as Windows Script Host (WSH) or KiXtart, AutoIt provides the easiest way to detect windows and send keys.
Detecting Windows and Text
Sometimes multiple windows can have the same title. Luckily, AutoIt allows you to specify a combination of window title and window text to specify the exact window you want. Running AutoIt in "Reveal Mode" allows you to see the title, text, sizes, and mouse coordinates of the currently active window in real time. To run this command, enter:
AUTOIT /REVEAL
For example, suppose you wanted to script the Add New Hardware Wizard window (see Figure 3.1).The /REVEAL switch would show the window title and text (see Figure 3.2).
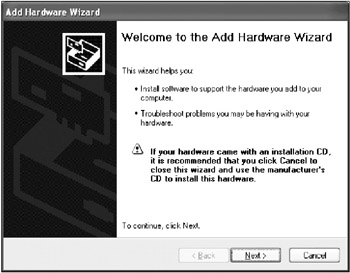
Figure 3.1: The Add New Hardware Wizard window.
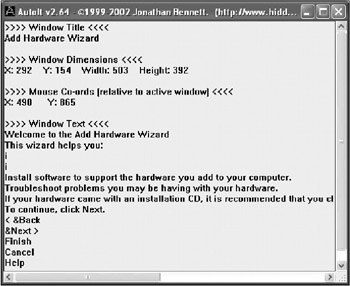
Figure 3.2: Detecting window title and text with /REVEAL.
| Tip | You can use the "AutoIt Reveal Mode" shortcut to start AutoIt in reveal mode. |
AutoIt [ADLIB] Section
One of the advantages that AutoIt has over using other send-key methods, such as KiXtart or WSH, is the ability to immediately intercept windows that may occur unexpectedly. This is accomplished through an optional section called [ADLIB]. When the [ADLIB] section detects an unexpected window, the script breaks out from its current location, executes the [ADLIB] command, and then returns to the current location.
Convert Script Files to EXEs
Included in the AutoIt installation package is a utility called AUT2.EXE used to convert AutoIt script files into standalone executables. By converting your scripts, you can prevent users from reading your code and modifying your scripts. The conversion utility is menu-based and allows you to set your own executable icon, provided that it is 32 by 32 pixels in 16 colors.
Scripting the AutoIt ActiveX Control
You can use the scriptable ActiveX control version of AutoIt with Windows Script Host. To gain access to the AutoIt object, you must first use the CreateObject function and set it to a variable:
Set variable = CreateObject("AutoItX.Control") | Note | For more information and details on usage, see the AutoIt ActiveX control documentation included in the program install. |
Microsoft Windows Installer
Before Windows 2000, installing and managing applications was a complete mess. Software companies created their own installation interfaces, each with its own set of rules, command-line options, and uninstall functions. This provided headaches for administrators who attempted to create common scripting solutions for application installations. To help reduce total cost of ownership (TCO) and provide a standardized set of installation rules, Microsoft created the Windows Installer.
The Windows Installer is a new installation and configuration service for 32-bit Windows platforms that standardizes the way programs install and uninstall. The Windows Installer is a Zero Administration Windows initiative and is required to conform to the "Designed for Microsoft Windows" logo standards. Some of the advanced features of the Windows Installer are self-repair, rollback, and install on demand. The Windows Installer comes packaged with Windows 2000/XP/2003, and is available as a separate download for Windows 9 x and Windows NT.
The Windows Installer runs as a two-part installation utility that consists of a client engine and a system service. The client engine (MSIEXEC.EXE) runs with user privileges and provides the interface between the system and the installation service. MSIEXEC.EXE reads the instructions from the installation package (*.MSI) and passes them to the installation service (Windows Installer).
The installation service enables the system to keep track of all program installations and system changes, providing for cleaner uninstalls. Because the installation service runs as a system service, it can be given various privileges to allow users to install their own applications.
Self-Repair
When a program file becomes corrupted or missing, a program installed with the Windows Installer can identify these files and replace them automatically. This is a handy feature for those of us with troublesome users who like to attempt their own uninstalls.
Rollback
The Windows Installer rollback feature creates a temporary backup and script of any files changed during the installation process. If a fatal error occurs during the installation, the rollback feature immediately runs the script and returns the system to its original state. All rollback files are stored in a temporary directory called config.msi, and are automatically deleted when the installation successfully completes. Rollbacks can take a significant amount of disk space and can be disabled by an administrator.
| Tip | You can always delete the config.msi folder manually if setup fails to remove it. |
Microsoft Windows Installer Switches
The MSIEXEC.EXE supports various command-line switches, allowing you to control the installer from the command shell or batch file. Here are some of the most common command-line switches for Microsoft Windows Installer:
-
/I ”Installs the program
-
/F ”Repairs an installation
-
/X ”Uninstalls the program
-
/L*V logfile ”Logs all information to a logfile
-
/QN ”No user interface
-
/QB ”Basic user interface
-
/QF ”Full user interface
-
/? or /H ”Displays some switches and copyright information
-
/X ”Uninstalls the program
EAN: 2147483647
Pages: 89