.Mac Mail
| Your .Mac account includes .Mac Mail (web-based email). Web-based email enables you to get or send email from any computer that has an Internet connection and a browser. In addition to accessing your .Mac email, you can set it up to check other email accounts you might have. Email-Only .Mac AccountsYou can buy additional email-only accounts that include fifty megabytes of email storage space for each account. These can come in handy when you're travelingyou can keep all your travel email separate from your personal or business mail to make sure you spend time receiving mail only from people who have this special address. Email-only accounts don't include many of the standard .Mac features such as iDisk, HomePage, Backup, and Bookmarks. But that's probably why they call it email-only. To add an email-only account to your .Mac membership, go to Mac.com and click the "Account" link in the web page's sidebar. In the Account page that opens, click the "Buy More" button. POP vs. IMAP Accounts.Mac Mail uses an Internet standard called IMAP (Internet Mail Access Protocol). IMAP mail servers manage and store copies of your mail on a remote server so you can access them from any computer in the world. IMAP is a good choice if you need to check your mail from many different computers. The other common type of mail server uses an Internet standard called POP (Post Office Protocol). POP servers usually erase your email from their hard disks as soon as you've picked it up. POP is a good choice if you always use the same computer to manage your email.
An Important Advantage of Web-Based EmailWhen you're at home and you send email, it gets delivered without a problem. That's because your Mail preferences include your Internet service provider's SMTP address the outgoing mail address (smtp.providername.net or something similar). To send outgoing email, it must be sent via your isp's smtp address, because that's who you're paying for Internet services. When you're traveling and using other connections, such as a Wi-Fi hotspot at Starbucks, you're connected through some other provider. So when you compose an email message and click "Send," you receive a response that says your mail is not deliverable. Web-based email is one solution to that problem. When you log in to your .Mac account, you can send email because .Mac has its own SMTP address. An alternative solution (if you don't want to limit yourself to web-mail) is to subscribe to an smtp service, such as SMTP.com. For a small fee you can register a computer with SMTP.com and your mail is delivered through their service. If you don't mind paying a fee for the convenience, this enables you to do your email tasks while on the go just as if you were at home, without logging in to .Mac. See pages 156157 for simple instructions about how to change Mail's smtp setting to "smtp.com" and enjoy being able to effortlessly send email from your laptop, no matter where you're connected. Start Using .Mac MailYou can use .Mac Mail in any browser on any kind of computer.
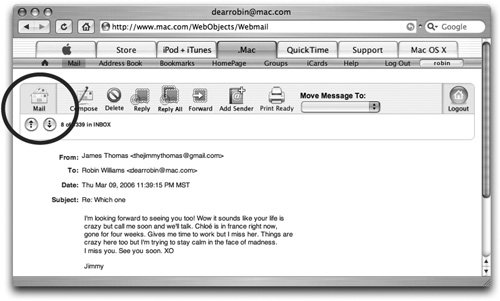
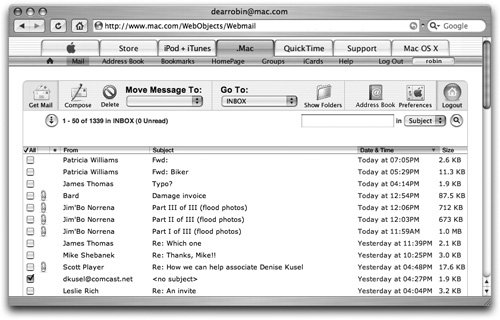 Below are brief explanations of each button on the web-mail page. If you want excessively detailed information, please see our other book, Cool Mac Apps. 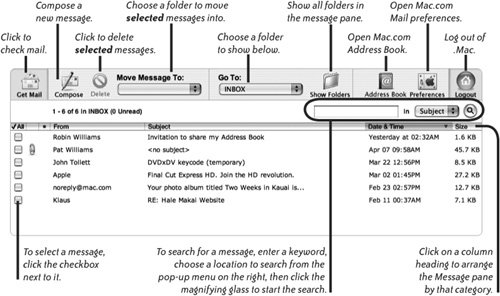 To get your mail and read it:
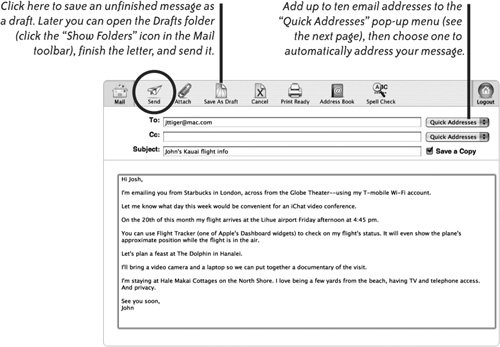
 To compose and send a message:
 |


EAN: 2147483647
Pages: 119
- Chapter II Information Search on the Internet: A Causal Model
- Chapter III Two Models of Online Patronage: Why Do Consumers Shop on the Internet?
- Chapter X Converting Browsers to Buyers: Key Considerations in Designing Business-to-Consumer Web Sites
- Chapter XI User Satisfaction with Web Portals: An Empirical Study
- Chapter XIV Product Catalog and Shopping Cart Effective Design