Windows 2000 Group Policy
Windows 2000 Group PolicyGroup Policies in Windows 2000 are a set of configuration settings that the administrator can apply to one or more objects on a computer, or multiple computers, in a domain. Unlike in Windows NT where you had to use several different utilities to control security settings, Windows 2000 centralizes the control of these settings under Group Policy. Group Policies can be used to control the user experience by customizing what they can and cannot do, and what security features are enabled. Group Policy in Windows 2000 is vastly superior to the policies that were available in Windows NT. For example, in Windows 2000 the policies are not permanent. If you decide to disable or remove a policy, the computer is restored to the state it was in before you applied the policy. In Windows NT, when you made a change in the system policy it resulted in a physical change to the Registry of the computer. To change the settings once they were applied meant that you had to apply a different set of changes to specifically undo the first set. This tattooing of the Registry meant that even if a policy was applied at the domain level, it would still be in effect if the computer was removed from the domain. In addition, there are far more options available via policy in Windows 2000. There are hundreds of options available via Group Policy in an Active Directory domain. Even when working with a standalone member server using Local Computer Policy, there are still many options available, including assigning startup or logoff scripts, system configuration, and password policy. Policies can be controlled at various levels, including at the local system, domain, OU, or site level. Policies are always applied in a specific order, with the order in which they are applied governing the effective settings. For example, the policy order used in Windows 2000 is
Because of this hierarchy, if there are conflicting settings in different policies, the policy that was applied last has precedence. A popular acronym that is used to remember this order of precedence is LSDOU, for Local, Site, Domain, and OU. This inheritance of policy settings can be blocked by an administrator or user with the appropriate permissions, so that a policy that was configured at the site level can be prevented from being applied to a particular OU. This is called blocking inheritance . The administrator also has the option to prevent this from occurring by selecting the No Override option when applying the policy. Local Computer PolicyThere are two types of group policy available in a Windows 2000 environment: Local Computer Policy, which is applied to a single computer, and Domain Group Policy, which can be applied at the domain, site, or OU level. Every Windows 2000 computer has its own Local Computer Policy object, regardless of whether or not it's a member of an Active Directory domain. There are some limitations with Local Computer Policy objects. For example:
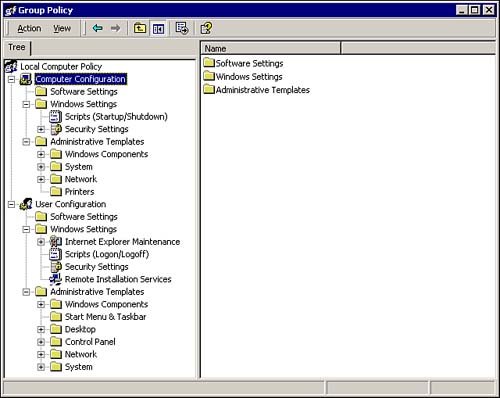
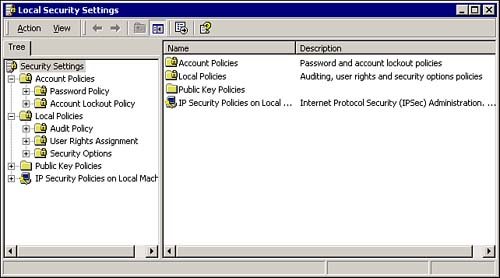
To access the Local Computer Policy object for a computer, key in gpedit.msc in the Run dialog. This opens the Group Policy MMC, shown in Figure 8.8, showing the available configuration settings for the local object. Figure 8.8. The Group Policy MMC, showing the Local Computer Policy object settings. As you can see in Figure 8.8, group policy objects are divided into two nodes, Computer Configuration and User Configuration . In a domain, OU, or site, you can make some settings common to a machine, while other settings will vary by user. However, remember that in a local object the user settings apply to all users, so you can make your settings at either node because the result will always be the same. Computer settings are applied at startup, whereas user settings are applied at logon, with the default refresh interval for both settings set to 90 minutes. The configuration settings listed under Administrative Templates on both nodes are similar to those settings that are available via the System Policy Editor. The other settings in the Computer Configuration and User Configuration areas are new to Windows 2000, or were only available at the domain level, such as some of the security settings that were previous configured in Windows NT 4.0 via User Manager. The Security Settings subnode that is shown in the Group Policy MMC under the Computer Configuration node is also available from the Start menu as the Local Security Settings MMC, as shown in Figure 8.9. To open the MMC, click Start, Administrative Tools, Local Security Settings. If you are working from a domain controller, you will also see Domain Security Settings and Domain Controller Security settings. Figure 8.9. The Local Security Settings MMC, showing the available policy object settings. The two most commonly used nodes under Security Settings are Account Policies and Local Policies. Account PoliciesAccount policies are used to configure the settings for password and account lockout policy. These settings were configured in the User Manager utility in Windows NT 4.0. The password policy settings allow you to customize the password requirements to require stronger passwords. The available settings are
The account lockout settings allow you to lockout a user account after several sequential failed logons . The available settings are
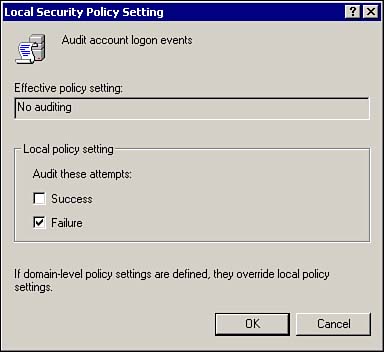
Local PoliciesThe Local Policies node of the Local Security Settings MMC has three subnodes: Audit Policy, User Rights Assignment, and Security Options. These items allow you to specify who has access to the computer, specify how much access, and audit specific events. Audit PolicyThe Audit Policy is used to configure which events will be recorded in the Security log. This allows you to track events, such as failed logon attempts. Auditing is not enabled by default, and must be enabled for the selected items. To turn auditing on, double-click one of the items in the right pane of the MMC as shown in Figure 8.10. Then select the desired action and click OK. Figure 8.10. The Local Security Settings MMC, showing how to configure audit settings. The available audit types are
Each policy can be configured to audit successes, failures, or both. Just about any activity involving a Windows 2000 object can be audited . When planning an audit policy, it's important to not only audit the accesses of resources, but also to audit user account management tasks. All entries are saved to the security log, and will provide you with a summary of the computer operations, showing which tasks were attempted and by whom. Not only does this help to detect unauthorized access, but it can also point out users who don't know what they're doing. A typical entry in the security log will show the following items:
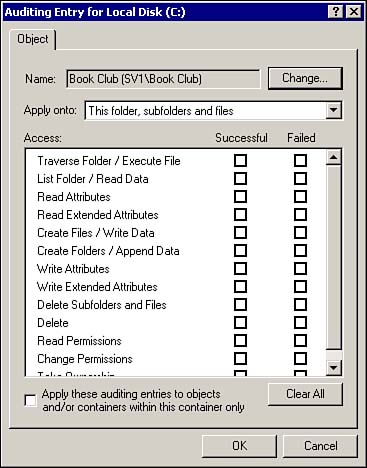
Except for the Audit Object Access selection, all of the other selections will begin recording audit events to the security log immediately after they are enabled. The Audit Object Access selection is used to allow you to audit specific objects, such as files, folders, or other resources, and needs to be specifically turned on for each object that you want to audit. To turn auditing on for a specific object
After the settings are saved, every time the specified action is taken on the object by the chosen user or group, an audit event will be written to the security log.
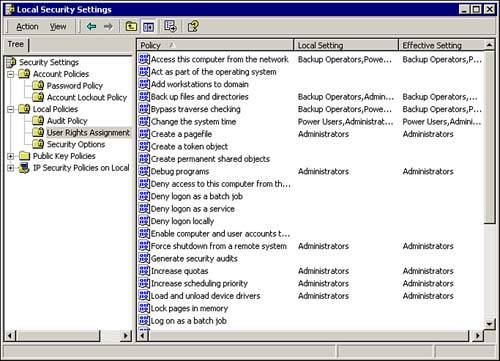
User RightsUser Rights are used to assign various privileges to specific user accounts and/or groups. Some of the default user rights assignments are shown in Figure 8.12. Figure 8.12. User Rights Assignment, showing some of the available settings. As you can see, several specific rights, such as the ability to back up files and directories or change the system time, are already assigned to certain groups. For example, you must be a member of the local administrators group to shut down a computer remotely. Unlike Account policies, which are usually set at the domain level and automatically override the local settings, by default User Rights are configured at the local level. The User Rights settings in the domain Group Policy are set to Not Defined by default. Security OptionsThe Security Options node contains a variety of security settings, some of which are available from the Control Panel applets. Similar to User Rights, these settings are commonly set through Local Policy, because these items are set to Not Defined in the domain Group Policy. A few of the commonly used items are
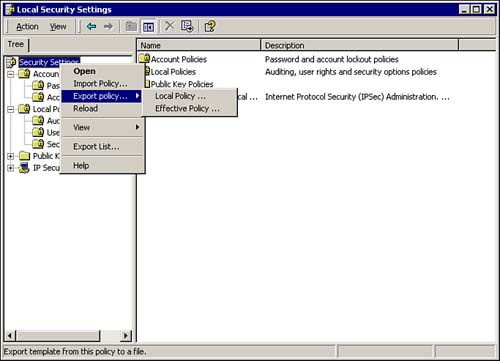
After you have configured the Local Computer Policy to your satisfaction, you can copy it to another computer. Just right-click the Security Settings node in the left pane of the Local Security Settings MMC, and select Export Policy, Local Policy, as shown in Figure 8.13. Figure 8.13. The Local Security Settings MMC, showing how to export a local policy. After the policy is exported to a file, it can be transported to another computer. Just repeat the previous steps and select Import Policy.
|
EAN: 2147483647
Pages: 155