| The Routing and Remote Access Service (RRAS) feature in Windows 2000 provides a multi-protocol router and support for remote access, including Virtual Private Networks (VPN). First introduced in Windows NT 4.0, the Windows 2000 version of RRAS combines software routing technology with remote access and authentication services.  | In addition, the RRAS service in Windows 2000 supports DHCP relay and Network Address Translation. These features are covered in depth on the 70-216 exam. |
The routing features in RRAS provide support for the following routing protocols: -
Routing Information Protocol (RIP) versions 1 and 2 -
Open Shortest Path First (OSPF) -
Internet Group Management Protocol (IGMP) -
AppleTalk Routing With these protocols, and other router features such as demand-dial routing, packet filtering, and Internet Control Message Protocol (ICMP) router discovery, the Windows 2000 RRAS is fully capable of replacing a hardware router in most situations. Configuring Inbound Connections In addition to the routing functions, RRAS is capable of being configured as a Remote Access Server. Although RRAS is included as a component of the basic install of Windows 2000, it is disabled by default. To turn on RRAS -
Open the RRAS MMC by selecting Start, Programs, Administrative Tools, and Routing and Remote Access. -
In the MMC, as shown in Figure 7.21, right-click on the server name in the left pane, and select Configure and Enable Routing and Remote Access from the pop-up menu. This starts the RRAS Setup Wizard. Click the Next button to get started. Figure 7.21. Enabling RRAS from the MMC. 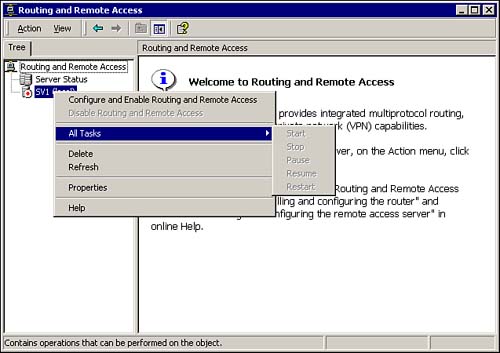 -
From the common configurations dialog shown in Figure 7.22, you can configure the following options: -
Internet Connection Server (ICS) This technology was discussed in the previous section. -
Remote Access Server This option allows remote clients to dial in to the network via a modem. -
Virtual Private Network (VPN) Server This option allows you accept secure remote connections from clients over the Internet. -
Network Router This option allows Windows 2000 to be configured as a software-based router. -
Manually Configured Server This option allows the user to custom configure RRAS. Figure 7.22. Configuration options available via the RRAS Setup Wizard. 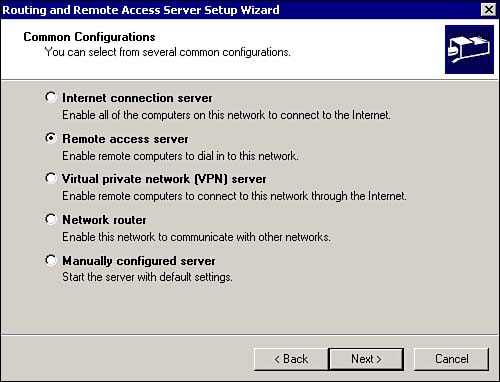 -
Select the Remote Access Server option, and then click the Next button. -
This opens the Remote Client Protocols dialog. From here, you can verify that the protocols that you want to support, such as TCP/IP, are listed. If a protocol was not installed before you started the wizard, it will not be listed. If the necessary protocols are listed, click the Next button to continue. -
This opens the IP Address Assignment dialog. From here you can select to assign IP addresses to the remote clients via DHCP. To let your existing DHCP server assign addresses to the remote clients, the remote access server must be a DHCP client. If it is not a DHCP client, it generates IP addresses for you. If you wish to configure a pre-determined range of IP addresses, select the From a Specified Range of Addresses option. Click the Next button to continue. -
From the Managing Multiple Remote Access Servers dialog box, you can specify whether you want the remote clients to authenticate using a Remote Authentication Dial-in User Service (RADIUS) server. RADIUS is an industry standard server that provides centralized authorization, authentication, and call accounting services for a group of remote access servers. Windows 2000 includes a RADIUS solution called the Internet Authentication Service (IAS). This optional service can be installed via the Add/Remove Programs applet in the Control Panel. Select No, then click the Next button to continue, and the Finish button to end. Creating a Remote Access Policy and Profile To permit a user to have dial-in access to a RRAS server, she must have permission granted via the dial-in properties of her user account and via a remote access policy. Remote access policies give the administrator more granular control over remote access. For example, the administrator is able to grant or deny access based on group membership, time of day, day of week, or type of access requested . These types of items are known as attributes within a remote access policy. We discuss how to add these attributes to a policy a little later. In addition, the administrator can use policies to specify the type of encryption used, the maximum session time, and callback policies.  | The default remote access policy is to allow access to users who have dial-in permission enabled in their user account settings. |
For the user to have authorization to connect remotely, he has to be authorized via the Dial-in Properties tab of his user account object in Active Directory. In addition, his connection properties must match at least one of the requirements that were configured in the remote access policy, such as correct time of day, and so on. To create a remote access policy -
From the left pane of the RRAS MMC, right-click the Remote Access Policies node under the server that you are configuring and select New Remote Access Policy from the popup. -
In the Policy Name dialog box, enter a descriptive name for the policy, and then click the Next button. -
From the Conditions dialog, click the Add button, and select the attribute that you want to base the policy on from the Select Attribute dialog shown in Figure 7.23. Click the Add button. Figure 7.23. Attributes available for a remote access policy. 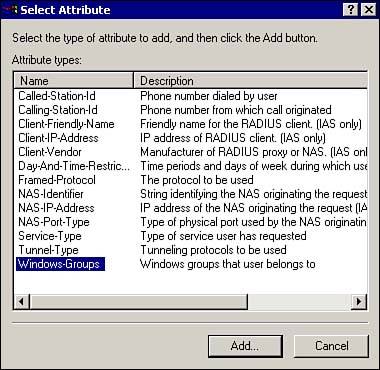 -
After the Add button is clicked, an additional dialog box appears where you can specify the parameters of the attribute that you selected. When finished configuring the attribute, click the OK button to return to the Conditions dialog. Click the Next button to continue. -
In the Permissions dialog, you specify what action to take if the user matches the conditions that you configured in the previous step. Either Grant or Deny access permissions. Select an option, and then click the Next button to continue. -
From the User Profile dialog, you can create a profile to apply to the connection. There are settings in the profile for -
Authentication This option allows you to select the types of authentication that are allowed, such as Extensible Authentication Protocol (EAP) or Challenge Handshake Authentication Protocol (CHAP). -
Advanced This option allows you to define the attributes that are sent to a RADIUS client by the Microsoft IAS server. -
Dial-in constraints This option allows you to set connection specific constraints such as idle time and maximum session length. -
Encryption This option is used to select the level of encryption to be used for this connection. -
IP This option is used to set IP filtering, or whether a user can request a specific IP address. -
Multilink This option is used to configure the properties of a multilink connection. -
After configuring the profile, click the OK button to save, and then Click the Finish button on the User Profile dialog. The combination of remote access profiles and policies allows the administrator a highly granular method of configuring remote user access. There are a few key things to remember about remote access policies: -
Policies are applied from the top down and the first match, either allow or deny, is used. -
If the default policy is deleted, the dial-up client has to match at least one of the policy configurations that you create to be granted access. -
The user must match all properties of a policy for access to be granted. |