Chances are that you've already got a collection of music on compact discs. In fact, you might have dozens of discs taking up room in organizers, spilling out onto shelves, getting their contents mixed up with their jewel cases, slowly driving you mad. Finding and playing music on your CDs, unless you're superhumanly organized, might be getting to be more of a hassle than it's worth.
Now that you have iTunes, it's time to put an end to all that. With a couple of clicks of the mouse, you can convert each of your commercial CDs into a catalog entry in the iTunes Libraryready for you to select and play at a moment's notice.
iTunes also makes a dandy player for any of your CDs, even if you don't want to import its music into the iTunes Library. Just insert the disc as shown in this task, wait for the track names to be downloaded, and then play the tracks as described in  Find and Play Music in iTunes. iTunes also keeps records of the downloaded track names and applies them to the files on the CD if you look at them in the Finder or Windows Explorer.
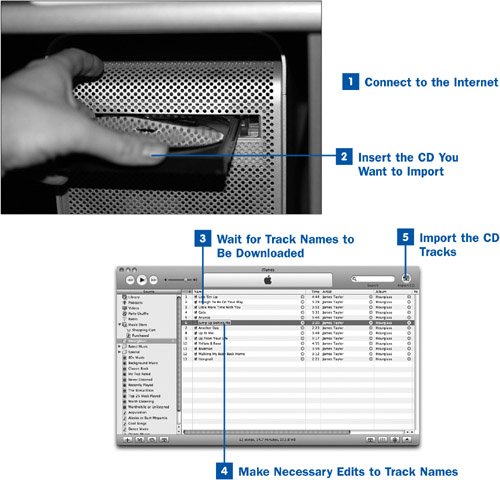
 Connect to the Internet
This step is optional but highly recommended. iTunes has to be able to connect to the Internet to download the album name and the titles of the tracks included on each of your CDs. Standard music CDs don't have this track name information embedded into themthe information on the CD itself is just several tracks of raw CDDA audio data, and the only way that the disc can address the data is by track numbers. The titles and album name are included only in the printed liner notes.
This is the reason for the existence of Gracenote (http://www.gracenote.com), also known as the CDDB, or CD Database. Gracenote is a publicly accessible database of CD names and track titles, defined using each CD's unique combination of track lengths. It's highly unlikely that any two different discs will have the same number of tracks with all the same track lengths. The unique arrangement of each disc's tracks and lengths enables iTunes to submit your CD's raw track information to Gracenote and immediately get back a response containing all the CD's track names, which are then applied to all the tracks on the CD in iTunes.
Note
Gracenote's database is populated through the volunteer efforts of millions of ordinary computer users like you. Its information might thus be inaccurate or incomplete. If you find errors in the downloaded track names from Gracenote, make the changes necessary (as shown in Step 4) and submit them to Gracenote as described in  Submit CD Track Names to the Gracenote Database.
 Insert the CD You Want to Import
First select an audio CD that you want to add to iTunes' Library. Open your computer's CD drive and insert the disc. Close the drive door and wait for the disc to spin up.
Tip
If you have a lot of music CDs to import, you can save time by setting up iTunes to automatically begin importing the music off every disc you insert. First open the iTunes Preferences window. (Choose Edit, Preferences in Windows or iTunes, Preferences on the Mac.) Then, in the Advanced section, click the Importing tab and choose the Import Songs or Import Songs and Eject option from the On CD Insert drop-down menu.
 Wait for Track Names to Be Downloaded
If you're connected to the Internet, iTunes contacts the Gracenote database and submits your CD's track lengths; if Gracenote finds a match, it returns the name of the CD album and the titles of all the tracks. In iTunes' song listing, the track names are applied to the tracks, and the disc is labeled with its album name.
Note
If you're on a dial-up modem connection, depending on your system configuration, iTunes might cause your modem to automatically connect to the Internet so that it can obtain the track names.
In the unlikely event that two or more disc entries in the Gracenote database have the same sets of track lengths, you are prompted to select the appropriate one. If you can't tell which one is correct (for instance, if two different people submitted significantly different information for the same disc), choose one; if you don't like the results, query the Gracenote database again as explained in  Get CD Track Names Manually.
If you don't have an active Internet connection, iTunes lists the disc as Untitled CD and shows the tracks with names such as Track 01, Track 02, and so on. See Get CD Track Names Manually if you inserted the CD before you connected to the Internet.
 Make Necessary Edits to Track Names
Gracenote's information might contain typos or outright errors. (As a volunteer project dependent on user input, it's not perfect.) You can correct these errors before importing the tracks. In fact, it's best to do it now instead of after importing so that when you insert the CD again, iTunes remembers the corrected information for the CD's tracks and not the erroneous data from Gracenote.
Click once on any song shown in the song listing to select it; click again in any of the displayed fields, such as the Song Name field. The field turns into an editable text box showing the field's current contents. You can type a new name for any track, change the artist name, adjust the genre (the style of music), change the year when the album was released, or make other similar changes. Alter the disc's album name by clicking its text label in the Source pane. Press Return or Enter to accept the changes to the name.
An alternative way to make changes to track informationand a more complete one that gives you access to far more fields than just the ones visible in the listingis to select a song and then choose File, Get Info (or right-click the song and choose Get Info from the context menu). In the dialog box that appears, make any changes you want to that track's information, and then click OK to apply them.
Select multiple tracks (hold down Shift as you click to select a range of songs, or hold down Ctrl or  to select individual noncontiguous tracks); then choose Get Info to edit certain fields of all the selected tracks at once. This is an excellent way to change (for example) the Genre field of all the tracks at once, if Gracenote supplied information claiming that the CD is a rock album but you would classify it as pop or alternative.
Tip
If you want to import only certain tracks and skip others, disable the small check box next to each track that you don't want to import.
 Import the CD Tracks
When all the track names are adjusted to your liking, click the round Import CD button in the upper-right corner of the iTunes window. The disc spins up and iTunes starts copying the music data onto your computer. Internally, iTunes is copying the raw CDDA music streams to memory and then encoding them to AAC format, into which it copies all your edited track information as it saves each song file to the hard disk. The speed of this process depends greatly on the performance of your computer. A high-end Intel Core computer, or a Pentium IV or Power Mac G5, can import at 25x or higher (25 times the speed of raw playback), and is in fact limited more by the data transfer rate of the CD drive than of the speed of the CPU. Older computers can import only at slower speeds, such as 10x or even as little as 5x.
Tip
By default, your music is imported in unprotected AAC format, the most efficient and high-quality format that iTunes supports. If you want to use a different format, such as MP3 or a lossless format such as AIFF or Apple Lossless, or if you want to adjust the bit rate or other options on the imported files, see  Import a CD in CD-Quality (Lossless) Format.
By default, iTunes plays the songs on the CD as you import the tracks. You can turn off this behavior in the Advanced, Importing section of the iTunes Preferences window.
Note
Tracks toward the end of the disc import faster than the ones at the beginning because CD audio is encoded from the center of the disc outward, and the outside of the disc moves fastermoving more data linearly past the sensor per secondthan the inside of the disc.
As iTunes finishes importing each track, a green check mark appears next to that track in the song listing, and you can switch to the Library view to see the tracks in your library. (Incomplete tracks are shown in gray and cannot be played.) When all the tracks have been imported and you hear the musical chime that signals the completion of the process, click the Eject icon next to the disc name in the Source pane, or simply eject the disc from your CD drive.
If your CD is damaged and iTunes has difficulty importing the tracks, refer to  Re-Import a Music CD for Improved Quality for some techniques you can try.
For the finishing touch, see  Add Album Art to Songs to give your imported music the graphical content it needs to really give you the full experience of your old physical CDs.
 Before You Begin
 See Also