Audio Applications
| The sound and multimedia support in FreeBSD has become quite good in recent years, after a long period of barely existing at all. Today it supports a wide range of popular sound cards, whether add-on devices such as Creative's SoundBlaster series, or integrated motherboard sound chipsets such as NVIDIA's nForce series. If you have one of these or many other common sound cards, chances are good that FreeBSD supports it natively. Even if FreeBSD does not have native support for your sound card, the commercial sound drivers from a company called 4Front Technologies might support it. Sound drivers for FreeBSD 6.x (and earlier versions) are available for $49 at the company's website at http://www.opensound.com, and there are free trial versions available as well. Enabling Sound SupportIn the default configuration, FreeBSD has no active audio subsystem. Sound support is available in a collection of kernel modules, one for every type of popular sound card. You'll need to load the appropriate kernel module to enable sound support for your system. The sound drivers are all located in /boot/kernel, and they all begin with the snd_ prefix. If you can't tell at a glance whether your model of sound card matches any of the inscrutably named kernel modules, refer to the online FreeBSD Handbook's section on supported hardware at http://www.freebsd.org/releases/6.0R/hardware-i386.html#SOUND (adjust the address to match your FreeBSD release) to match up your sound card model with an appropriate kernel module. For example, a SoundBlaster Audigy 2 card is supported by the snd_emu10k1 driver. Tip If you still aren't sure what driver to use, or you can't find your sound card listed under any of the supported kernel modules on the Handbook site, you can try using the generic snd_driver module. This is a meta-driver that loads all the sound drivers into the kernel at once, and it might make your sound card work. It's better to find out for sure what driver to use, thoughhaving lots of kernel modules loaded at once is a great way to destabilize your system. Use the cat /dev/sndstat command after loading the drivers to find out which one is actually being used. After you've found out what sound driver to use, add it to your /boot/loader.conf file to cause it to be loaded at boot time: snd_emu10k1_load="YES"Then reboot the system. If you don't want to reboot, you can use kldload to load the kernel module immediately: # kldload snd_emu10k1Then use the kldstat command to verify that the sound driver was loaded. After you have enabled the appropriate sound driver and rebooted, type dmesg | more to check the dmesg output from the kernel. Look for information indicating that your sound card was correctly detected on system boot. For example, the dmesg output on my system contains the following lines: sbc0: <Creative SB AWE64> at port 0x220-0x22f,0x330-0x331,0x388-0x38b irq 5 drq 1,5 on isa0 pcm1: <SB16 DSP 4.16> on sbc0 This output shows that FreeBSD detected a SoundBlaster AWE 64, and gives the memory addresses and IRQ that the card is occupying. Use the cat /dev/sndstat command to find out further status information on your card and ensure that the system has recognized it properly. If FreeBSD doesn't seem to find your sound card, you might want to try to get sound working using the 4Front sound drivers. Once again, they can be obtained at http://www.opensound.com. Tip To speed up the boot process, you might choose to compile your card's sound driver into the kernel, rather than making FreeBSD load it dynamically every time you boot up. To do this, add the following two lines to your kernel's configuration file, /usr/src/sys/i386/conf/MYKERNEL: device sound device "snd_emu10k1" Use the appropriate sound driver in the second line. Then recompile the kernel as described in full detail in Chapter 18, "Kernel Configuration." Note that if you build sound support into the kernel, it might conflict with the 4Front sound drivers if you bought them; be sure to remove them from the /boot/loader.conf file if you had them enabled there. Note Generally, in FreeBSD, only one application can produce sound output at once; if one application has opened the sound device, you might receive an error such as can't open /dev/dsp! If this occurs, try using fstat | grep /dev/dsp to find out if an application that you left running (or that another user is running) has hold of the sound output device. Using the MixerThe next step in setting up sound, once the kernel's sound support has been loaded, is to use the mixer to set up the proper sound output levels for various audio sources and frequency ranges. You should be able to access the FreeBSD mixer from the command line. From a shell prompt or terminal window, type the command mixer and press Enter. Your system will output something similar to the following: Mixer vol is currently set to 75:75 Mixer bass is currently set to 50:50 Mixer treble is currently set to 50:50 Mixer synth is currently set to 75:75 Mixer pcm is currently set to 75:75 Mixer speaker is currently set to 75:75 Mixer line is currently set to 75:75 Mixer mic is currently set to 0:0 Mixer cd is currently set to 75:75 Mixer igain is currently set to 0:0 Mixer ogain is currently set to 50:50 This shows what levels (in percentage values ranging from 0 to 100) each audio device in the system is set to. The numbers separated by colons represent the left and right stereo channels of each sound component. Most of the items in the list are self-explanatory, but a few of them deserve some more attention:
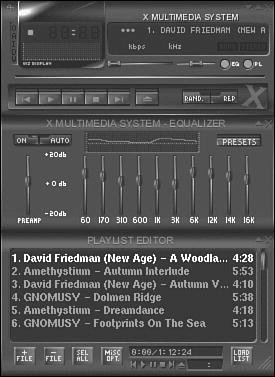
To make changes to any one of the levels, you can type mixer, followed by the name of the device and the desired level. For example, the following will set the CD output volume to 90 percent on both the left and right channels: # mixer cd 90If you want to set the left and right channels to different values, you need to include both values, separated by a colon. For example, the following will set the CD volume to 100 percent for the left channel and 80 percent for the right channel: # mixer cd 100:80At system boot time, most of the mixer values will default to 75 percent. If you want to have different default values at system boot, there are two ways to accomplish this. The first way is by creating a startup file in /usr/local/etc/rc.d. In the file, simply include a list of the desired mixer commands. You can name the file anything you want. For example, you might call the file mixerset. Here is an example of what the file might contain: mixer vol 80:80 mixer cd 90:90 mixer pcm 50:50 As root, create this file in the directory /usr/local/etc/rc.d and save it as mixerset, for example. Next, make the file executable by issuing the following command: # chmod u+x mixersetThe commands inside this file will now be run at each system boot and cause the mixer to be set to the desired values. Tip If the preceding steps are unclear to you, see Chapter 8, "Working with the Shell," and Chapter 14 for more information on these topics. The second way you can change the default mixer values is by adding commands to your login script (see Chapter 11 for further details). Open either .profile or .login(depending on your shell) in your favorite text editor and add the mixer commands that you want to set. For example, you might want to add the following lines to the file: mixer vol 80:80 mixer cd 50:50 mixer pcm 90:90 Unlike the changes made to the startup file, these do not need to be made as root, and they also will not take effect at system boot. They will take effect as soon as you log in to the system. The benefit of this method is that if more than one person uses this system, each person can create his own customized set of mixer settings to suit his listening preferences. Each time that user logs in to the system, his custom mixer settings will be applied. Mixers in X11If your tastes run toward the graphical, several X11-based interfaces to the mixer are available, including KMix for KDE and GMix for GNOME, both of which are standard components of their respective desktop environments. Figure 6.10 shows the desktop-agnostic xmixer, which is available in the FreeBSD ports or packages in the audio section. Figure 6.10. xmixer, a graphical front-end for manipulating the sound driver's recognized channels.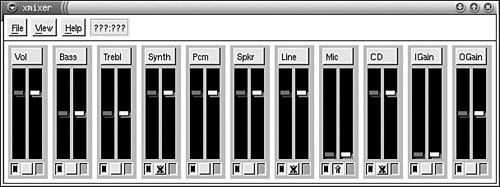 Using the familiar Windows-like icons in xmixer, you can graphically manipulate the left and right channels (or both locked together) of any of the audio output channels that FreeBSD recognizes. You can also disable certain channels if you don't need them or want them to be muted. MP3 Playback Under X11 with XMMSNow that you have the audio device configured properly, you will probably want to play some sounds with it. Yes, your MP3 collection will work with FreeBSD. XMMS, the X Multimedia System, is a Winamp clone for FreeBSD and other UNIX-like systems. It is available in the FreeBSD ports or packages in the multimedia category. Note KDE has its own built-in media player, Noatun. You might prefer to use this utility instead of XMMS if you're running KDE. On GNOME, on the other hand, you can play back MP3, Ogg Vorbis, and other types of audio files using the included Totem Movie Player. After you have XMMS installed, you can start it with the command xmms, either issued at a shell prompt in a terminal window or at the Run Command dialog box (or equivalent). You can also create menu entries or desktop shortcuts for it, if you use it often enough. Figure 6.11 shows XMMS with the mixer and playlist windows also open. Figure 6.11. The XMMS MP3 player. Windows users who have used Winamp will be quite comfortable with XMMS because its controls are virtually identical. Yes, it even supports Winamp skinsand you don't even have to unzip them first. Simply place your zipped Winamp skins in the directory .xmms/Skins located in your home directory. Click the icon at the very upper-left corner of XMMS; then select Options, Skin Browser from the pull-down menu. This will open a dialog box in which you can select the desired skin. Tip In order for you to be able to use zipped skins, you will have to have the unzip program installed. It can be installed from the FreeBSD ports or packages and is located in the archivers category. In addition to Winamp skins, a large number of XMMS skins are available at http://www.xmms.org/skins.php. Like the Winamp skins, they can simply be copied into the .xmms/Skins directory and do not need to be unzipped first. XMMS skins are normally distributed as gzipped tar files with a .tar.gz extension. This is a popular archive format for UNIX-like systems that is similar to ZIP files. XMMS also supports various visualization and audio effect plug-ins. Many of these are available as FreeBSD ports in the multimedia category. Note You can create your own MP3 or Ogg Vorbis files from your CD collection using any of several CD-ripping applications available for the command line, X11, or KDE/GNOME. KDE comes with KAudioCreator, and GNOME has Sound Juicer, both of which will look up CD track information from an online database and apply them to your imported tracks as you encode them. For full music management functionality, though, look into Amarok (for KDE), which serves as an excellent music and playlist manager with many advanced features that even iTunes doesn't have, or Songbird, a cross-platform iTunes-style music database with a Linux version that FreeBSD should be able to run under Linux compatibility. |
- Chapter III Two Models of Online Patronage: Why Do Consumers Shop on the Internet?
- Chapter VII Objective and Perceived Complexity and Their Impacts on Internet Communication
- Chapter VIII Personalization Systems and Their Deployment as Web Site Interface Design Decisions
- Chapter XI User Satisfaction with Web Portals: An Empirical Study
- Chapter XV Customer Trust in Online Commerce