Post-installation Configuration and Customization
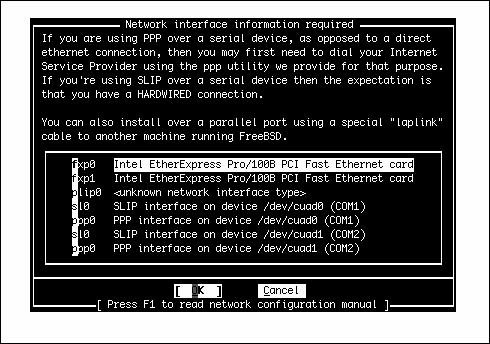
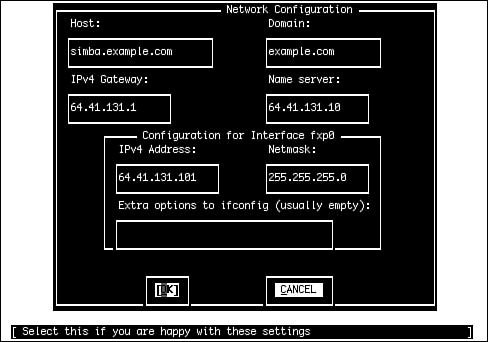
| When the file-copying process is complete, you will see a screen that congratulates you for making it to this point. The screen also informs you that Sysinstall will now move on to the final configuration questions. From the initial step of configuring the network in this post-installation phase, you will proceed to set the time; configure the mouse; choose the desktop, software packages, and users you want to assign to your system; and set the root password. Select OK to continue. Configuring the NetworkNext, you are asked if you want to configure any Ethernet or SLIP/PPP network devices. (This step will not be necessary if you are installing from floppies; you already had to configure your network earlier in the process.) If you have the necessary network configuration information from your system administrator, you can go ahead and set these up now. If you don't have this information available or if you are setting up a new network and are unfamiliar with networking, you can always re-enter this utility later after you have read the chapters on networking. Caution If you are on a network and you do not configure the network device(s) now, be aware that when the system reboots, you cannot access the network until you configure the network devices to work with it. With that said, if you don't have a network or you don't know what values should go in the fields for the network configuration, go ahead and skip this section and come back to it later after you have read the networking chapters in Part IV, "System Administration." If you don't want to configure any network devices now, simply select No and move on to the next section of this chapter. If you do want to configure network devices at this time, select Yes. You should now see a screen like the one shown in Figure 2.6. Figure 2.6. Selecting the network interface to configure. Select the network device you want to configure from the list and then press Enter. Note that depending on the make and model of your Ethernet adapter, it may have various names. It will usually have the number zero, though (for example, fxp0), if it is the first or only Ethernet adapter in the system. After you select the network device you want to configure, you are asked if you want to try the IPv6 configuration of the interface. Unless you are sure your network has an IPv6 server on it that is set up to send you configuration information, you should select No. The next question asks you the same thing about the DHCP configuration of the interface. If your network has a DHCP server on it, FreeBSD will attempt to contact that server and obtain its network information. If your network does not have a DHCP server, you should select No. If you're on a corporate or routed home network and you're not sure whether DHCP is available, select Yesmost routed networks have DHCP servers. If DHCP responds by filling in your network information, you can skip the next few steps. The next screen allows you to enter the information about your network. This will be covered in much more detail in Chapters 22, "Principles of TCP/IP Networking," and 23, "Configuring Basic Networking Services," but here are a few guidelines to get you started. Figure 2.7 shows the Network Configuration screen; Table 2.5 lists what the fields in this screen are for. Figure 2.7. Configuring the network interface.
If you are unclear about any of these concepts, you should read Chapters 22 and 23 before configuring the network. Caution If you aren't sure what numbers or names should go in the Network Configuration screen, ask someone who will know. Never simply fill in random numbers or names if your system is on a network. If your system is connected to a network, simply inserting random numbers in the IPv4 Address field or a random hostname in the Host field is a sure way to get on the bad side of the network administrators as well as other network users. If you select an IP address that conflicts with an existing system on the network, bad things will happen, including possible denial of service to an important network resource if your IP address conflicts with that of a major server. Use the Tab or Enter key to move between fields. When you are done, select OK to leave the configuration screen. Depending on the type of network interface you set up, you may now be asked if you want to bring the interface up right now. Select No because you are almost done with the install and will be rebooting the system soon anyway. Sysinstall will then ask you a series of questions about the network:
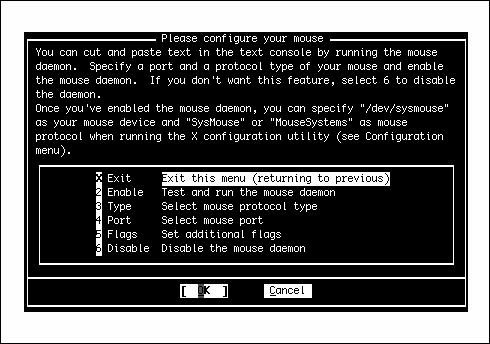
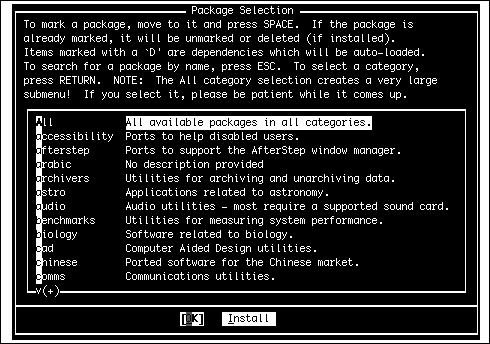
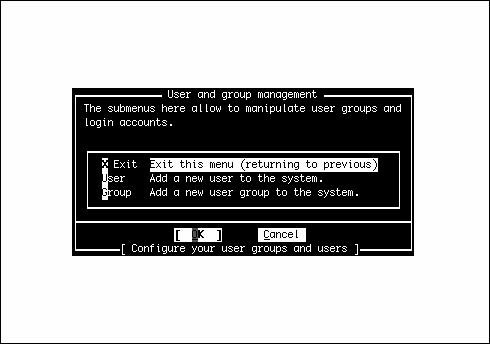
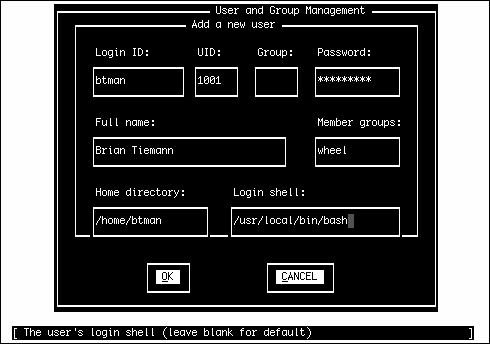
Customizing the ConsoleNext, you have the opportunity to customize the FreeBSD console settings. You can use these settings to customize the behavior of your keyboard, to choose which font will be used on the screen display, and to select which screensaver to use. If you select Yes to the question asking you whether you want to customize your console settings, you see a menu like the one shown in Figure 2.8. Figure 2.8. Customizing the console settings. Most of these options don't need any explicit configuration; they're set by default to settings that will work as expected with most modern hardware. However, you can experiment with settings such as Font and Saver to alter how your console appears and blanks its screen, or Repeat to adjust the keyboard repeat rate. Other options, such as Keymap and Screenmap, are less self-explanatory. Keymap allows you to choose a different keyboard layout from the default U.S. English layout, which you'll need to do if you're using a keyboard with a different set of keys. Similarly, the Screenmap option lets you choose a character set mapping that is appropriate for your country if the default one doesn't work for you; if you have older hardware where the built-in font can't be changed, it allows you to select how the text you encounter should be translated into text the hardware can display. Finally, the Ttys option (Terminal TYpes) allows you to change the default console terminal emulation mode from the default VGA terminal (cons25) to another whose behavior matches the screen mapping you choose in the Screenmap section. For any of the console configuration options, choose the option you need to configure and then follow the onscreen instructions. Setting the Time ZoneNext, Sysinstall asks whether you want to set the system's time zone. Select Yes. The next screen will ask whether your system's clock is set to UTC (known also as Coordinated Universal Time, Greenwich Mean Time, and Zulu Time). It probably isn't, so unless you are sure your clock is set to UTC, select No. The next menu asks you to select your region, your country, and other information about where you are located. After you provide Sysinstall with all this information, it shows you a three-letter abbreviation for your time zone and asks whether this abbreviation looks reasonable. If it looks correct, select Yes. If it doesn't, select No. You can always come back and do it again. Linux CompatibilityThe next question asks whether you would like to enable Linux binary compatibility. If you select Yes, Sysinstall will install a mini-Linux filesystem in your /usr partition that includes the Linux share libraries and other necessary programs for Linux to run on FreeBSD. Unless you are sure you will not be running any Linux programs, I suggest you select Yes. This can be a very useful option. (In fact, much of the manuscript for this book was originally written using StarOffice for Linux, running under FreeBSD's Linux emulation.) Note Your first thought might be that you don't want to install the Linux binary compatibility module. If you've worked with emulators under other operating systems, you know how slow they can be. With FreeBSD, however, this is not the case. Linux support in FreeBSD is not done through an emulator but rather is implemented at the kernel level. FreeBSD's Linux support is so good that it runs most Linux applications as fast as native Linux. In fact, FreeBSD will even run some Linux applications faster than Linux itself runs them! Configuring the MouseIn FreeBSD, you can use your computer's mouse whether you're in the text-mode console or in the graphical X Window System. The text-mode (console) mouse driver gives you the ability to copy and paste text at the command line or in console programs, making use of all three buttons on your mouse, if available. If the system will be a purely "headless" server, with no windowing system and no need for a console mouse pointer, you can elect not to enable the mouse driver. However, if you're going to be using FreeBSD as a desktop operating system, you'll want your mouse to work, and you need to configure and enable the mouse driver. First, FreeBSD asks you whether you have a non-USB mouse attached to your system. Non-USB mice include PS/2 mice (as is standard on most PCsthe mouse plugs in right next to the keyboard, with a round plug) or serial mice that connect to the COM1 or COM2 port. Select Yes if you have a PS/2 or serial mouse, or No if your mouse connects through USB (see Figure 2.9). Figure 2.9. Configuring the mouse. The next screen contains several steps for configuring your mouse. If you don't plan to use the mouse, in X or in the text console, select Disable here and skip the rest of this section. Otherwise, select Type to specify the type of mouse. The following screen contains several options for specialized or old-style mice, but the defaultAutois correct for just about any PS/2-style mouse available today. It's also the appropriate option if you have a USB mouse. Next, select Port. If you have a PS/2 mouse, select Auto (the default). Otherwise, choose the appropriate serial port where your mouse is connected. The X Window System makes use of all three buttons on a standard mouse. If you have a mouse with only two buttons on it, you need to emulate a three-button mouse by telling the mouse driver to interpret the clicking of both buttons at the same time (what's known as a chord) as a click of the virtual third button. You can do this by selecting the Flags option on the menu and typing 3 in the dialog that pops up. Another useful option you might want to put in here is -r high to make the pointer move faster or -r low if the pointer moves too fast and you want to slow it down. If you need both options, you can use 3 r high, for example. After you finish configuring the mouse settings, select the Enable option to test and run the mouse daemon. If the mouse is set up correctly, you should now be able to move the mouse pointer around on the screen. When you are done testing the mouse, select Yes if the mouse worked (note that the mouse still doesn't work in the menu; you still need to use the arrows and the Tab key) or choose No if it didn't. You are then returned to the mouse configuration menu. Assuming that the mouse worked, select the Exit option. Installing Additional Software PackagesSelect Yes when asked whether you want to browse the FreeBSD package collection. From the menu that follows, you can install some additional software that will be useful in the next couple of chapters. Feel free to browse through the collection as long as you want to see what is available. For now, I don't recommend that you install a ton of software at this pointthe first priority is getting your system booted, and it's very easy to add software later, once you're up and running. There are a few packages that I recommend you install for use in the next few chapters, however. When you're asked where you want to install the packages from in the Choosing Installation Media menu, select CD/DVD if you are installing FreeBSD from the included CD-ROM. Otherwise, select FTP to get the packages from the distribution server. Figure 2.10 shows the main menu for the package installation system. Figure 2.10. Installing additional packages. To navigate through the package installation system, use the arrow keys to move between packages and categories. Use the spacebar or Enter key to select or unselect a package. When you have finished selecting packages in a category, use the Tab key to highlight the OK option and press Enter to get back to the main selection menu (where you can select the category you want to browse). Packages that are already installed will have an X next to them; unselecting these packages causes them to be uninstalled. Packages that have a D by them are dependencies, meaning that they are required by some other package currently installed. At the bottom of the screen is a short description of the currently highlighted package. Note By the time this book goes to press, some of the version numbers on the software listed may have changed. In this case, select the option that appears closest to what I list here. For example, I list bash-3.0.16_1. If your menu has bash-3.0.17 instead, select it. I suggest that you choose the bash-3.0.16_1 package in the shells category. This is a very powerful and easy-to-use shell for the FreeBSD command-line interface. Linux users will be familiar with this shell because it is the default shell on almost all Linux distributions. UNIX gurus can also install any other shell in this list that they want to have available. Browse as many categories as you like, selecting any packages you'd like to install. When you're done selecting packages, return to the main selection menu and press Tab until Install is highlighted; press Enter to proceed with the batch installation from the selected media. Adding a UserWhen the package installation is complete, you are asked whether you want to add any user accounts to the system. Select Yes to create a normal user account for yourself. It is dangerous to use the root account for normal operations because root has no restrictions and can damage or destroy important system files if you make a mistake. Using your normal user account for most operations prevents this. On the Help screen, shown in Figure 2.11, select User to add a new user to the system. Figure 2.11. Adding users and groups to the system. You are then taken to a form you need to fill out to add the new user (see Figure 2.12). Figure 2.12. The Add a New User form. Not all the fields on this form have to be filled in. Actually, you should leave some of them blank so the system can make a default choice for you. Use the Tab key to move between the various fields. The following sections describe each of these fields and make recommendations for adding values to them. Login IDLogin ID is the name you use to identify yourself to the system when you sign in. The ID you type in this field should not be more than eight characters long, for compatibility reasons, though FreeBSD supports usernames up to 16 characters long. Common conventions are to use initials, nicknames, or combinations of initials and first or last name. For example, I might use brian, briant, or btiemann as my login name. Each user on the system must have a unique login name. Names are case-sensitive and, by convention, use all lowercase letters. Spaces and special characters are not allowed, aside from the hyphen (-) and underscore (_). UIDUID is a numeric ID that the system uses to keep track of users. You should leave this field alone and let the system pick the number for you. GroupThis field refers to the primary group you will be a member of. Once again, leave this field alone and let the system pick for you. PasswordIn this field, you type the password you will use to log in. Passwords are case-sensitive. Here are some guidelines for choosing good passwords that crackers (commonly known as hackers, although this is not the correct term for people who illegally break into computer systems) can't figure out:
At the same time, it's good to pick something you can remember easily. Some techniques for doing this include combining parts of various words together (remembering, of course, to include both uppercase and lowercase letters and to stick a few numbers and at least one special character in somewhere). You can also use what I call keyboard substitutiona technique where you pick a word that means something to you (but that others will not know) and then substitute the character to the upper-left, upper-right, lower-left, or lower-right as the actual character in the password. For example, Alice becomes Qoid3. After you decide on a password, enter it carefullyyou will not be asked to verify it. The password will show up on the screen as asterisks (*). If you mistype it, you will not be able to log in (if you accidentally do mistype the password, you can read how to fix it in Appendix C). After you decide on your password, do not write it down anywhere. Do not write it on the bottom of your desk. Do not write it down in your appointment book. Do not have it tattooed on your arm. And whatever you do, do not write it on a Post-It note and stick it on your monitor. (I know that seems like stating the obvious, but you would be surprised how many users do just that.) Also, do not tell your password to anybody, including your coworkers, your spouse, or your children. Full NameYou can either type your name in this field or leave it blank (remove User & if you intend to leave it blank). Note that some programs, such as the UNIX mail program, will use this field to determine what to put in the From field of the email you send. Therefore, it is probably a good idea to enter your name here. Member groupsI suggest you type wheel in this field. This will make you a member of the group "wheel," which will allow you to assume the identity of the root user (super-user or system administrator) without having to log out and log back in as a different user (although you still need to supply the root password to do this). Caution It's very important to set up at least one wheel user right awaythis ensures that you'll be able to connect to the computer remotely, using that user account, and become root (using the su command) to perform system administration tasks. You can't SSH directly to the machine as root (without performing some extra trickssee Chapter 13, "Users, Groups, and Permissions"); unless you have a non-root user who can log in remotely and assume root privileges, you'll be dead in the water once you leave the facility where the machine has been installed. Home DirectoryThis field lists the place where your home directory will be located on the hard disk. You should leave this field alone and let the system choose for you. Login ShellThe login shell is the default command-line shell you will be placed in after you log in. Assuming you installed the bash shell, as suggested earlier, I suggest you type /usr/local/bin/bash in this field (including the slashes). If you later decide you do not like the bash shell, it is easy to change your default shell to a different one (see Chapter 8, "Working with the Shell" for more details). Note Be aware that /bin/csh, the default built-in shell included in FreeBSD, is the same thing as tcsh (also available by default at /bin/tcsh). After you finish entering the information, tab over to the OK button and press Enter. The user account will be created for you, and you will be returned to the menu shown earlier in Figure 2.12. Select the Exit option. Setting the Root PasswordPress Enter when you see the message about setting the system manager's password. You are then given a prompt at the bottom of the screen that asks you to enter a root password. It looks like this: Changing local password for root. New password : All the guidelines you read earlier for choosing and protecting your normal user password are doubly important here. Anyone who knows your root password (or can find it out) can access anything on your entire system and can do anything to your entire system as well. He will have access to read confidential information, email it to other places, change or destroy data on your system, and do whatever other evil things he pleases. After you decide on a root password, enter it at the prompt. Notice that it will not show up onscreen as you type it. This prevents someone from looking over your shoulder as you type and reading your password or even seeing how long it is (a valuable piece of information in itself, to a password-cracker). After you enter the password, press Enter. You will be asked to verify the password. Type it again and press Enter. Assuming that you typed it the same way both times, the installation will ask whether you want to visit the general configuration menu for a chance to set any last options. Select No. You are then returned to the main menu. | ||||||||||||||||||||