Managing Security Policy with Code Groups
| Security becomes a major challenge when dealing with mobile code and third-party components. For example, you probably want to restrict macros and assembly components from accessing anything other than the document or application that contains them. You may even want to protect your system from bugs in software from trusted vendors . To handle these situations, CAS allows security policy to be enforced on assemblies according to established rules of code group membership. This means that security decisions can be applied to individual assemblies that are used in combination within an application such that each assembly is treated in a specific and appropriate manner according to the trust level of the code group to which it belongs. It would be too difficult to manage security policy on an assembly-by-assembly basis. Since there could potentially be thousands of assemblies on a given machine, it would be far too labor- intensive to fiddle with them all individually. Instead, you manage code groups by specifying the criteria that is used to determine code group membership for entire categories of assemblies. You can think of a code group as a set of assemblies that represent a common degree of trust. Then, security policy is defined in terms of the permission set granted to each specific code group rather than to each individual assembly. The Basic Concepts of Security Policy ManagementThere are three configurable security policy levels: Enterprise, Machine, and User. Enterprise is the highest level, and User is the lowest level. There is also a fourth security policy level, which is the lowest , known as the AppDomain level, [15] but it is only programmatically managed within a given application and not administratively managed. Each level is used to define code access security policy, but lower security policy levels cannot grant more permission than that defined by higher security policy levels. Each policy level contains a hierarchy of code groups. Each code group specifies a membership condition that determines which assemblies belong to that particular code group. Strangely, it is possible to define membership conditions that result in an assembly falling into more than one code group.
Each code group has a named permission set associated with it. A permission set specifies the actions that the CLR will permit code in that code group to perform. As you can guess from its name , a permission set contains a set of permissions. Each of these permissions defines exactly what resource access or program action is being permitted. Permissions are determined for an assembly at each policy level, and the resulting permissions are determined by evaluating the intersection of the permissions for policy levels. Ultimately, permissions are determined according to code group membership, which in turn is based on host and assembly evidence. Therefore, you can think of security policy as a mapping from security evidence to a permission set. By manipulating permission sets and code groups membership criteria, the administrator can determine what permissions are ultimately granted to individual assemblies. The .NET platform provides the following two tools for managing .NET security policy:
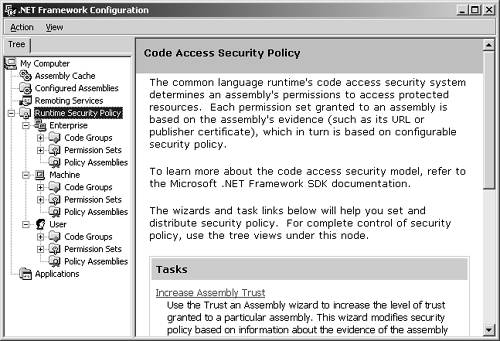
The .NET Framework Configuration tool can be used to administer local machine security policy, and it can also be used to create policy deployment packages that target the enterprise using SMS (System Management Server) and Active Directory Group Policy. The Caspol command-line utility is not as easy to use manually, but it is more suitable for automated scripting of policy administration. Using the .NET Framework Configuration ToolThe .NET Framework Configuration tool runs as an MMC (Microsoft Management Console) snap-in. This tool is used for many configuration purposes, but in this chapter we focus on using it for .NET security policy configuration. You can start this tool by double-clicking on the Mscorcfg.msc file, or you can select Start Settings Control Panel menu, and then select Administrative Tools Microsoft .NET Framework Configuration. Within this tool, you open the Runtime Security Policy node, as shown in Figure 8-1. As you can see, there are three subnodes named Enterprise, Machine, and User, which are the three configurable security policy levels we talked about earlier. Under each of those policy levels, there are three subnodes named Code Groups, Permission Sets, and Policy Assemblies. Each of these subnodes contains further subnodes, which we discuss in more detail shortly. For now, it is sufficient to understand that the Code Groups node contains criteria for categorizing groups of assemblies with common security requirements, the Permission Sets node contains named sets of security permissions, and the Policy Assemblies node contains fully trusted assemblies that implement classes that define security objects that represent code group membership conditions and code access permissions. Figure 8-1. Runtime security policy in the Microsoft .NET Framework Configuration tool. Actually, policy assemblies are very special. Policy assemblies define permissions and membership conditions that are used by the security engine during permission evaluation. If you add a custom permission or custom membership condition to your security policy, you must first add the assembly implementing the custom security object and all the assemblies it depends on to the list of policy assemblies. The policy system will then grant the required full trust to those assemblies for use in evaluating the security policy that is defined using those custom security objects. Policy assemblies must be fully trusted, digitally signed, and deployed in the global assembly cache before they can be added to the list of policy assemblies. Since policy assemblies enter the inner sanctum of security management, it is obvious that you must be absolutely certain that they are completely trustworthy, or your entire security infrastructure will be compromised! The highest of the configurable security policy levels is the Enterprise level, which is used to define policy for an entire organization. The second security policy level is the Machine level, which defines policy for all code that is run on the local computer. The third level is User, which defines security policy for the currently logged-on user. Table 8-1 shows the purpose of each of these three policy levels. Table 8-1. Configurable Security Policy Levels
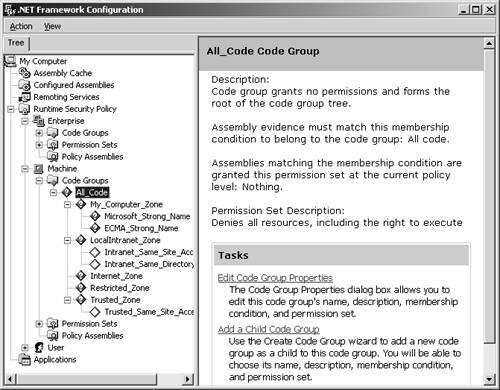
At runtime, when the CLR loads an assembly, it first determines which code group (or groups) the assembly belongs to according to the supporting evidence provided by the assembly, and then it evaluates the appropriate security policy according to its code group membership. The security policy is determined by evaluating all of the three security policy levels, and the result is formed by the intersection of the permissions granted by all three levels. In other words, it requires a unanimous vote so that if an assembly lacks a given permission at any of these levels, then it is not granted that permission. Figure 8-2 shows the hierarchy of code groups defined under the machine level. At each code group node, you can edit the code group membership properties, and you can also create child code groups. The hierarchy allows you to loosely define group membership near the root node, and as you go further down the tree, you typically define more restrictive membership constraints. Every code group has a single permission set associated with it, and it also has a set of criteria that is used to determine if any given assembly belongs to that code group. Figure 8-2. Machine code groups. If you select a particular code group, and then click on the Edit Code Group Properties link, you will see the Code Group Properties dialog. With this dialog, you can edit the code group name, description, membership condition, and permission set. This is shown in Figures 8-3, 8-4, and 8-5 for the preexisting My_Computer_Zone Code Group. Figure 8-3. Code Group Properties general tab. Figure 8-4. Code Group Properties membership condition tab. Figure 8-5. Code Group Properties permission set tab. As we have just seen, every code group has a single permission set. However, a single permission set can contain a number of permissions. A single permission represents the right to take some action or access some resource in some way. There are several preexisting permission sets, and it turns out that the .NET Framework Configuration tool also allows you to construct your own new named permission sets. There are also several preexisting code group membership conditions that are provided by the .NET Framework. Just as was the case for code access permissions, each of the code group membership conditions is also implemented as a class defined in a policy assembly. Also, just as you can create your own custom code access permission classes, you can also create your own code group membership condition classes. The key concept here is simply that a code group membership condition determines whether the membership condition is satisfied by an assembly's evidence. Table 8-2 shows the name and purpose of the prebuilt code group membership conditions along with the evidence used in determining membership. Table 8-2. Code Group Membership Criteria
THE PINVOKE EXAMPLE: DEFINING A NEW CODE GROUPThere are several general-purpose predefined code groups, such as My_Computer_Zone and LocalIntranet_Zone, with associated default permission sets. However, there are times when you need to modify existing code groups or define your own new code groups. Let's go through the steps of a typical example where the .NET Framework Configuration Tool is used to define a new code group with specific code access permissions. The PInvoke example is a simple program that attempts to call into the two Win32 APIs GetComputerName and GetLastError . If you run this program under the original default security policy, you will see that it works properly even though it takes the risk of calling into unmanaged code. This is because it is run on the local machine, and, according to default security policy, the MyComputer security zone is fully trusted, as shown in Figure 8-6 Figure 8-6. My_Computer_Zone is fully trusted. We will soon see how we can change this so that the PInvoke program is no longer permitted to call into unmanaged code, but, first, let's look at the source code for the program. As you can see, there is no hint of any security- related code whatsoever. This is because we are not interested in security programming at this point. Instead, we want to focus on the administrative business of managing security policy. When you run this program under default security policy, it simply displays the name of the local machine. //PInvoke.cs using System; using System.Text; using System.Runtime.InteropServices; using System.Security; public class Test { [DllImport("kernel32.dll", CharSet=CharSet.Ansi)] public static extern bool GetComputerName ( StringBuilder name, out uint buffer); [DllImport("kernel32.dll")] public static extern uint GetLastError (); public static int Main(string[] args) { bool result = true; uint error = 0; StringBuilder name = new StringBuilder(128); uint length = 128; Console.WriteLine( "Attempting to call GetComputerName"); result = GetComputerName (name, out length); if (result == true) Console.WriteLine( "GetComputerName returned: " + name); else { error = GetLastError (); Console.WriteLine( "Error! GetComputerName returned: " + error); } Console.Write("Press Enter to exit..."); Console.Read(); return 0; } } Here is the output from the program. Note that this is before we make any changes to the default security policy. Naturally, the name of your machine will appear differently. Attempting to call GetComputerName GetComputerName returned: HPDESKTOP Of course, the PInvoke program does not actually do any real damage; otherwise , you would not want to try running it as a demonstration example! But let's pretend for a moment that you are an administrator and you do not have its source code. Since you do not know what it might attempt to do, you might want to configure security such that it cannot do any harm. To do this, you first define a new code group with membership criteria that includes the PInvoke.exe assembly. Start the .NET Framework Configuration Tool, and then open the Code Groups node under the Machine policy level. You could have just as easily chosen the Enterprise or User level, but in this example you will be working under the Machine policy level. Under the Code Groups node, click on the All_Code node and then click on the Add a Child Code Group link. [16] In the resulting Create Code Group wizard, enter the name My_Own_Zone and a description for the new zone, as shown in Figure 8-7.
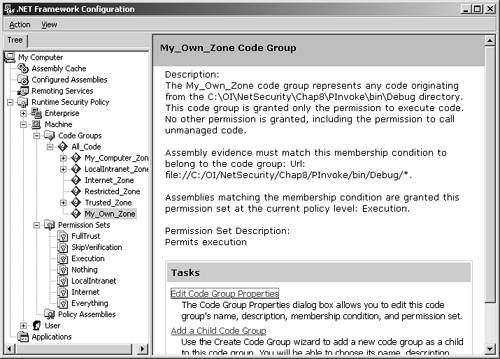
Figure 8-7. Creating My_Own_Zone step 1. Click Next to go to the next step of the wizard to choose the code membership condition. In the condition type combo box, choose URL, and in the URL field, enter file://C:/OI/NetSecurity/Chap8/PInvoke/bin/Debug/* , as shown in Figure 8-8. This will make any assembly found in that directory a member of the My_Own_Zone code group. Figure 8-8. Creating My_Own_Zone step 2. Click Next to proceed to the third step of the wizard, where you will assign a permission set to the new code group. In the Use existing permission set combo box, select the Execution permission, as shown in Figure 8-9. Figure 8-9. Creating My_Own_Zone step 3. Finish the wizard by clicking Next and Finish. The new code group will then appear in the .NET Configuration Tool, as shown in Figure 8-10. Notice that the name My_Own_Zone appears in the code group hierarchy, and the description and membership condition appear in the right-hand pane. Figure 8-10. My_Own_Zone created. Now, click on the Edit Code Group Properties link to see the My_Own_ Zone code group properties dialog. On the General tab, select the checkbox that specifies that this policy level will only have the permissions from the permission set associated with this code group, as shown in Figure 8-11 Figure 8-11. My_Own_Zone properties general tab. On the Permission Set tab, you can see what permissions are granted by the Execute permission set. As you can see in Figure 8-12, the Execute permission set contains a single permission named Security. Figure 8-12. My_Own_Zone properties permission set tab. If you now select the Security permission in the list box, and then click on the View Permission button, you can see the details of this Security permission. Figure 8-13 shows that this permission allows code execution, but it disallows every other possible aspect of the Security permission. [17] In particular, notice that the permission to call unmanaged code is not granted. Since the permission set contains no permissions other than the Security permission, it is clear that the My_Own_Zone code group is rather severely restricted.
Figure 8-13. My_Own_Zone permission viewer. Next, close the Permission Viewer window and click OK to close the Code Group Properties dialog. Now that you have finished creating your own code group and established its membership criteria and associated permission set, you can try running the PInvoke program again. Previously, this program simply displayed the current machine name. But now, it throws an exception, as shown in the following output. There is no point in trying to catch this exception within the PInvoke program's Main method, since it is actually thrown when an attempt is made to call the Main method. This is because of the DllImport attribute that is applied to the Main method. Unhandled Exception: System.Security.SecurityException: System.Security.Permissions.SecurityPermission at Test.Main(String[] args) The state of the failed permission was: <IPermission class= "System.Security.Permissions.SecurityPermission, mscorlib, Version=1.0.3300.0, Culture=neutral, PublicKeyToken=b77a5c561934e089" version="1" Flags="UnmanagedCode"/> DEFINING A NEW PERMISSION SETWe have just seen how to add a new code group and associate it with a permission set. However, we just used a predefined permission set named Execution, which has a rigidly defined set of permissions contained within it. Recall that the Execution permission set contains a single permission named Security, and that permission has only the one enabled capability to execute code. What if you want a Security permission that will enable code execution and thread control but disable all other possibilities, such as calling unmanaged code and application domain creation? You may even want to define a new permission set that contains a combination of permissions, such as Security, User Interface, and File IO permissions, each with a customized set of options enabled. For these situations, you need to create a new permission set. [18]
To define a new permission set, start the .NET Framework Configuration Tool and open the desired policy level. In this example choose the Machine policy level, and then open the corresponding Permission Sets node. Click on the Create New Permission Set link in the right-hand pane, and in the resulting Create Permission Set wizard, enter the name MyPermissionSet and provide a description for the new permission set, as shown in Figure 8-14 Figure 8-14. Create MyPermissionSet step 1. Click Next to move to the second step of the wizard, where you construct the permission set contents. You select permission items in the left list box, and click the Add button to move them to the right list box. Figure 8-15 shows what this dialog looks like before any permission has been added. Figure 8-15. Create MyPermissionSet step 2. For each of the items that you move to the right list box, you are provided a permission-specific dialog where you can make detailed decisions about exactly what options the permission entails. This is shown in Figure 8-16 in the case of the File IO permission and in Figure 8-17 in the case of the Security permission. Figure 8-16. File IO permission settings. Figure 8-17. Security permission settings. After you have added the desired permissions to your new permission set, you can click Finish to close the Create Permission Set wizard. The final result is shown in Figure 8-18 Figure 8-18. MyPermissionSet created. Now that you have created the new permission set, you can associate it with a code group in the same way we saw earlier with a predefined permission set. In particular, you should notice that the newly created permission set will now automatically appear in the Create Code Group wizard and the Edit Code Group Properties dialog that we saw earlier. Using the Caspol.exe UtilityThere is a command-line alternative to the .NET Configuration tool, named Caspol.exe . [19] Generally, people prefer to use a nice GUI interface, especially when first learning about the concepts. However, command-line tools are more useful when batch file scripts and programs are used to automate the configuration process.
The command-line options supported by Caspol are numerous , and we will not go into them in exhaustive detail here. Instead, let's just look at a few examples of the types of work that can be done with this utility. Table 8-3 shows some of the more commonly used command-line options. Abbreviations for command-line arguments and target operands are not shown here. Please see the Caspol documentation for further details. Table 8-3. The Caspol Command-Line Options
|

EAN: 2147483647
Pages: 126