16.2. Choosing a Power Supply Use the following guidelines to choose a power supply appropriate for your system:
Choose the correct form factor. -
Above all, make sure the power supply you buy fits your case.
Choose a name-brand power supply. -
There are literally scores of brands of power supplies available, many of which are made in the same Chinese factories and simply have different labels attached to them. Most of those are of mediocre quality or worse, but some good name-brand power supplies are made in China. For years we have exclusively used and recommended units from two companies, Antec (http://www.antec.com) and PC Power & Cooling (http://www.pcpowerandcooling.com). Both produce a wide range of models in different capacities. One of them is probably right for your needs.
Choose a power supply with sufficient capacity. -
When it comes to power supplies, too much capacity is far better than too little. Using a 450W power supply on a system that draws only 250W does no harm; assuming equal efficiencies, the 450W unit consumes the same amount of power as would a 250W unit. Using a higher-capacity power supply than necessary costs a bit more, but has several advantages. The larger power supply generally runs cooler, because its fans were designed to cool the unit when it runs at full capacity. The larger unit typically provides tighter voltage regulation because it's not being stressed. And when it's time to add a faster processor or video card, the larger power supply has enough excess capacity to handle the additional load. It's possible to add the maximum current draws for all system components and size the power supply on that basis. The problem with that method is that it can be nearly impossible to determine those draws for all components, especially motherboards and expansion cards. If you want to keep it simple, size your power supply according to the following configurations:
Basic system -
For a system with a slow processor, 256 MB to 512 MB of RAM, embedded video, one hard drive, one optical drive, and zero or one expansion card, install a 300W or larger power supply.
Mainstream system -
For a system with a midrange processor, 512 MB to 1 GB of RAM, a midrange video adapter, one or two hard drives, one or two optical drives, and one or two expansion cards, install a 400W or larger power supply.
High-performance system -
For a system with a fast processor, more than 1 GB of RAM, one or two fast video adapters, two or three hard drives, one or two optical drives, and two or more expansion cards, install a 500W or larger power supply.
Choose a high-efficiency power supply. -
Don't buy any power supply, particularly a high-capacity unit, that is rated at less than 70% efficiency at moderate to high loads. (Power supplies are typically less efficient at very light loads.)
Choose a quiet power supply. -
Noise-reduced power supplies used to sell at significant premiums over standard power supplies. That's no longer true. Mainstream "quiet" power supplies such as the Antec TruePower 2.0 and PC Power & Cooling Silencer series sell for little or no more than standard power supplies of equal quality that produce considerably more noise. Even if your goal is not to produce a quiet PC, there's little point to choosing a noisy unit when quieter units are so readily available. 16.2.1. Installing a power supply Before you do anything else, verify that the new power supply is set to the correct input voltage. Some power supplies detect the input voltage and set themselves automatically, but some must be set manually. If your power supply is of the latter type, check the position of the slide switch to make sure it's set for the correct input voltage, as shown in Figure 16-11. Figure 16-11. Verify that the power supply is set for the proper input voltage 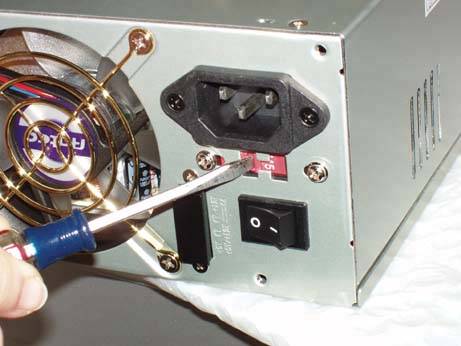
| AVOID FIREWORKS | If you connect a power supply set for 230V to a 115V receptacle, no harm is done. The system receives half the voltage it requires, and won't boot. But if you connect a power supply set for 115V to a 230V receptacle, the system receives twice the voltage it's designed to use, and is destroyed instantly in clouds of smoke and showers of sparks. |
Standard power supplies are secured with four screws. To remove a power supply, disconnect the AC supply cord, the motherboard power cable(s), and all device power cables. Use one hand to hold the power supply in place while removing the four screws that secure it, and then lift it straight out. Some power supplies use a locking tab and slot arrangement, so you may have to slide the power supply a short distance to clear the tab before lifting it out. To install a power supply, reverse that process. Slide the power supply into place, as shown in Figure 16-12, making sure that the locking tab, if present, mates with the slot. Figure 16-12. Slide the power supply into place 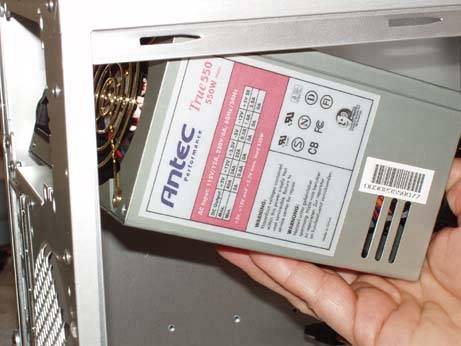
Once the power supply is in place, align the screw holes and insert the screws, as shown in Figure 16-13. If necessary, support the power supply with one hand while you insert screws with the other. Many good cases have a tray that supports the power supply, while other cases simply leave the power supply hanging in mid-air, secured only by the screws. In the latter situation, you may want to get someone to volunteer a second pair of hands to hold the power supply while you insert the screws, particularly if you're working in an awkward position. We've seen at least one motherboard destroyed by a dropped power supply, which ripped the processor, heatsink/fan, and socket right out of the motherboard on its way past. Figure 16-13. Secure the power supply with the four screws provided 
The next step in assembling the system is to connect the power cables from the power supply to the motherboard. The 20-pin or 24-pin main power connector is usually located near the right front edge of the motherboard. Locate the corresponding cable coming from the power supply. The main power connector is keyed, so verify that the cable is aligned properly before you attempt to seat it. Once everything is aligned, press down firmly until the connector seats, as shown in Figure 16-14. It may take significant pressure to seat the connector, and you should feel it snap into place. The locking tab on the side of the connector should snap into place over the corresponding nub on the socket. Make sure the connector seats fully. A partially seated main power connector may cause subtle problems that are very difficult to troubleshoot. All recent Intel systems and many AMD systems require the ATX12V +12V power connector. On most motherboards, the +12V power connector is located near the processor socket. Orient the cable connector properly relative to the motherboard connector, and press the cable connector into place until the plastic tab locks, as shown in Figure 16-15. Figure 16-14. Connect the Main ATX Power Connector 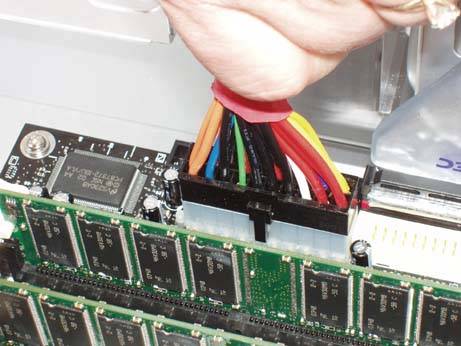
Figure 16-15. Connect the ATX12V Power Connector 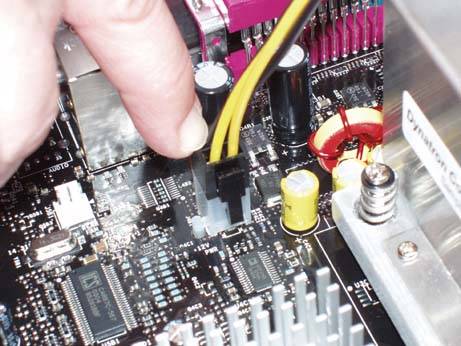
After you connect the motherboard power connectors, connect the power cables for the following items: Any supplementary power connectors present, such as the supplementary Molex connector on the motherboard, the PCI Express graphics power connector, the fan or supplementary power connector on your AGP video card, and so on All hard drives, optical drives, tape drives, floppy drives, and so on Any supplemental fans that connect to the power supply rather than to the motherboard
Once you've verified that everything is installed and connected correctly, dress the cables, reconnect the main power cable, and apply power to the system. 16.2.2. Troubleshooting power supplies Suspect a power supply problem if you experience any of the following symptoms, particularly in combination: Memory errors. Such errors may be caused by defective or poorly seated memory or by overheating, but insufficient or poorly regulated power from a failing or inadequate power supply is a likely cause. If a memory testing utility such as Memtest86 reports errors at a consistent address or range of addresses, the problem is probably the memory itself. If memory errors occur at random, nonreproducible addresses, the problem is most likely the power supply. Sporadic or regular boot failures. Obviously, such errors may be caused by hard drive, cable, or disk controller problems, but inadequate or poorly regulated power is also a common cause of this problem. Spontaneous reboots or system lockups during routine operations, especially during OS installations, that are not attributable to running a particular program. Numerous other factors can cause this problem, but one common cause is insufficient or poorly regulated power to the memory and/or processor. Lockups after you install a new processor, memory, drive, or expansion card. Driver issues aside, this problem commonly occurs when new components overload a marginal power supply. This problem is particularly likely to occur if you make dramatic changes to the system, such as replacing a slow processor with a fast, high-current processor or adding a high-current video card. The power supplies provided with commercial systems, particularly inexpensive ones, often have very little reserve.
In-depth power supply troubleshooting is impractical unless you have a well-equipped test bench. There are, however, a couple of things you can do to isolate the problem to the power supply:
Use the motherboard monitoring utility. -
Most motherboard makers provide a monitoring utility to track system temperatures, fan speeds, and power supply voltages. (Intel, for example, provides the Intel Active Monitor, shown in Figure 16-16.) Install and enable this utility and use it to keep an eye on voltages. Most monitoring utilities allow you to set threshold values. If a voltage drops below or climbs above the acceptable range, the monitoring utility generates an alert. Some monitoring utilities allow you to log data, which can be very helpful in troubleshooting power supply problems. Figure 16-16. Use the motherboard monitoring utility to watch voltages 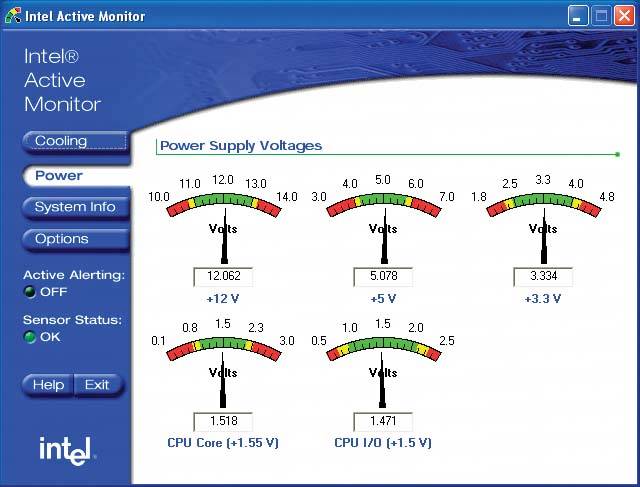
Swap the power supply for a known-good unit. -
If you have a spare known-good power supply or a second system with a compatible power supply, try installing the known-good unit temporarily. If the problems stop, it's likely that the original power supply is marginal or defective. | Advice from Brian Bilbrey | At home, I keep a new ATX12V Antec power supply on the shelf. That power supply is equivalent to the most powerful one currently in my collection of computers, and so can be used to replace any of them. Power supplies have moving parts to keep the system cool, and also have first exposure to any input power problems, so they are the single most likely component to fail. That invariably happens on Sunday night at 9:03 PM with a presentation due on Monday morning. Spares on hand are good. |
|