Hack 45. Dark Adapt Your Vehicle  
Keep the observing site dark by making your vehicle less of a beacon. Nowadays, even many dark-sky observing sites are plagued with light pollution from streetlights and other local sources. You can't do much about most of those local light sources other than use screens or move your scope to a shaded spot. But there is one common source of local light pollution you can do something about: your vehicle. Unmodified vehicles are astronomy-hostile. If you open a door, a bright light comes on. If you shift into reverse, a bright light comes on. If you step on the brake, a bright light comes on. Any of these is sufficient to destroy the dark adaptation of anyone nearby. (Yes, even the brake lights, which appear red but in fact have enough white light to destroy night vision.) Fortunately, it's cheap and easy to modify your vehicle to avoid these problems. Some astronomers take radical steps, such as replacing all of the interior incandescent lamps with red LED arrays and installing switches and cabling to control their brake and backup lights manually. We've heard of one guy who installed a single switch on his dash that toggles relays to switch his entire vehicle between "normal mode" and "astronomy mode"all interior lamps, including the dashboard lights, switch to red LED and all exterior lights are disabled. That's a bit much, even for us. Fortunately, you don't have to go to those lengths to make your vehicle astronomy-friendly. Here's what we recommend: Learn the location of your vehicle's fuse box and which fuses control which lights. When you arrive at a dark-sky observing site, pull the fuses for your backup lights and brake lights. That way, you can depart without ruining other observers' dark adaptation. If your vehicle turns on its headlights automatically when you start it, pull that fuse as well. (When you head home, don't forget to reinstall the fuses once you're a safe distance from the observing site.) Either turn off your interior lightsif necessary, pull their fusesor install red filters on them. We prefer to install red filters because we often work in or near our vehicle and it's convenient to have safe illumination inside.
There are several popular ways to filter the overhead and courtesy lights: Replace the bulbs with red LED or red-filtered incandescent bulbs. Crutchfield (http://www.crutchfield.com) and other car audio dealers sell these replacement bulbs in sizes to fit various vehicles. The LED models may be quite expensive, though$20 or more per bulband you'll need several to do the whole vehicle. Paint the bezels with red fingernail polish. Use the deepest red polish you can find, and apply several coats. The drawback to this method is that it's irreversible, at least without replacing all of the bezels. (And you won't believe how much those little pieces of plastic can cost. Our local Isuzu dealer quoted $47 for a replacement bezel for the overhead light in our Trooper.) Paint the bulbs with red fingernail polish, again using several coats of the deepest red polish you can find. The drawback to this method is that the bulbs become quite hot, and the red coating may blister and peel. Use Rubylith film or ruby-red theatrical gels [Hack #44]. This method may not work, depending on the physical configuration of your courtesy lights. If the bulb is recessed and the bezel mounts flat against a surface, clamp the ruby-red film between the bezel and the surface, sealing any gaps through which white light might escape. If the bulb is exposed, as is common for overhead lights, it's difficult to get the red film to conform to the shape of the bezel, and small gaps are likely. If the bulb is exposed or the bezel otherwise makes it difficult to seal all gaps with ruby-red film, use brake-light tape. You can buy a roll large enough to do your entire vehicle at any auto supply store for a couple of bucks. Simply apply the brake-light tape to the entire interior surface of the bezel, pressing the sticky side into place to conform to the shape of the bezel. Use more than one layer. Brake-light tape appears red, but actually transmits quite a bit of non-red light, which impairs dark adaptation. We've found that two or three layers is usually a good compromise between the amount of light transmitted and its color.
Figure 4-3 shows how we filtered the courtesy lights in our Isuzu Trooper. We applied one layer of brake-light tape first, pressing it down around the edges to make sure any gaps were covered. We then added a second layer, this one a small piece of ruby-red theatrical gel, to stop the non-red light passed by the brake-light tape. Figure 4-3. Installing red filtering on an interior light 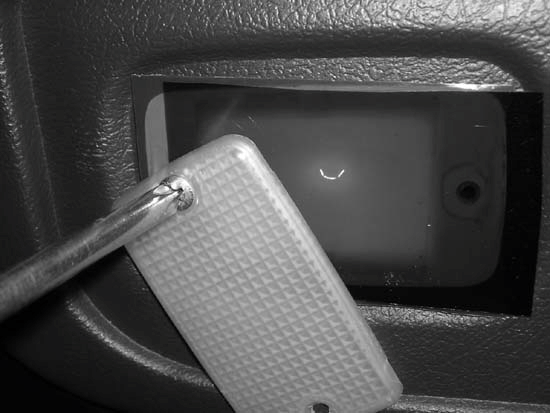
 | In Figure 4-3, it appears that the ruby-red film is skewed to the right, not covering some of the illuminated area at the left. In fact, once the bezel is screwed back into place, the second layer of film entirely covers the light emitting area. What's interesting is the bright vertical strip at the left, near the screw, where the light passes through only the brake-light tape. That additional brightness is due solely to the orange, yellow, and even green light being passed by the brake-light tape. The ruby-red film has a much sharper transmission cut-off, and stops that non-red light. |
|
|