Hack24.Slow Down, You Move Too Fast, You ve Got to Make the Evening Last
Hack 24. Slow Down, You Move Too Fast, You've Got to Make the Evening Last
Take a second look and some notes. But above all, take your time. Attention to detail can be learned, and here's where you'll learn it. There are two fundamental elements to visual observation of astronomical objects: the first is to locate the object, and the second is to observe it. Whether you use a telescope, a binocular, or the naked eye, the first is often so difficult for the beginning astronomer that little thought is given to the second. This is completely understandable and quite natural. Furthermore, you've probably been looking at things all your life and think you know a little about how to do it. Right? Well, then, you must have noticed the pattern of the paper on this page: the swirls, thick and thin patches, color variation, etc. If you have, then you can probably skip the rest of this hack, as that attention to detail is exactly what is required of you in observing astronomical objects. If you haven't, then, hopefully, you'll find here some useful tips on how to improve your observing eye. First, slow down! There are numerous tips for locating objects elsewhere in this book. For now, assume you've located a target. Now is the time to take a deep breath and relax. Leave the object in the field of view. If you have a scope with a drive, turn it on. If not, be sure you have an eyepiece with as wide a field of view as possible and keep the object close as you take a few minutes to recover from the task of finding the object. Have a drink of coffee or a quick bite. 2.15.1. Look It Over and Under, Up and DownNow that you've relaxed a bit from the task of finding the object, go back to the eyepiece and have a look. Study the object for a few minutes using the eyepiece with which you found it. This should be your lowest magnification, widest field of view eyepiece [Hack #48]. How many stars can you detect in the object? Immediately around it? If it is a galaxy or a nebula, how does the size and shape change as you go from direct vision to averted vision? Is the view different if you avert your vision to the right or left, up or down? If the object is a globular cluster, can you resolve stars across its face? Just on the outskirts? At all? The point is, ask yourself as many questions as you can think of about the detail you see. Are there patterns? Any striking shapes or colors? Transfer the image in the eyepiece into your eye. When you're satisfied with the image now in your mind, change eyepieces and go through your questions again. Do this for at least two different magnifications. I generally use three, depending on the object. The wide-field look with the eyepiece (80X) I use to find the object, and then I use a medium-magnification (150X or so for an 8-inch scope) and a high-magnification (250300X) view. Ifthe object is exceedingly small, I may skip the medium view; if it is large, or has very low surface brightness, I'll skip the high-magnification view. Also, if the object may benefit from a filterusually a planetary or emission nebula or a bright planettake a good long look both with and without the filter(s) [Hack #58]. Note how the view changes.
Remember to look at the whole object, get sort of a global picture, and then look at small details. This takes some practice. Viewed through a telescope, astronomical objects rarely have the bold visual impact of professional (or even good amateur) astrophotographs. There are a variety of reasons, but first and foremost is the fact that astronomical photographic exposures are longminutes to hourswhile the human eye can collect light only for a second or two. Thus, the photograph shows parts of objects that are very, very faint or even invisible when viewed through a telescope. 2.15.2. You'll See More with Your EyesBut there is a tradeoff, and it is one that makes visual observing still worth-while in an age of photography and electronic imaging. Photographs (film or electronic image) suffer from poor range. What makes it possible for a photograph to show very faint things well makes it very, very difficult for it to show two things in the same image that have very different brightnesses. The eye, on the other hand, has excellent range. Take M42, the Orion Nebula. If you've been involved in amateur astronomy for even a few weeks, you've seen photographs of M42, the pink nebula with wide arms that end in bluish or greenish tinted delicate curtains. But look at the center of the nebula in a photograph. It is a white blob. If you've seen M42 through a telescopeor a binoculareven once, you know there is no blob in the middle of M42. There is a beautiful multiple star, the Trapezium. These four jewels (along with a couple of other much fainter stars you may be able to see) sit in the "middle" of M42. Through a small telescope with a field of view on the order of a degree or so, you can see this nebula looking very much like it does in photographs. There are two key differences:
In photographs that show the Trapezium, not enough light from the nebula hits the film (or chip) to register an image. In photographs that show the nebula, the Trapezium is very overexposed and appears as a blob, as shown in Figure 2-25. The photographs are impressive, and many new observers are disappointed by the view through a scope; howeve, for my money, the subtlety and delicacy of the visual image is much more beautiful than photographs. You simply have to take your time and see the whole picture along with the details. Figure 2-26 is my sketch of M42 and the Trapezium, done at 290X with my 8" SCT and a 7mm Nagler eyepiece, showing full detail in both objects. (The field of view in the sketch is much smaller than that of the photograph, so the sketch shows only a small portion of the nebula, with the Trapezium group of stars centered.) Most objects you'll want to observe have the same dual nature: one photographic identity and one visual. While the photographic image is bolder (brighter, more stars, etc.), the visual image reveals numerous features that are absent in the photograph. If you're prepared for the visual image to be less boldly impressive, you've taken the first step in appreciating the subtle image you'll see at the eyepiece. 2.15.3. New Ways of SeeingEven so, you'll likely need time to learn to see the way experienced amateur astronomers see. Fortunately, there are a few things you can do to speed the learning process along. First, you can practice your observing skills away from the eyepiece. You can use a variety of items as a stand-in for a faint galaxy. Among the items I've heard of being used in this way are eggs, white paper, walls, ceilings, rocks, and carpet. Carpet? Well, you get the idea. Anything that at a glance looks to be featureless but that has subtle texture, color variation, or a hard-to-discern pattern provides a chance to work on your observing skill. I'll often do this while waiting at doctor's offices or for a meeting to start; pick a wall and try to find the texture and the patterns. Figure 2-25. A photograph of M42 shows detail in the nebula, but the Trapezium is burned out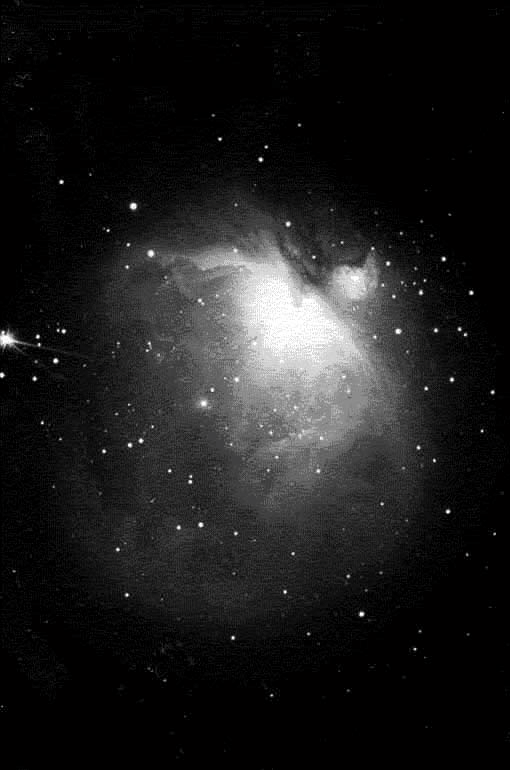 Figure 2-26. A sketch of M42 shows full detail in both the Trapeziumand the nebula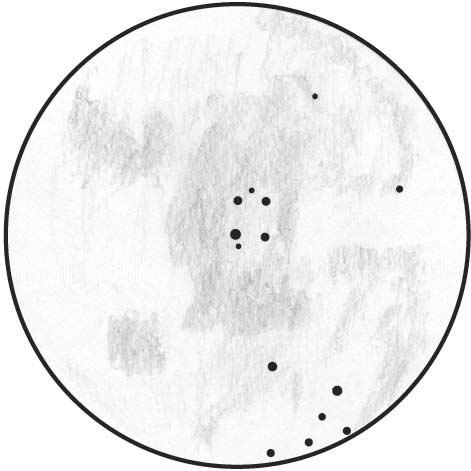 You'll be surprised how different a plain, white wall will look after you've studied it for a few minutesand how much easier these patterns appear after you've done this a few times. The second thing you can do to increase your observing skill is to sketch objects. At first, I was intimidated by the idea of sketching until I realized that the point wasn't to produce beautiful pictures but to help me see better. If you're worried about producing poor drawings, don't worry, you will. But you have two things going for you: one, you work in the dark and you don't have to show anyone your work; and two, you'll get better quickly. Equip yourself with the following items:
You can use any old pen and paper, but I recommend going all out. Foronly 10 dollars or so, you can buy a proper sketchbook and a set of pencils. I use a set of 24 ranging from very fine to very dark. Using a bound book gives both better paper and a more hardy housing for your work. These tools will let you produce nice drawings that you can refer to in the future. Before you begin, you should prepare a number of circles on each page. These circles will represent the field of view. Don't make them too big or small. You'll need enough room to draw sufficient detail, but making your drawings too big can make it hard to accurately represent the proportions in the object. I make mine with a compass, and they're about three inches in diameter. Figures 2-27, 2-28, and 2-29 show my sketches of Mars, the galaxy M82, and the Trifid Nebula (M20), respectively. Figure 2-27. A sketch of Mars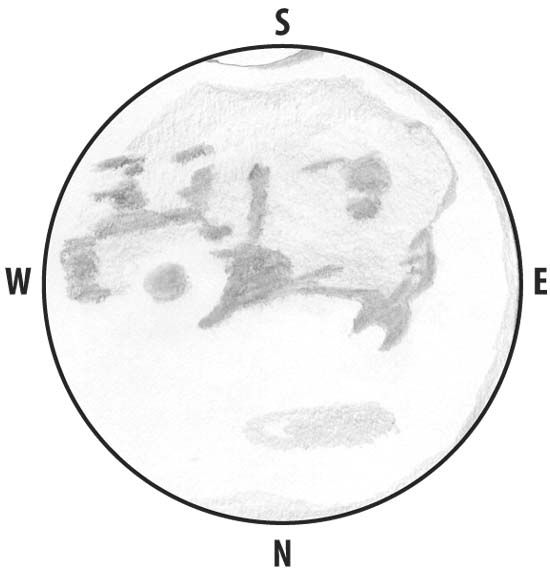 Figure 2-28. A sketch of the galaxy M82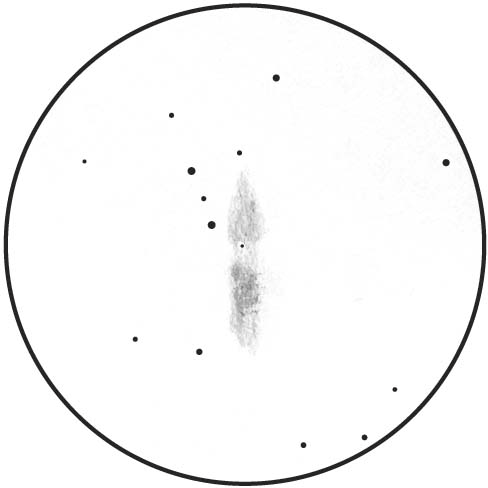 Figure 2-29. A sketch of the Trifid Nebula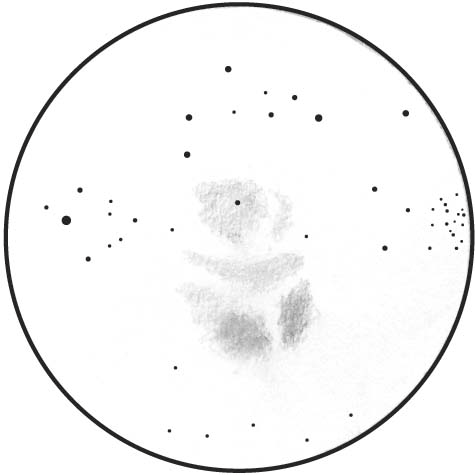 After you've set up your equipment (telescope, binocular, etc.), note the date, conditions, and observing site location as you would anytime you log an object. Generally, when I sketch an object, I go through the sequence of eyepieces and filters described previously. I may take a few notes, and I keep in mind the best magnification to show detail and yet properly frame the object. When I feel comfortable with my mental image of the object, I begin by drawing the field stars paying special attention to spacing and relative brightness. Depending on the field, I may draw all of the stars or just a few of the brighter ones. In any case, these stars will serve as a guide for the sketch of the object itself.
Once the field stars are drawn (really, they're just dots, bigger or smaller to represent brightness), I begin drawing the object itself. This is an iterative process: look through the eyepiece, sketch, compare, look, sketch, compare. Actual drawing techniques are described better elsewhere and by others. Remember not to hold the pencil too tightly. Use your finger to smudge the object to soften the image. Don't erase too much (or at all, if possible). Use only a red light to look at the page on which you work. Again, keep in mind that the real point isn't a beautiful rendering of the object, but rather training your eye to see better. It is the iterative process that is the key to this. Keep going back and forth from eyepiece to paper to eyepiece until your drawing contains all of the subtle details you can see. Look for new details each time and also be sure to confirm old observations (old being anywhere from a minute ago to years ago). Always be on the lookout for a new "angle" on an old object.
You can, and probably should, also practice drawing daytime objects. I've practiced on trees, leaves, eggs, and my driveway. These exercises make for good practice at both drawing and seeing. It won't take long before you'll notice that your drawings actually look good. If you wouldn't be ashamed of the sketches you see here, consider that I've only been at this for a couple of years and that I nearly didn't make it out of first grade because I couldn't, and I suppose still can't, fingerpaint. At this point, it is worth considering observing styles. Observing sessions range from a Messier Marathon [Hack #30], which involves only finding objects with no attention to the object itself, to spending an entire hours-long session on a single object. Your observing style is which you most prefer and most favor. I've done both and you may, too. I generally prefer a session closer to the latter scenario, and I have good friends who prefer sessions closer to the former. What is most important is that you decide what type of session fills your observing needs and keeps bringing you back. There is no right or wrong way to enjoy the night sky. In any case, you'll probably find that engaging in one type of session makes you better able to accomplish and appreciate the other. And, if you wind up with a beautiful piece of art in the form of a sketch, so much the better. Dr. Paul B. Jones |
EAN: 2147483647
Pages: 112
- An Emerging Strategy for E-Business IT Governance
- A View on Knowledge Management: Utilizing a Balanced Scorecard Methodology for Analyzing Knowledge Metrics
- Measuring ROI in E-Commerce Applications: Analysis to Action
- Governing Information Technology Through COBIT
- Governance Structures for IT in the Health Care Industry
