Compiling from Source
Back in the old days of Unix, the only way to install software was from source code. This was because most people edited the source code themselves, or at least liked to have the option of doing so. Nowadays, innovations such as RPMs make life easier, but knowing how to compile a source file is a vital Linux skill to have. In some cases, it's your only option for installing a certain program.
| Note | For what it's worth, a program compiled on your own system will be faster than one compiled by a third-party for general users. However, whether this speed boost is noticeable is open for debate. |
Before you can compile from source, you usually need two specific pieces of system software: the make program and the development (also referred to as devel) versions of any libraries you might need to run the application you want to install.
| Note | If you selected the C++ Compiler and Tools options during initial installation, you'll already have the make program. |
Getting the Make Program and Devel Libraries
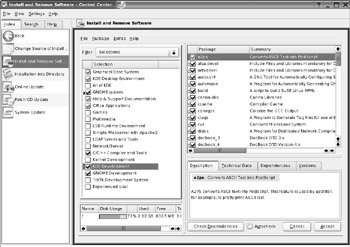
Getting the make program is best done via YaST2's software installation facility. Select K menu ® Control Center, click YaST Modules, click the Software icon, and then click Install and Remove Software. In the Filter drop-down list at the top of the screen, choose Selections. Then make sure there's a check in the C++ Compiler and Tools entry in the list on the left side of the screen, as shown in Figure 29-8. Then click the Accept button in the bottom right to install the software.

Figure 29-8. To compile software, you'll need the C++ package set, as well as development versions of various software.
The requirement of installing devel versions of libraries is a little more difficult to meet. For example, if you intend to compile from source a program that relies on components of KDE (or the QT libraries, which KDE itself relies on), you can select the KDE Development option in the YaST2 Install and Remove Software screen.
However, you won't really know which libraries a program installation routine requires until you see an error message pointing out they're not present! Generally speaking, however, selecting both the KDE and GNOME devel package options within YaST2 (as shown in Figure 29-8) is a good idea if you intend to compile any kind of Linux software from source, because it will invariably depend on one or the other.
Compiling and Installing a Program
Once you have the necessary system software, compiling a program is actually easier than you might think. In most cases, the programmer generates scripts that check your system and then creates a file specifically built to facilitate installation of the program on your system. In fact, in most cases, you can install a program by issuing three simple commands in sequence:
./configure make make install
In some cases, the programmer might also create a few brief text files outlining any specific options you might need to specify as command options with the ./configure command, or anything else you should bear in mind. This information will most likely be included in text files named README and INSTALL.
As an example, we'll walk through installing an application from source. For demonstration purposes, I've chosen the KTag program, which is a prototype application designed to allow the easy editing of MP3 music artist and track information. At the time of writing, it's just reached version 0.5 and isn't yet included in the SUSE Linux default installation. The program's home page is integrated into the main KDE page at www.kde.org.
Decompressing the File
Once the program has downloaded, you end up with a file called Ktag-0.5.tar.bz2. You can see immediately that this is a tarball archive that has been compressed with bzip2, because it has a .tar.bz2 file extension. Therefore, the first step is to decompress it with the following command:
tar -zxf Ktag-0.5.tar.bz2
I'll explain how the tar command works in the Chapter 32, which covers backup.
Checking the README and INSTALL Files
Decompressing the file creates a folder called Ktag-0.5. We switch into it and have a look around. In particular, we take a look at the README and INSTALL files to see if there's any specific advice. It turns out there isn't in this case, although some programs sometimes suggest you specify which operating system you're using as a command option when using the ./configure command (keep in mind that the open-source nature of software used on Linux means it can also be installed on other versions of Unix, so this is often necessary).
Running configure
Because no special treatment is necessary, we press ahead with the first command, which can be run as an ordinary user:
./configure
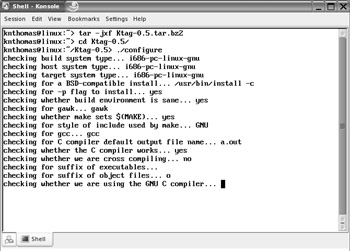
This will quickly fill the console window with line after line of text as the configure script checks your system for compatibility, as shown in Figure 29-9. If it runs into a problem, such as a missing library file, you'll be told about it there and then. If such an error arises, you're back to the dependency problems, as described previously. You must then track down the specified dependencies. There's no need to install these from source. You can find and use an RPM file if that's most convenient.

Figure 29-9. The ./configure command will test your system for compatibility, so keep an eye on the output.
If the configure script complains that it's missing a certain library file, you should install not only the library itself, but the additional version of the library marked devel. You can track down the devel file using YaST2, just like the standard version of the program.
| Note | Be aware that the configure script is very thorough and checks for components that the program you're trying to install might not even need. Because of this, you shouldn't worry if, as the text scrolls past, you see that various components are missing. Unless configure complains about it, it's not a problem. |
If the configure script finds no problems, then you might not be informed of your good fortune. It will simply finish with a handful of lines mentioning that a make file has been created. This is what's needed for the next stage: compiling the program itself.
Compiling the Program
To compile the program, use the following command, again as an ordinary user:
make
Once again, the screen will rapidly fill with text, although this time there's no need to pay attention. This is merely the output of the compiler and doesn't mean much to anyone other than programmers. Depending on the complexity of the program and its size, this stage can take a long time to complete.
When it's finished, you once again won't be told much, unless something has gone wrong. Unless you're specifically informed of a failure, you should assume that everything has worked fine.
Installing the Program Files
The last command must be issued as root user because it copies the files to the various locations on the hard disk where they're going to reside:
su <enter root password> make install
This step should be finished relatively quickly and, again assuming that you don't receive an error message, you should find the program is installed and ready for use.
It's unlikely that compiling a program from source will undertake any user-friendly niceties such as creating a K menu entry. You'll need to do this by hand. To run the program, you can simply type its name from a shell prompt.
EAN: 2147483647
Pages: 293