Network Configuration
|
To communicate with other computers, your computer needs a network connection. Computers connect to networks by having the operating system recognize a network interface adapter (such as Ethernet) or other hardware (such as a dial-up modem).
The Network Administration Tool comes with Red Hat Linux and can be used to configure your network interface. To use the Network Administration Tool, you must be running the X Window System and have root privileges. To start the application, click the Main Menu Button and choose System Settings > Network (or type the command redhat-config-network at a shell prompt).
If you prefer modifying the configuration files directly, refer to the Official Red Hat Linux Administrator’s Guide for information on their location and contents.
| Tip | Visit the Red Hat Hardware Compatibility List at http://hardware.redhat.com/hcl/ to determine if Red Hat Linux supports your hardware device. |
Overview of Configuring a Network Connection
To configure a network connection with the Network Administration Tool, perform the following steps:
-
Add the physical hardware device to the hardware list.
-
Add a network device associated with the physical hardware device.
-
Configure any hosts that cannot be looked up through DNS.
-
Configure the hostname and DNS settings.
This chapter will discuss each of these steps for each of the following types of network connections:
-
Modem Connection — A modem connection uses a modem to establish a connection to the Internet. Digital data is modulated into analog signals and sent over phone lines. To configure this type of connection, see the “Establishing a Modem Connection” section later in this chapter for more information.
-
xDSL Connection — An xDSL (Digital Subscriber Line) connection uses high-speed transmissions through telephone lines. There are different types of DSL such as ADSL, IDSL, and SDSL. The term xDSL means any type of DSL connection. See the “Establishing an xDSL Connection” later in this chapter for more information.
-
Cable Modem Connection — A cable modem connection uses the same coaxial cable that your TV cable travels on to transmit data. Most cable Internet providers require you to install an Ethernet card (or other Ethernet adapter, such as a USB adapter) in your computer that connects to the cable modem. Then, the cable modem connects to the coaxial cable and to your Ethernet card. The Ethernet card is usually required to be configured for DHCP. See the "Establishing an Ethernet Connection" section for more information on setting up your Ethernet card.
-
Wireless Connection — If you are connecting your Red Hat Linux computer to a wireless access point (WAP) or peer-to- peer (also called ad-hoc) network with a wireless (802.11x) network card, then you will need to configure your wireless device. See the “Establishing a Wireless Connection” section later in this chapter for more information.
Establishing an Ethernet Connection
To establish an Ethernet connection (such as for a cable modem or DSL connections), you need a network interface card (NIC), a network cable (usually a CAT5 cable), and a network to connect to. There are different speeds to networks; make sure your NIC is compatible with the network to which you want to connect.
To add an Ethernet connection, start the Network Administration Tool and follow these steps:
-
Click the Devices tab.
-
Click the Add button.
-
Select Ethernet connection from the Device Type list, and click Forward.
-
If you have already added the network interface card to the hardware list, select it from the Ethernet card list. Otherwise, select Other Ethernet Card to add the hardware device.
Note The installation program usually detects supported Ethernet devices and prompts you to configure them. If you configured any Ethernet devices during the installation, they will already appear in the hardware list on the Hardware tab.
-
If you selected Other Ethernet Card, the Select Ethernet Adapter window appears. Select the manufacturer and model of the Ethernet card. Select the device name. If this is the system's first Ethernet card, select eth0 as the device name, if this is the second Ethernet card, select eth1, and so on. The Network Administration Tool also allows you to configure the resources for the NIC. Click Forward to continue.
-
On the Configure Network Settings page (shown in Figure 12-1), choose between DHCP and a static IP address. If the device receives a different IP address each time the network is started, do not specify a hostname. Click Forward to continue.
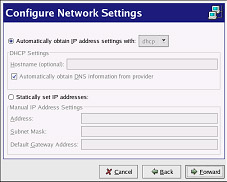
Figure 12-1. Ethernet Settings -
Click Apply on the Create Ethernet Device page to save the changes.
After configuring the Ethernet device, it appears in the device list.
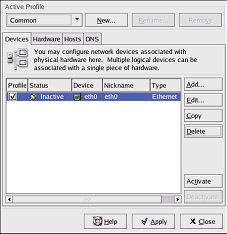
Figure 12-2. Ethernet Device
After adding the Ethernet device, you can edit its configuration by selecting the device from the device list and clicking Edit. For example, when the device is added, it is configured to start at boot time by default. You can edit its configuration to modify this setting.
When the device is added, it is not activated, as seen by its Inactive status. To activate the device, select it from the device list and click the Activate button.
Establishing a Modem Connection
A modem can be used to configure a dial-up Internet connection over an active phone line. An Internet Service Provider (ISP) account (also called a dial-up account) is required. To add a modem connection, start the Network Administration Tool and follow these steps:
-
Click the Devices tab.
-
Click the Add button.
-
Select Modem connection from the Device Type list and click Forward.
-
If there is a modem already configured in the hardware list (on the Hardware tab), the Network Administration Tool assumes you want to use it to establish a modem connection. If there is not a modem already configured, it tries to detect any modems in the system. This probe might take a while. After probing, the window shown in Figure 12-3 appears.
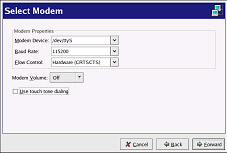
Figure 12-3. Modem Settings -
Configure the baud rate, flow control, and modem volume. If you do not know these values, accept the defaults. If you do not have touch tone dialing, uncheck the corresponding checkbox.
-
Click Forward.
-
If your ISP is in the pre-configured list, select it. Otherwise, enter the required information about your ISP account. If you do not know the values, contact your ISP.
-
Click Forward.
-
On the Create Dialup Connection page, click Apply to save the changes.
After configuring the modem device, it appears in the device list as shown in Figure 12-4.

Figure 12-4. Modem Device
After adding the modem device, you can edit its configuration by selecting the device from the device list and clicking Edit. For example, when the device is added, it is configured not to start at boot time by default. Edit its configuration to modify this setting. Compression, PPP options, login name, password, and more can also be changed.
When the device is added, it is not activated, as seen by its Inactive status. To activate the device, select it from the device list, and click the Activate button.
Establishing an xDSL Connection
DSL stands for Digital Subscriber Lines. There are different types of DSL such as ADSL, IDSL, and SDSL. The Network Administration Tool uses the term xDSL to mean all types of DSL connections.
Some DSL providers require you to configure your system to obtain an IP address through DHCP with an Ethernet card. If you are required to use DHCP, refer to the “Establishing an Ethernet Connection” section earlier in this chapter to configure your Ethernet card.
Some DSL providers require you to configure a PPPoE (Point-to-Point Protocol over Ethernet) connection with an Ethernet card. If you must supply a username and password to connect, you are probably using PPPoE. Ask your DSL provider which method to use.
If you are required to use PPPoE, start the Network Administration Tool and follow these steps:
-
Click the Devices tab.
-
Click the Add button.
-
Select xDSL connection from the Device Type list and click Forward.
-
If your Ethernet card is already in the hardware list, select the Ethernet Device from the pull-down menu on the page shown in Figure 12-5. Otherwise, the Select Ethernet Adapter window appears.
Note The installation program usually detects supported Ethernet devices and prompts you to configure them. If you configured any Ethernet devices during the installation, they will already appear in the hardware list on the Hardware tab.
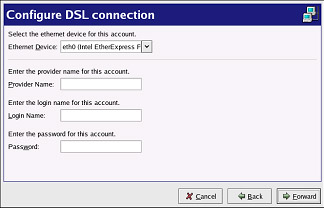
Figure 12-5. Configuring a DSL Connection -
If the Select Ethernet Adapter window appears, select the manufacturer and model of the Ethernet card. Select the device name. If this is the system's first Ethernet card, select eth0 as the device name, if this is the second Ethernet card, select eth1, and so on. The Network Administration Tool also allows you to configure the resources for the NIC. Click Forward to continue.
-
Enter the Provider Name, Login Name, and Password.
-
Click Forward.
-
On the Create DSL Connection page, click Apply to save your changes.
After configuring the DSL connect, it appears in the device list, as shown in Figure 12-6.
After adding the xDSL connection, you can edit its configuration by selecting the device from the device list and clicking Edit. For example, when the device is added, it is configured not to start at boot time by default. Edit its configuration to modify this setting.
When the device is added, it is not activated, as seen by its Inactive status. To activate the device, select it from the device list, and click the Activate button.
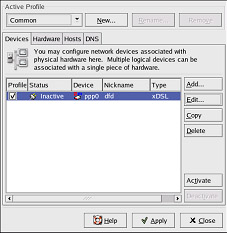
Figure 12-6. Viewing a New xDSL Device
Establishing a Wireless Connection
Wireless Ethernet devices are becoming increasingly popular, especially with broadband connections such as xDSL and cable modems. The configuration for a wireless connection is similar to the Ethernet configuration except that it allows you to configure SSID, mode, frequency, channel, transmit rate, and key for your wireless device.
To add a wireless Ethernet connection, start the Network Administration Tool and follow these steps:
-
Click the Devices tab.
-
Click the Add button.
-
Select Wireless connection from the Device Type list and click Forward.
-
If you have already added the wireless network interface card to the hardware list, select it from the Ethernet card list. Otherwise, select Other Ethernet Card to add the hardware device.
Note The installation program usually detects supported wireless Ethernet devices and prompts you to configure them. If you configured them during the installation program, they will already appear in the hardware list on the Hardware tab.
-
If you selected Other Ethernet Card, the Select Ethernet Adapter window appears. Select the manufacturer and model of the Ethernet card and the device. If this is the first Ethernet card for the system, select eth0, if this is the second Ethernet card for the system, select eth1, and so on. The Network Administration Tool also allows the user to configure the resources for the wireless network interface card. Click Forward to continue.
-
On the Configure Wireless Connection page, configure the ESSID, mode, frequency, channel, transmit rate, and key for your wireless device.
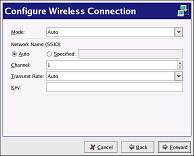
Figure 12-7. Wireless Settings -
On the Configure Network Settings page, choose between DHCP and static IP address. You may specify a hostname for the device. If the device receives a dynamic IP address each time the network is started, do not specify a hostname. Click Forward to continue.
-
Click Apply on the Create Wireless Device page to save your changes.
After configuring the wireless device, it appears in the device list as shown in Figure 12-8.
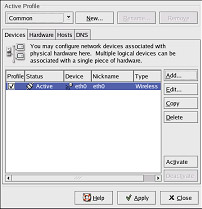
Figure 12-8. Wireless Device
After adding the wireless device, you can edit its configuration by selecting the device from the device list and clicking Edit. For example, you can configure the device to activate at boot time.
When the device is added, it is not activated, as seen by its Inactive status. To activate the device, select it from the device list, and click the Activate button.
|
EAN: N/A
Pages: 223