Structures
|
Structures (structs) provide a way to create the compound data or record types that you might have come across in other programming languages. Like classes, structures can contain member functions, data members, properties, delegates, and events, but there’s one important difference: structures are value types, not reference types. Therefore, if you have a value type that needs to have some internal structure, such as a point with X and Y coordinates, you can implement it using a struct. The following exercise shows how to create a structure representing a point, how to create instances of the structure, and how to use the instances in code.
| Note | Both traditional and managed C++ use the struct keyword to define structures. This chapter discusses the use of .NET (managed) structs rather than the traditional struct. Declaring .NET structures has the advantage of working within the .NET world and also allows you to exchange structures with other .NET languages. |
Creating and Using a Simple Struct
-
Start Microsoft Visual Studio .NET, and create a new Visual C++ Console Application (.NET) project named Structs.
-
At the top of the
 Structs.cpp file, immediately under using namespace System;, add the following structure definition:
// The Point structure definition __value struct Point { public: int x, y; };The __value and struct keywords start a structure definition, and you’ll notice that structures look very similar to classes in the way they are defined. The body of the structure is enclosed in braces and finishes with a semicolon, and the public and private keywords are used to set the access level for structure members.
Notice the use of the __value keyword here. This keyword tells the compiler that this is a value type and not a traditional C++ structure. It’s important that you remember to use __value when defining your structures.
This simple structure represents a point on a graph, so it has two integer data members representing the X and Y coordinates.
-
To create and initialize a Point object, add the following lines to the _tmain function of your application:
// Create a Point Point p1; // Initialize its members p1.x = 10; p1.y = 20;
Notice that the code doesn’t use the new operator. The new operator is used to create references to objects, and value types aren’t accessed by reference. Instead, a Point has been created on the program stack, and you access it directly as p1. Because the data members are public at this point, you can access them using the familiar dot notation.
-
Add two lines to print out the value of one of the struct members, like this:
Console::Write(S"p1.x is "); Console::WriteLine(p1.x);
If you compile and run the program at this point, you should see the output p1.x is 10.
Investigating the Structure
In this exercise, you will run the program under control of the debugger so that you can look at the structure of the value type you have created.
-
If you closed the Structs project, open it again and open the source file.
-
Insert a debug breakpoint by clicking in the gray border to the left of the code. Click next to the declaration of p1. A red dot appears in the border.
-
Start the debugging session by pressing F5.
Once the program has loaded, it will execute and stop at the breakpoint. You can now use the Locals window at the bottom of the screen to look at the structure of the Point type.
-
If the Locals window isn’t displayed in debug mode, display it by pressing Ctrl+Alt+V followed by L.
You should see an entry for the variable p1. Any type that has internal structure—such as Point—will have a plus sign (+) to the left of the variable name.
-
Click on the plus sign to expand the structure. You’ll see a display similar to the one shown in the following figure.
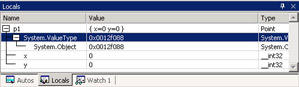
You can see that p1 has three entries under it. The first shows that it’s derived from System::ValueType, which is in turn derived from System::Object. The other two are the x and y members, which are both 32-bit integers. At this point in time, they haven’t been given an initial value, so they both contain 0.
-
Press F10 three times to initialize p1 and execute the next two assignment statements.
This action will result in p1 being initialized, and you will see the values of x and y change to 10 and 20, respectively. The values also change from black to red in the Locals window, showing that they were changed in the previous execution step.
-
Continue pressing F10 to single-step through the code, examining the changes that occur to p1. When you’re done, click the Stop Debugging button on the toolbar (a blue square) or press Shift+F5.
Differences Between Structures and Classes
Structures and classes have several fundamental differences:
-
You can’t initialize members in a structure definition. If you need to provide initialization for a structure type, you have to provide a constructor.
-
Structures can’t have finalizers because they aren’t garbage collected.
-
Inheritance isn’t applicable to structs, so they can’t inherit from anything else and can’t be used as a base class.
-
Structs can implement interfaces.
Implementing Constructors for a Struct
In this next exercise, you will add a constructor to the Point struct so that instances can be initialized on creation.
-
Continue using the project from the previous exercise.
-
Add the following two lines immediately after the public declaration in your Point structure definition:
Point() { x = 0; y = 0; } Point(int xVal, int yVal) { x = xVal; y = yVal; }The first constructor takes no arguments and simply sets both data members to 0. A constructor that takes no arguments is called a default constructor. The second constructor takes two int values and uses them to initialize the x and y data members. In this case, the arguments are simply being copied into the data members, but it would be simple to add some checking to ensure that the data passed in is correct.
Note Anyone who has used C++ before will be familiar with the use of default arguments on constructors. You can’t use default arguments on managed types in Visual C++, so you need to provide an explicit default constructor.
-
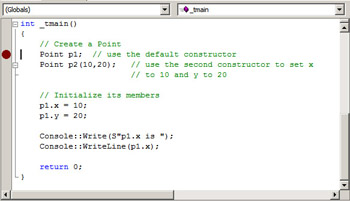
You can now add extra code to your _tmain function to create
initialized Points.Point p1; // use the default constructor Point p2(10,20); // use the second constructor to set x // to 10 and y to 20
Using One Struct Inside Another
It’s possible—and often useful—to use one struct inside another. Imagine that you have a structure named Person for describing a person. The structure contains the name and date of birth, among other data. You could use separate fields for each item, but you could also make the date entries into another struct and refer to it inside Person. Here’s an example:
// A Date structure containing day, month and year __value struct Date { int dd, mm, yyyy; }; // A Person structure containing a Date member __value struct Person { String* name; Date DOB; }; You can see how the Date structure contains three members representing the day, month, and year. This structure is quite general, so you could use it in other programs. The Person structure contains a String reference to hold the name and a Date object to hold the date of birth.
In this exercise, you will use these two classes to investigate how structure data members work.
-
Start Visual Studio .NET, and open a new Visual C++ Console Application (.NET) project named Person.
-
At the top of the file, immediately under using namespace System;, add the previous structure definitions for Date and Person.
-
In the main function, create a Person object. Remember that you don’t use new because structures are value types.
// Create a Person Person p1;
-
Fill in the values for the fields.
// Fill in the name p1.name = "Fred"; p1.DOB.dd = 10; p1.DOB.mm = 3; p1.DOB.yyyy = 1960;
Notice how structure data members are accessed. Because the DOB member has members of its own, you simply extend the dot notation to another level to access its members. You can continue this nesting to as many levels as you like, although it is unusual to go much deeper than you’ve done here.
-
You can also initialize all the members of Person in one line. Remove the four initialization lines you entered in Step 4, and then amend the line where you create Person:
Person p1 = {"Fred", {10, 3, 1960}};Can you see what is going on here? The data in the braces—called an aggregate initializer—provides data for the initialization of the struct. The Person struct contains two items, a String and a Date. Therefore, there are two items in the list. Because Date has members of its own, its entries are also enclosed in braces.
Note Use of an aggregate initializer is an alternative to using a constructor and can be useful where there’s no checking to be done on the data.
-
If you decide that the date of birth is wrong, you can simply create a new Date and copy it into the Person object. Try this:
// Create a new Date Date newDOB = {1, 4, 1955}; p1.DOB = newDOB;The new Date takes the values specified in the initializer, and it is then copied into the Person object, overwriting the values in the Date already there.
-
You can see the structure of the Person struct by running the program under control of the debugger. Place a breakpoint in the program at the line where p1 is created by clicking in the gray margin to the left of the code. You should see a red dot appear, marking an active breakpoint.
-
Start the program by pressing F5. Once the program has loaded, it will execute and stop at the breakpoint. You can now use the Locals window at the bottom of the screen to look at the structure of the Person type.
-
If the Locals window isn’t being displayed in debug mode, display it by pressing Ctrl+Alt+V followed by L.
-
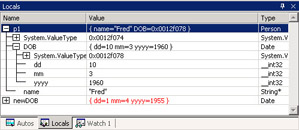
Click the plus sign to the left of p1 in the Locals window to expand the structure of Person. You’ll see that it has name and DOB members, and if you click the plus sign to the left of DOB, you can expand its structure as well.
-
Press F10 to step through the code until all the members are initialized. You will see the members of p1 displayed in red as each value changes.
-
When you’ve finished, press Shift+F5 to stop debugging or click the Stop Debugging button on the toolbar.
Finally, let’s consider nested structure definitions. If you don’t want to use the Date struct anywhere except inside your Person structure, you can define the Date structure inside the Person structure, as shown here:
// A Person structure containing a Date structure __value struct Person { String* name; __value struct Date { int dd, mm, yyyy; }; Date DOB; }; You create Person variables and access their members exactly the same as before. The big difference is that the Date structure is now a part of Person, so you can’t create Date variables on their own.
Copying Structs
Because structs are value types, copying them makes a copy of the values they contain. Contrast this behavior with classes, where copying objects results in references being copied.
Person p1; Person p2; ... p2 = p1; // p1’s data is copied into p2 MyClass m1; MyClass m2; ... m2 = m1; // m2 and m1 now refer to the same object. // No data is copied.
| Note | You can’t use a __gc reference type as a member of a struct because structs aren’t garbage collected; a reference member would have to take part in garbage collection. |
|
EAN: N/A
Pages: 208