Defining Your Own Attributes
|
As you’ll see in this section, you can easily define custom attributes and use them in your projects. Custom attributes are quite simple to write because an attribute’s parameters are simply represented by a class with properties and methods. For example, suppose you had the following attribute attached to a class designed to control the generation of logging information at run time:
[LogAttribute("myfile.log", type=LogAttribute::AllMethods)] __gc class MyClass... The attribute has two parameters, one for the log file name and a second that determines the level of logging. The attribute is represented by a class called LogAttribute whose members contain the file name and type information. Information about the attribute class is included with the metadata for MyClass, and a LogAttribute object can be queried at run time to retrieve its parameters. You’ll see how to query attributes in code in the final section of this chapter.
You can use any .NET class to represent an attribute, but you’ll tend to use a class that derives from the System::Attribute base class because it will give you a number of convenient methods.
Attributes can be used at all levels in .NET, so you can apply them to whole assemblies, to .NET types, or to individual methods and properties within types. An attribute usually isn’t applicable at all levels, so there needs to be some way to restrict the items to which an attribute can be attached.
The AttributeUsage attribute, represented by the System::AttributeUsageAttribute class, is a meta-attribute: an attribute that is applied to attributes. You attach an AttributeUsageAttribute to the class that implements an attribute to indicate where it can be used. Here’s an example:
[AttributeUsage(AttributeTargets::Method)]
This attribute would be attached to an attribute class to show that it can be used only on methods. The following table lists the members of the AttributeTargets enumeration that control where attributes are valid.
| Member | This attribute can be applied to . . . |
|---|---|
| All | Any element |
| Assembly | An assembly |
| Class | A class |
| Constructor | A type constructor |
| Delegate | A delegate |
| Enum | An enumeration |
| Event | An event |
| Field | A field |
| Interface | An interface |
| Method | A method |
| Module | A PE (Portable Executable) module |
| Parameter | A parameter |
| Property | A property |
| ReturnValue | A return value |
| Struct | A struct, for example, a value type |
If you want to specify more than one target, you can combine two or more members together with the bitwise OR operator (|), as you’ll see in the next exercise.
Attribute Class Properties
Although some attributes can be used without parameters, most will specify at least one. Attribute parameters fall into two groups:
-
Positional parameters, which are identified simply by their position in the parameter list
-
Named parameters, which are specified as a name/value pair
Consider the example of a custom attribute such as the one offered at the beginning of the “Defining Your Own Attributes” section:
[LogAttribute("myfile.log", type=LogAttribute::AllMethods)] This attribute has one positional parameter and one named parameter called type. Positional parameters always appear before named parameters, are specified in a fixed order, and are passed to the class constructor. Named parameters are implemented as properties in the attribute class.
Design Criteria for Attribute Classes
Before moving on to the exercise, here are a few design criteria you should bear in mind when you write a custom attribute class:
-
Always add “Attribute” to the class name for an attribute (for example, call a class DocumentationAttribute rather than Documentation).
-
Use positional arguments for required parameters.
-
Use named arguments for optional parameters.
-
Provide a read-only property for each positional argument.
-
Provide a read/write property for each named argument. Be sure the name of the property differs in case from that of the argument (for example, for an argument called type, provide a property called Type).
Writing a Custom Attribute
This exercise will show you how to create a custom attribute that can be used to document methods and properties. In the next section, you’ll see how to write code that makes use of this attribute.
-
Create a new Visual C++ Class Library (.NET) project and call it CustomAtt. The custom attribute needs to be created as a DLL so that it can be used in other projects.
-
Open the
 CustomAtt.h header file, and edit the skeleton class as follows:
namespace CustomAtt { [AttributeUsageAttribute(AttributeTargets::Method | AttributeTargets::Property)] public __gc class DocumentationAttribute { }; }Our class is called DocumentationAttribute; the name follows the convention of having the class name for an attribute end with “Attribute.” The class is tagged with an AttributeUsageAttribute that limits its use to class methods and properties. Note how you can use more than one member of the AttributeTargets enumeration by combining them with the bitwise OR operator. This class doesn’t inherit from System::Attribute because we don’t need any of the features it provides.
-
The attribute will include three pieces of data: the documentation text, which will be a positional parameter; and author and date strings, which will be optional (and thus implemented as named parameters). Add the declarations for the three members to the class:
namespace CustomAtt { [AttributeUsageAttribute(AttributeTargets::Method | AttributeTargets::Property)] public __gc class DocumentationAttribute { String* text; // documentation text String* author; // optional author field String* date; // optional date field }; } -
Add the constructor:
public: DocumentationAttribute(String* txt) { // Save the text away text = txt; }The constructor takes a string as its only argument, which is saved away as the documentation text.
-
Add a read-only property so that users can retrieve the text at run time:
// Read-only property to return the text __property String* get_Text() { return text; }Note A read-only property is one that implements a get method without also implementing a matching set method.
-
Add read/write properties to allow access to the two named
parameters:// Properties for the positional parameters __property String* get_Author() { return author; } __property void set_Author(String* au) { author = au; } __property String* get_Date() { return date; } __property void set_Date(String* dt) { date = dt; }Remember that in managed C++, the name of the property function needs to match the name you want to give to the parameter, so a parameter called Date will be implemented by property methods called get_Date and set_Date. The two set functions simply save the strings they are passed; in real code, you’d probably want to perform some validation.
-
Build the project to check that you haven’t made any errors.
-
Add some code that will use the new attribute. Right-click on the solution name in Solution Explorer, choose Add from the shortcut menu, and then select New Project. Make sure the project type is set to Console Application (.NET), and call the project TestAtts. Click OK.
-
Open the
TestAtts.cpp file and add #using and using namespace lines to the top of the file:#using <mscorlib.dll> #using <CustomAtt.dll> using namespace System; using namespace CustomAtt;
The #using directive causes the compiler to load and access the CustomAtt DLL, and the using declaration makes it possible to use the attribute class without having to fully qualify the class name.
-
Define a managed class that uses the new custom attribute:
// A class to test the attribute __gc class TestAtts { int val; public: [DocumentationAttribute( "The TestAtts class constructor takes an integer", Author="julian", Date="10/10/01")] TestAtts(int v) { val = v; } [DocumentationAttribute( "The read-only Value property returns the value of" " the int class member", Author="julian")] __property int get_Value() { return val; } };The DocumentationAttribute has been attached to the two members of this class. The constructor uses all three possible parameters, whereas the property uses only the text and the Author named parameter.
Note Remember that you can split a string literal over two lines, and as long as there is nothing between the closing and opening double quotation marks except white space characters, the preprocessor will concatenate them for you.
-
Build the project to make sure it compiles cleanly. You can now use ILDASM to see how the attribute data is held in the class.
-
Run ILDASM as before, and open the TestAtts.exe file, which you’ll find in the CustomAtt\Debug directory. Click the plus sign (+) next to the blue component symbol labeled TestAtts, and double-click on the .ctor entry. This will bring up the disassembly for the constructor, as shown here:
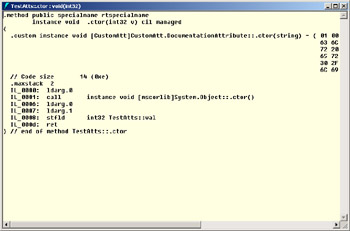
You can see how the code creates a DocumentationAttribute object that then forms part of the TestAtts object. You can access this attribute object from code. You’ll see how to do this in the next section.
-
Before leaving this exercise, try adding the DocumentationAttribute to the class, like this:
[DocumentationAttribute("The TestAtts class", Author="julian")] __gc class TestAtts { ... }When you compile this code, the compiler will give you an error message because the attribute cannot be applied to classes:
c:\Code\TestAtts\TestAtts.cpp(14): error C3303: ’CustomAtt::DocumentationAttribute’: attribute can only be used on ’methods, properties’
|
EAN: N/A
Pages: 208