Installation
|
|
The Active Directory Schema Manager snap-in is installed by default on domain controllers. This snap-in is also included in the Windows Administration Tools pack, and can be installed onto any computer with Windows XP/.NET. (Windows 2000 has its own version of that tool.) It appears neither on the Start menu nor in the Control Panel, and should be manually added to an MMC console. (If the snap-in is installed as a part of Windows Administration Tools, it does appear on the Start menu as well as other administrative snap-ins.) You only need to first register the DLL by entering the following command at the command prompt:
regsvr32 schmmgmt.dll
You should get the message shown in Fig. 7.29.

Fig. 7.29: This message will appear if the DLL-file is registered successfully
If you install Windows Administrative Tools on a computer (see Chapter 8, "Common Administrative Tasks"), the appropriate DLL is registered automatically.
After schmmgmt.dll is registered on a computer, you can create an MMC document (which is a console saved with any name you like) containing the Active Directory Schema Manager snap-in, or add the snap-in to an existing custom console.
Modifying the Schema
All modifications of the schema are only permitted on the DC that possesses the Schema Master FSMO role. It is highly recommended that you adhere to this requirement.
| Note | To find the Schema Master in a forest, use the following command: dsquery server — hasfsmo schema. |
In Windows 2000, by default, the modification of the schema is disabled. Therefore, to modify the schema, start the Active Directory Schema Manager snap-in (which by default is targeted to the Schema Master) and set first the flag The Schema may be modified on this Domain Controller in the Change Schema Master window. After this, you can change the schema itself and schema access permissions. In Windows .NET, this flag is absent.
| Attention | By default, only members of the Schema Admins group can modify the schema. It is, however, also possible to grant this permission to other people. The schema's updates are dumped from cache to disk every 5 minutes. You can manually reload the schema to force this process. |
Modification and, in particular, extension of the schema, require a profound understanding of Active Directory concepts and classes structure, and this could be the theme of a separate book. (Some basic information on this question is given in Chapter 16, "Active Directory Service Interfaces (ADSI).") However, in routine work an administrator may want to perform the following operations (these are the names of checkboxes at the General tab in the Properties window of an attribute or a class; see Fig. 7.31):
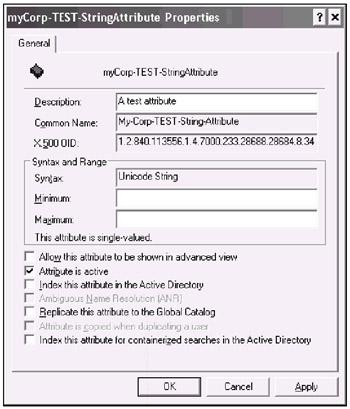
Fig. 7.31: Properties of an attribute
-
Attribute (class) is active (in Windows 2000, a similar flag Deactivate this attribute (class) has an opposite meaning). If a newly created (e.g., a test) attribute or class is not yet used (i.e., there are no new objects of that class, or that attribute has not been added to a class) in Active Directory, you may "disable" it. (You cannot delete attributes and classes in Active Directory.) Such an attribute or class is considered to be defunct. In Windows .NET, it is possible to redefine and reactivate it.
-
Index this attribute in the Active Directory. Indexing of an attribute speeds up the frequently used query operations that include the attribute.
-
Replicate this attribute to the Global Catalog. If an attribute is included in Global Catalog, you can get the attribute's values when performing forest-wide queries.
-
Show objects of this class while browsing. This flag controls the state of the showInAdvancedViewOnly attribute (see above "Hiding Directory Objects from Browsing"). If this flag is set, the attribute's value is FALSE. The flag possibly affects the custom (newly created) classes only.
To carry out these operations, expand the Attributes or Classes node in the tree pane and find the desired attribute or class. Open the Properties window and set the appropriate flag on the General tab.
| Caution | After a new attribute has been added to the global catalog, a forest-wide replication is triggered. (This is the case regarding all schema modification operations.) This can result in significant network traffic. Therefore, this operation should not be performed often and should be well planned. |
Extending the Schema
Extension of the schema is not a particularly complicated operation, but nonetheless, it is a very crucial one. You must always remember that all extensions of the schema are not reversible (even if you restore Active Directory from a backup copy!) and may result in significant forest-wide replication traffic.
Let us discuss how to create a new attribute and class on a few examples. (See also about extending the schema in Chapter 16, "Active Directory Service Interfaces (ADSI)" and Chapter 17, "Scripting Administrative Tasks.")
Creating an Attribute
Before creating an attribute, you must carry out the following operations:
-
Choose the attribute's common and LDAP display names according to Microsoft recommendations.
-
Obtain the base X.500 OID (see Chapter 16) and add your specific attribute ID to it.
-
Select the attribute's syntax.
-
Choose the minimum and maximum values for the attribute (optional).
| Attention | The base X.500 OIDs — one for classes and one for attributes — are obtained only once for your organization. Then you can add your own increasing IDs to the base OIDs. |
When you have gathered all this information, point to the Attributes node in the tree pane and click Create Attribute in the context menu. Click Continue in the warning window. Fill in the fields in the Create New Attribute window. (All fields except Minimum and Maximum are mandatory.) Click OK. Fig. 7.30 displays sample information necessary for the creation of a string attribute.
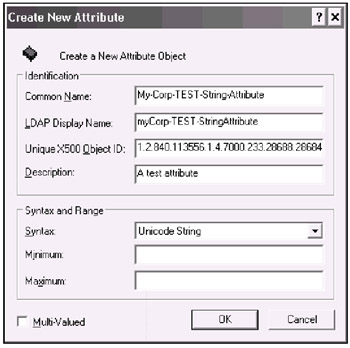
Fig. 7.30: An example of creating a new string attribute
| Attention | In Windows 2000, if you receive the "Schema update failed in recalculating validation cache" error, verify the selected OID. Windows .NET provides more specific diagnostic messages. Now you can find the new attribute on the list, view the attribute's properties (Fig. 7.31), give a description to it, and set the necessary flags (checkboxes). At this point, you can use the created attribute, i.e., add it to an existing class(es) (see below and in Chapter 17, "Scripting Administrative Tasks"). |
Creating a Class
To create a class, you must gather the following information:
-
The class's common and LDAP display names according to Microsoft recommendations
-
The base X.500 OID (and add your specific class ID to it)
-
The type of class (commonly, structural) and the parent class (optional; top by default)
-
The lists of mandatory and optional attributes of the class (if a structural or auxiliary class inherits only the attributes from the parent and does not have its own attributes, why create such a class?)
-
The possible superior(s) — the container(s), in which creation of the class's objects is permitted
Point to the Classes node in the tree pane and click Create Class in the context menu. Click Continue in the warning window. Fill in the fields in the Create New Schema Class window. Fig. 7.32 illustrates this step. Click Next.
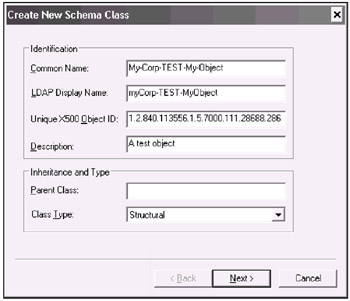
Fig. 7.32: The first step in creating a new object class
In the next window (Fig. 7.33), you can add mandatory and optional attributes to the class. If you leave both lists empty, the new class will have only the attributes of the parent class. You can add and remove attributes until you click Finish.
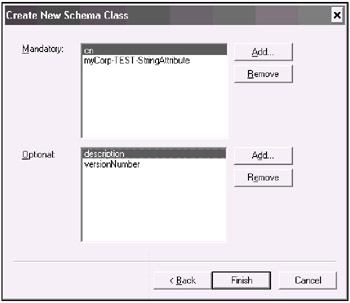
Fig. 7.33: In this window, you can add mandatory and optional attributes
| Attention | It is possible to add optional attributes to a class at any time, but the mandatory attributes are added only at the class's creation. |
To define a possible superior for the new class, select the class from the list, open the Properties window, and click the Relationship tab (Fig. 7.34). Add the necessary class, click Apply, and close the window. You have now created a new class.
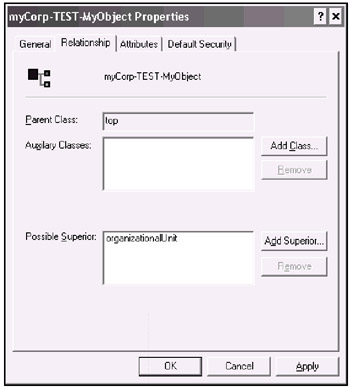
Fig. 7.34: This window allows you to add auxiliary classes to a class and to define containers (possible superiors), in which objects of that class can be created
If the class created is of the auxiliary type, you may wish to add it to an existing class. To do this, select a class, open the Properties window, click the Relationship tab, and add the new class to the Auxiliary Classes list (Fig. 7.34).
Adding Attributes to Existing Classes
It is possible to add newly created or existing attributes to classes — new or standard ones. Select the applicable class from the list and open the Properties window.
You can add necessary attributes to the Optional tab on the Attributes tab: click Add and choose an attribute from the Select Schema Object list. Click Apply and close the window. Reload the schema or wait until the schema's updates are written to disk. Then the new attributes of the class will be "visible" in other administrative tools.
|
|
EAN: 2147483647
Pages: 154