Section 1.3. Files and Folders
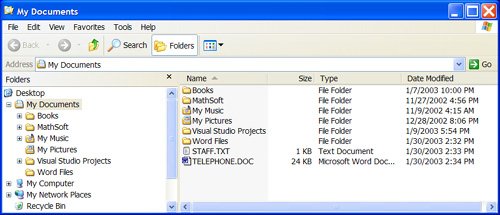
1.3. Files and FoldersModern computers have a hard disk, a diskette drive, and a CD (or DVD) drive. The hard disk is permanently housed inside the computer. You can read information from all three drives, but can write information easily only to the hard disk and to diskettes. We use the word disk to refer to either the hard disk, a diskette, a CD, or DVD. Each drive is identified by a letter. Normally, the hard drive is identified by C, the diskette drive by A, and the CD (or DVD) drive by D or E. Disk management is handled by Windows. Disks hold not only programs, but also collections of data stored in files. The term file refers to either a program file, a text file, or some other kind of data file. We created a text file in Section 1.2. Each file has a name consisting of a base name followed by an optional extension consisting of a period and one or more characters. The term filename refers to the combination of the base name, the period, and the extension. A filename can contain up to 215 characters, typically consisting of letters, digits, spaces, periods, and other assorted characters. (The only characters that cannot be used in filenames are \, /, :, *, ?, <, >,", and |) Extensions are normally used to identify the type of file. For example, spreadsheets created with Excel have the extension xls (eXceL Spreadsheet), documents created with Word have the extension doc (DOCument), and files created with Notepad have the extension txt (TeXT document). Some examples of filenames are "Annual Sales.xls," "Letter to Mom.doc," and "Phone.txt". Neither Windows nor Visual Basic distinguishes between uppercase and lowercase letters in folder and filenames. For instance, the names COSTS02.TXT, Costs02.Txt, and costs02.txt are equivalent. We use uppercase letters in this book for filenames. Because a disk is capable of holding thousands of files, locating a specific file can be quite time consuming. Therefore, related files are grouped into collections called folders. For instance, one folder might hold all your Visual Basic programs, and another the documents created with your word processor. Think of a disk as a large folder, called the root folder, that contains several smaller folders, each with its own name. (The naming of folders follows the same rules as the naming of files.) Each of these smaller folders can contain yet other named folders. Any folder contained inside another folder is said to be a subfolder of that folder. Each folder is identified by listing its name preceded by the names of the successively larger folders that contain it, with each folder name preceded by a backslash. Such a sequence is called a path. For instance, the path \Sales\NY02\July identifies the folder July, contained in the folder NY02, which in turn is contained in the folder Sales. Think of a file, along with its name, as written on a slip of paper that can be placed into either the root folder or one of the smaller folders. The combination of a drive letter followed by a colon, a path, and a filename is called a filespec, an abbreviation of "file specification." Some examples of filespecs are C:\VB01\VB.EXE and A:\Personal\INCOME02.TXT. In early operating systems such as MS-DOS, folders were called directories. Many Visual Basic objects and commands still refer to folders as directories. The terms "root folder" and "path" are a reference to the "tree" metaphor commonly used to describe a computer's disk. In this metaphor, the large folder at the lowest level of the disk is called the "root" folder. The smaller folders contained in the root folder can be thought of as "branches" that emanate from the root. Each branch may have smaller branches, which in turn may have their own smaller branches, and so on. Finally, a file in one of these folders can be thought of as a leaf on a branch. The leaf is reached by starting at the root and following a "path" through the branches. A program called Windows Explorer helps you view, organize, and manage the folders and files on your disks. We will learn how to use Windows Explorer to create, rename, copy, move, and delete folders and files. Using Windows ExplorerTo invoke Windows Explorer, click the Windows Start button, click on Run, type in the word "Explorer", and click on the OK button. The appearance of the Explorer window depends on the version of Windows being used and the values of certain settings. Figure 1.4 (on the next page) shows a possible Explorer window for Windows XP. The Folders pane on the left side of the window contains a folder tree with the My Documents folder highlighted. (Only one folder at a time can be highlighted. The icon for a highlighted folder appears to be physically open, and its name appears in the title bar at the top of the Explorer window.) The contents of the highlighted folder are displayed in the right pane of the Explorer window. In Figure 1.4, the highlighted folder contains six subfolders and two files. To highlight a different folder, just click on it with the left mouse button. Figure 1.4. An Explorer window for Windows XP |
1. | From Windows Explorer, press Alt/T/O to display the Folders Options dialog box. |
2. | Click on the View tab in the dialog box. |
3. | If there is a check mark in the box next to "Hide extensions for known file types," click on the box to remove the check mark. |
4. | Click on the OK button to close the Folders Options dialog box. |
To create a new folder:
1. | Highlight the folder that is to contain the new folder as a subfolder. |
2. | On the File menu, point to New, and then click Folder. (Or press Alt/File/New/Folder.) The new folder appears with the temporary name New Folder. |
3. | Type a name for the folder, and then press the Enter key. (The allowable names for folders are the same as for files. However, folder names do not usually have an extension.) |
To rename a folder or file:
1. | Click on the folder or file in the right pane with the right mouse button. |
2. | In the Context menu that appears, click Rename. The current name will appear highlighted inside a rectangle. |
3. | Type the new name, and then press the Enter key. |
To delete a folder or file:
1. | Click on the folder or file with the right mouse button. |
2. | In the Context menu that appears, click Delete. A "Confirm Folder Delete" or a "Confirm File Delete" dialog box containing the name of the folder or file will appear. |
3. | Click the Yes button. |
Or
1. | Click on the file or folder with the left mouse button. |
2. | Press the Delete key. |
To copy a folder or file:
1. | Click on the folder or file to be copied with the right mouse button. |
2. | In the Context menu that appears, click on Copy. |
3. | Point to the folder where the copy is to be placed. |
4. | Click on the second folder with the right mouse button. |
5. | In the Context menu that appears, click on Paste. |
To move a folder or file:
1. | Click on the folder or file to be moved with the right mouse button. |
2. | In the Context menu that appears, click on Cut. |
3. | Point to the folder where the copy is to be moved. |
4. | Click on the second folder with the right mouse button. |
5. | In the Context menu that appears, click on Paste. |
You also can carry out some of the preceding operations by "drag and drop." For details, see the Help Topics accessed through the Windows Explorer Help menu. For instance, you can delete a folder or file by dragging it to the Recycle Bin and releasing the left mouse button.
Using the Open and Save As Dialog Boxes
In Section 1.2, we used the Open and Save As dialog boxes by just typing in the filespec for the desired file. These dialog boxes provide many features that assist with the locating of folders and files. Figure 1.5 shows an Open dialog box obtained from Windows XP. In the Save As dialog box, "Look in:" is replaced with "Save in:", and "Files of type:" is replaced with "Save as type:".
Figure 1.5. An Open dialog box from Windows XP.
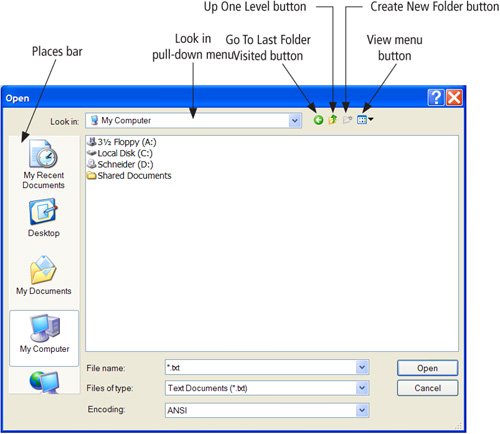
You can begin the search by clicking on one of the icons in the Places bar. In Figure 1.5, the My Computer icon was pressed. The following steps would be used to locate the file with filespec "C:\VB Programs\3-5-3\bin\Debug\PAYROLL.TXT":
1. | Double-click on "Local Disk (C:)" to obtain a list of all the folders and files on the hard drive C:. (The text in the "Look in:" box will now read "Local Disk (C:)". |
2. | Double-click on the folder named "VB Programs" to obtain a list of its subfolders and files. |
3. | In succession, double-click on "3-5-3," then on "bin," and finally on "Debug." The subfolders and files in the folder Debug will now be displayed. PAYROLL.TXT will be in the list. |
4. | Double-click on PAYROLL.TXT to open it. |
The Save As dialog box operates in a similar way. However, after the desired folder is displayed in the "Save in:" box at the top of the dialog box, you would type the base name of the file into the "File name:" box.
Practice Problems 1.3
| 1. | Where is the file having filespec "C:\TODAY.TXT" located? |
| 2. | Is "C:\Sales\New York" a filespec or a path? |
Exercises 1.3
| 1. | Explain why "Who is there?" is not a valid filename. |
| 2. | Explain why "FOUR STAR HOTEL ****" is not a valid filename. |
| 3. | What is wrong with the filespec "C:/Sports/TENNIS.DOC"? |
| 4. | Why do files on CDs usually have their read-only attribute turned on? |
| 5. | What is the path for a file whose filespec is "C:\Revenue\Chicago\MAIN.TXT"? |
| 6. | What is the filespec for the file PRES.TXT that is contained in the folder InfoUSA, where InfoUSA is a subfolder of the root directory of a diskette in the A drive? |
| 7. | Must the two files with filespecs "A:\DATA.TXT" and "A:\Info\DATA.TXT" be identical; that is, copies of one another? |
| 8. | What is the difference between a filespec and a filename? |
From Windows Explorer, highlight a folder on your computer that contains many files, and then press Alt/V/D to select the Details option from the View menu. In Exercises 9-12, give the effect of clicking on the specified column head in the right-hand pane.
| 9. | Size |
| 10. | Type |
| 11. | Modified |
| 12. | Name |
| 13. | The companion website for this book has a folder named Programs\Ch09\Pictures. Use Windows Explorer to obtain a list of the files in this folder, and then press Alt/V/H to select the Thumbnails option from the View menu. Describe what you see in the right pane. |
| 14. | Open the folder on your hard disk named My Documents. How many subfolders does the folder contain directly? How many files does the folder contain directly? |
In Exercises 15 and 16, carry out the stated tasks.
| 15. |
|
| 16. |
|
Solutions to Practice Problems 1.3
| 1. | The file is located in the root folder of the C drive. |
| 2. | It could be either. If "New York" is a folder, then it is a path. If "New York" is a file, it is a filespec. In this book, we always give extensions to files and never give extensions to folders. Therefore, by our conventions, "C:\Sales\New York" would be a path. |
EAN: 2147483647
Pages: 164