| In this section, you add functionality to the DataEntry application. You will make an HTTPService call to access the data and use this data to populate a Tree control. The Tree control is tailor-made to display XML data. You will use the Tree control to easily navigate the complex data structure and populate the form you created in Lesson 4, "Using Simple Controls." ActionScript 3.0 contains native XML support in the form of ECMAScript for XML (E4X). This ECMA standard is designed to give ActionScript programmers access to XML in a straight forward way. E4X uses standard ActionScript syntax that you should already be familiar with, plus some new functionality specific to E4X. Caution!  | The XML class in ActionScript 3.0 is not the same as the XML class in ActionScript 2.0. That class has been renamed to XMLDocument, so it does not conflict with the XML class now part of E4X. The old XML document class in ActionScript is not covered in this book. You should not need to use this class except in working with legacy projects. |
Understanding E4X operators In this task and also through the rest of this lesson, you will use E4X functionality. The new E4X specification defines a new set of classes and functionality for working with XML data. These classes and functionality are known collectively as E4X. First, for a very basic, very quick review of XML terminology, examine the XML object as it would be defined in ActionScript: private var groceryXML:XML = new XML(); groceryXML= <catalog> <category name="vegetables"> <product name="lettuce" cost="1.95"> <unit>bag</unit> <desc>Cleaned and bagged</desc> </product> <product name="carrots" cost="2.95"> <unit>pound</unit> <desc>Baby carrots, cleaned and peeled</desc> </product> </category> <category name="fruit"> <product name="apples" cost=".95"> <unit>each</unit> <desc>Sweet Fuji</desc> </product> <product name="raspberries" cost="2.95"> <unit>pint</unit> <desc>Firm and fresh</desc> </product> </category> </catalog>;
The following statements describe the XML object, with the XML terminology italicized: The root node (or element) is catalog. There are two category nodes. The product node has two child nodes called unit and desc. The product node has two attributes name and cost.
Now you have the basic XML terminology understood, you can start using some of the powerful E4X operators. First consider the dot (.) operator. You will use these to access data in the XML document. The dot operator behaves much like the dot in object.property notation which you are familiar with. You use the dot operator to navigate to child nodes. So the statement groceryXML.category.product.unit
would yield the following results: <unit>bag</unit> <unit>pound</unit> <unit>each</unit> <unit>pint</unit>
Tip  | When using E4X notation, the root node, in this case category, is not used in statements. |
If you want a specific unit, you would have to employ the parentheses [()] operator. The parentheses operator is used to do evaluation in an E4X construct. So the statement groceryXML.category.product.(unit=='pint')
would yield the following results: <product name="raspberries" cost="2.95"> <unit>pint</unit> <desc>Firm and fresh</desc> </product>
Notice that E4X, when doing an evaluation with the parentheses, returns the entire node containing the specified unit node, not just the node itself. You can do the same types of evaluation and searching using the attribute (@) operator. To specify an attribute rather than a child node in an evaluation, you use the @ operator. So the statement groceryXML.category.product.(@cost=='2.95')
would yield the following results: <product name="carrots" cost="2.95"> <unit>pound</unit> <desc>Baby carrots, cleaned and peeled</desc> </product> <product name="raspberries" cost="2.95"> <unit>pint</unit> <desc>Firm and fresh</desc> </product>
Notice because there were two matches of cost attribute matching 2.95, both were returned. Another very powerful operator in E4X is the descendant accessor, represented by two dots (..). This operator navigates to descendant elements of an XML object, no matter how complex the XML's structure. So the statement groceryXML..product
would yield the following results: <product name="lettuce" cost="1.95"> <unit>bag</unit> <desc>Cleaned and bagged</desc> </product> <product name="carrots" cost="2.95"> <unit>pound</unit> <desc>Baby carrots, cleaned and peeled</desc> </product> <product name="apples" cost=".95"> <unit>each</unit> <desc>Sweet Fuji</desc> </product> <product name="raspberries" cost="2.95"> <unit>pint</unit> <desc>Firm and fresh</desc> </product>
The descendant accessor operator searched through the entire XML object and returned all the product nodes. The result would have been the same no matter how deeply nested the product nodes were. You have now seen just a slice of the very powerful E4X implementation in ActionScript 3.0. For more information see Chapter 11: Working with XML in the Programming ActionScript 3.0 documentation that comes with Flex. Populating a Tree Control with XML Data Just as you used an ArrayCollection to populate List and ComboBox controls in the last two tasks, you will use an XMLListCollection to populate the Tree control. The XMLListCollection has many of the same characteristics of the ArrayCollection that make it an excellent choice for components that want an XML data provider, like the Tree control. 1. | Using a web browser, browse to the following URL:
www.flexgrocer.com/categorizedProducts.xml
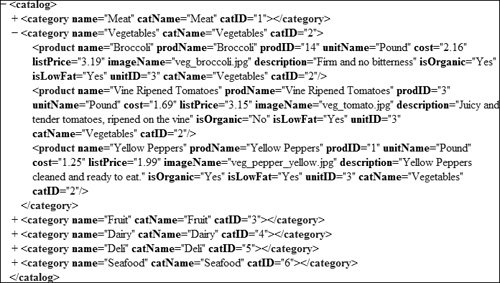
The grocery items used for the store inventory are displayed in the XML structure shown in the following example. You see that products are grouped by category. The node displayed shows Broccoli, Vine Ripened Tomatoes, and Yellow Peppers grouped in the Vegetables category.
 This URL displays the XML that you will load at run time. You will parse the XML at the client within Flash Player using the new E4X functionality. This URL displays the XML that you will load at run time. You will parse the XML at the client within Flash Player using the new E4X functionality.
It makes sense to sort the products on the server, instead of at the client. This results in better performance. Sorting can be a processor-intensive task, so if you can do it on the server, you should!
| 2. | Open DataEntry.mxml.
| | | 3. | Remove the existing <mx:Model> tag block.
You will be populating the form with dynamic data from the HTTPService class instead of with static XML data embedded in the SWF file.
| 4. | Directly below the existing HTTPService call, add another <mx:HTTPService> tag, assign it an id of prodByCatRPC, and specify the url property to http://www.flexgrocer.com/categorizedProducts.xml. Specify the resultFormat as e4x.
<mx:HTTPService url="http://www.flexgrocer.com/categorizedProducts.xml" resultFormat="e4x"/>
The Tree control easily handles E4X data. In this case, you are transforming the XML in the file into ActionScript XML objects. In the next steps you will use this data in the Tree control.
| 5. | Directly after the <mx:HTTPService> tag, add an <mx:XMLListCollection> tag, specify the id as foodColl, and specify the source as prodByCatRPC.lastResult.category.
<mx:XMLListCollection source="{prodByCatRPC.lastResult.category}"/>
The XMLListCollection is very much like the ArrayCollection except it is used for XML data. This class contains the same hooks for data binding and also contains data manipulation methods. It is a best practice to bind to an XMLListCollection instead of native XML objects. In this case, you are placing the E4X XML data into an XMLListCollection; remember the repeating node is category.
| 6. | Move to the top of the application and add to the existing creationComplete event so it calls the prodByCatRPC HTTPService using the send() method.
<mx:Application xmlns:mx=http://www.adobe.com/2006/mxml layout = "absolute" creationComplete="unitRPC.send();prodByCatRPC.send()">
This actually executes the HTTPService call. You need to add a semicolon to separate the two lines of ActionScript code.
| 7. | Scroll to the top of the <mx:Form> tag and remove from the five <mx:TextInput> tags the text properties for each form element. Leave the id properties of the <mx:TextInput> tags as they are, except for the Product Name FormItem, where the id for that TextInput should be changed to prodName to match XML data you will soon be retrieving. Also remove the <mx:FormHeading> tag.
You will be retrieving remote XML data and using it to populate the Form. In this situation, all you need to do is have an instance name, represented by the id of the UI control, for use in a binding.
| | | 8. | In the Form, change the Description's <mx:TextInput> to an <mx:RichTextEditor>. Set the id to be description and set the height of the control to 200.
<mx:FormItem label="Description"> <mx:RichTextEditor height="200"/> </mx:FormItem>
The <mx:RichTextEditor> allows users to mark up the text entered into the control. With this control users can change the font family, color, size, and style, and other properties such as text alignment, bullets and URL links of text entered.
| 9. | In the Form, group the isLowFat and isOrganic <mx:CheckBox> tags into one <mx:FormItem> tag with a label of Specialties. Remove the selected properties, and add label properties with the text "Is Low Fat" and "Is Organic."
<mx:FormItem label="Specialties"> <mx:CheckBox label="Is Low Fat"/> <mx:CheckBox label="Is Organic"/> </mx:FormItem>
This is just for aesthetic purposes.
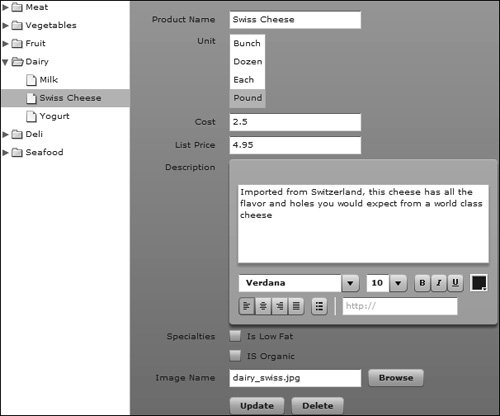
| | | 10. | In the Form, change the label of the <mx:FormItem> tag which is currently Image Path to Image Name. Also add a direction property set equal to horizontal for this FormItem. Check to be sure your finished Form appears as follows:
<mx:Form> <mx:FormItem label="Product Name"> <mx:TextInput /> </mx:FormItem> <mx:FormItem label="Unit"> <mx:List rowCount="4" dataProvider="{units}" labelField="unitName"/> </mx:FormItem> <mx:FormItem label="Cost"> <mx:TextInput /> </mx:FormItem> <mx:FormItem label="List Price"> <mx:TextInput /> </mx:FormItem> <mx:FormItem label="Description"> <mx:RichTextEditor height="200"/> </mx:FormItem> <mx:FormItem label="Specialties"> <mx:CheckBox label="Is Low Fat"/> <mx:CheckBox label="Is Organic"/> </mx:FormItem> <mx:FormItem label="Image Name" direction="horizontal"> <mx:TextInput /> <mx:Button click="fileBrowse()" label="Browse"/> </mx:FormItem> <mx:FormItem> <mx:HBox> <mx:Button label="Update" /> <mx:Button label="Delete" /> </mx:HBox> </mx:FormItem> </mx:Form>
You will be populating all this information from the Tree control instead of accessing the data directly, and the changes you made to the Form allow this to happen.
| 11. | Add a Tree control directly above the existing form. Assign it an id of productTree, a height of 100%, a dataProvider of foodColl, a labelField of @name, and a change event of populateForm. Be sure to pass the event object that is created.
<mx:Tree height="100%" dataProvider="{foodColl}" labelField="@name" change="populateForm(event)"/>
The Tree control will display complex data structures and enable the end user to easily navigate through them. The user can use the Tree to find the product they are interested in updating or deleting. You are doing all of the categorizing on the server for better performance, which will cause less strain on Flash Player.
| 12. | Surround both the Tree control and the Form container with an HBox so the two elements will be arranged horizontally.
This will make the layout of the application more intuitive.
| | | 13. | Create the skeleton of a new private function with the name of populateForm(), data typed as void. The function should accept a parameter named event data typed as Event. Inside of the method, create a variable with the name of selectedNode data typed as Object. Set this variable equal to the selectedItem of the event.target object, which is the selected node from the Tree control.
private function populateForm(event:Event):void{ var selectedNode:Object=event.target.selectedItem; }
Because you specified that this method would be called on a change event, the populateForm() method is called when the user clicks a node in the Tree control.
Because it is an event, an event object is generated, and the target is the name of the object that emitted the event; in this case, productTree.
| 14. | Add conditional logic that checks to make sure that the XML attribute prodName in that node is defined. Add an else statement that will call the resetForm() method if there is no prodName attribute in the XML data structure.
private function populateForm(event:Event):void{ var selectedNode:Object=event.target.selectedItem; if(selectedNode.@prodName != undefined) } else { resetForm(); } }
The selectedItem property of the Tree control enables you to access the node the user has selected. Once you have that information, you can use E4X notation to get the data located in that node. For example, in each node you have the product name, the cost, the image, and more information that you can access and update using the DataEntry application. The conditional logic checks to make sure that the node you are working with has a prodName property; otherwise, you will reset the form. The prodName property will not have a value when you click on a category. You will write the resetForm() method in an upcoming step.
| | | 15. | Set the text property of the prodName field to the corresponding attribute value of the selectedNode using E4X notation. Set the text property of the cost field, listPrice, description, and imageName using the same syntax. Set the selected property of the isOrganic and isLowFat CheckBoxes to the appropriate value. These are stored in the XML data as yes/no values; you need to use the Util class' yesNoToBoolean() method to convert these values into Booleans. The method should look as follows:
private function populateForm(event:Event):void{ var selectedNode:Object=event.target.selectedItem; if(selectedNode.@prodName != undefined){ prodName.text = selectedNode.@prodName; cost.text = selectedNode.@cost; listPrice.text = selectedNode.@listPrice; description.text = selectedNode.@description; isOrganic.selected = Util.yesNoToBoolean(selectedNode.@isOrganic); isLowFat.selected = Util.yesNoToBoolean(selectedNode.@isLowFat); imageName.text = selectedNode.@imageName; } else { resetForm(); } }
This populates the form fields with the data that the user has selected from the Tree control using the attribute (@) E4X notation you are familiar with.
| 16. | As the first line of the if block, use the presetList() method of the Util class to prepopulate the List. Specify the first parameter as unitID, the second parameter as "unitID", and use E4X syntax to obtain the unitID property from the selectedNode.
Your populateForm() method should look as shown:
private function populateForm(event:Event):void{ var selectedNode:Object=event.target.selectedItem; if(selectedNode.@prodName != undefined){ Util.presetList(unitID,"unitID",selectedNode.@unitID); prodName.text = selectedNode.@prodName; cost.text = selectedNode.@cost; listPrice.text = selectedNode.@listPrice; description.text = selectedNode.@description; isOrganic.selected = Util.yesNoToBoolean(selectedNode.@isOrganic); isLowFat.selected = Util.yesNoToBoolean(selectedNode.@isLowFat); imageName.text = selectedNode.@imageName; } else { resetForm(); } }
You also need to populate the unit List control you created earlier to specify what types of units are displayed. This information is in the data structure stored in the Tree control, but you need to preselect the List with this information. You can use the presetList() method of the Util class to accomplish this. This method will take the data structure from the Tree and populate the List with the appropriate unit elements, enabling the user to select from the List.
| | | 17. | Build a private resetForm() method that will set all the values back to blank positions if the prodName value is not defined in the Tree data structure.
private function resetForm():void{ prodName.text = ""; unitID.selectedIndex = -1; cost.text=""; listPrice.text=""; description.text=""; isOrganic.selected = false; isLowFat.selected = false; imageName.text = ""; }
If there is no data in the prodName node of the Tree, you should reset all the information in the form. This will occur when the user clicks on a category instead of an actual grocery item.
| 18. | Save and run the application. You should see that the Tree control is populated with data. When you drill down through the data, it is displayed on the form you created earlier.
This provides a great way for the user to navigate a complex data structure and easily find the information they need.
 | 19. | Close the file.
|
|