In the last task, a separate container (a VBox) was used on the main application page that was configured especially for printing. If the printing configuration was very long and complex, it would probably not be a workable solution; a separate custom component would be better. In this task, you will do just that: build a custom component whose job is to hold the printable version of whatever data you want the user to print. Just like the previous task, the component will not be visible on the screen. However, this component will not create extra blank space on the screen; it will be built just for printing.
1. | Right-click the views folder in the flex2tfs_Printing project and choose New > MXML Component. Set the Filename to be PrintView.mxml, and the Based On component should be a VBox. Set the width to 450 and the height to 250. Click Finish.
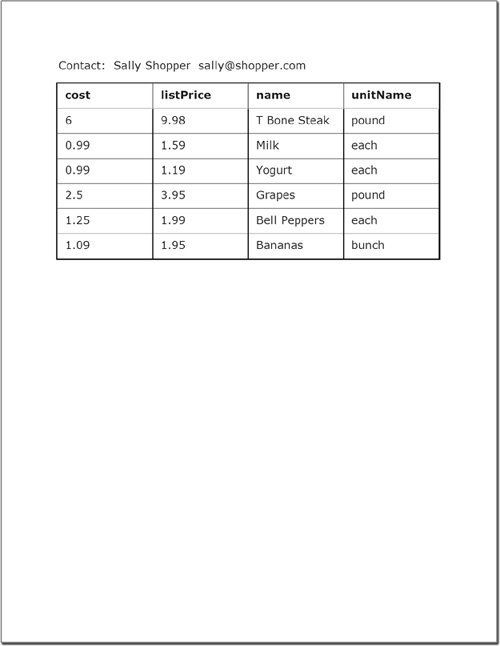
This is the skeleton of the custom component that will be used just for printing.
|
| |
2. | Set the following properties for the VBox:
backgroundColor: | #FFFFFF | paddingTop: | 50 | paddingLeft: | 50 | paddingRight: | 50 |
|
3. | In the VBox, insert an <mx:Label> with an id of contact.
This is where you will bind the user name and e-mail address gathered in the Form.
|
4. | Following the Label control, insert an <mx:PrintDataGrid> tag with an id of myPrintDG and a width and height of 100%.
You will tie the dataProvider of the normal DataGrid to this PrintDataGrid.
|
5. | Check to be sure that your custom component appears as follows:
<?xml version="1.0" encoding="utf-8"?> <mx:VBox xmlns:mx="http://www.adobe.com/2006/mxml" height="250" width="450" backgroundColor="#FFFFFF" paddingTop="50" paddingLeft="50" paddingRight="50"> <mx:Label /> <mx:PrintDataGrid width="100%" height="100%"/> </mx:VBox>
Of course, the custom component could be as complex as needed to meet your printing needs.
|
6. | Open the file PrintingTask3.mxml from the flex2tfs_Printing project.
Note that this application file has the Form used in PrintingTask2, as well as the skeleton of the doPrint() function created.
|
7. | In the doPrint() function, create a new FlexPrintJob object local to the function named pj. Insert an if statement that gracefully handles the situation if the user cancels the print job. At this point, your function should appear as follows:
private function doPrint():void{ var pj:FlexPrintJob = new FlexPrintJob(); if(pj.start() != true) { return; } }
Flex Builder will automatically add the import for mx.printing.FlexPrintJob to the file when you specify the type of the variable pj. You can also import it manually by adding it to the top of the script block.
|
| |
8. | At the top of the script block, import the custom component you built earlier in this task.
import views.PrintView;
You will instantiate an instance of this class shortly, so you must import it.
|
9. | In the function just below the if block, create an instance local to the function of the PrintView custom component class named myPrintView.
var myPrintView:PrintView=new PrintView();
This is the instance of the custom component you will use for printing.
|
10. | Use the addChild() method to add the newly created myPrintView object as a DisplayObject of the Application.
this.addChild(myPrintView);
The addChild() method is a method of the mx.core.Container class, which is the parent of the Application class. The method adds a child DisplayObject object to the specified container.
Tip  | Remember that you cannot give an instance name to the Application (or any tag used as a base tag of a component), so you refer to the Application by using the keyword this. |
|
11. | Fill the contact Label from the PrintView component with the customer name and customer e-mail concatenated together with the literal text Contact: preceding them. Remember that you must reference the Label through the myPrintView object.
myPrintView.contact.text = "Contact: " + custName.text + " " + custEmail.text;
|
12. | Set the dataProvider of the PrintDataGrid equal to the dataProvider of the normal DataGrid. Remember that you must reference the PrintDataGrid through the myPrintView object.
myPrintView.myPrintDG.dataProvider = prodInfo.dataProvider;
|
13. | Add the myPrintView object to the print job using the addObject() method and then send the print job to the printer using the send() method.
pj.addObject(myPrintView); pj.send();
|
14. | To "clean up" after printing, remove the myPrintView object.
removeChild(myPrintView);
|
| |
15. | Check to be sure that your function appears as follows:
private function doPrint():void{ var pj:FlexPrintJob = new FlexPrintJob(); if(pj.start() != true) { return; } var myPrintView:PrintView=new PrintView(); this.addChild(myPrintView); myPrintView.contact.text = "Contact: " + custName.text + " " + custEmail.text; myPrintView.myPrintDG.dataProvider = prodInfo.dataProvider; pj.addObject(myPrintView); pj.send(); removeChild(myPrintView); }
Just to reiterate, this function instantiates the custom component, adds it as a display object to the Application (even though it is not actually displayed to the screen), sets the data values, prints, and finally cleans up after itself.
|
16. | Run the application. Click the Button labeled Print in the Flex application.
You should be able to both print and cancel the print job. When you print, you will see the custom component with the appropriate properties' values and content.
|