This chapter discussed many of the issues connected with creating tables, but you never actually got around to creating one from start to finish. This case example attempts to remedy that shortcoming. The Nifty Lions database currently has no Employees table. In the following exercise, you create the table using these columns and business rules:
Total allowed vacation days and total allowed sick days cannot exceed 20.
1. | In the Database window, double-click Create Table in Design View.
|
2. | In the Field Name column, type EmployeeID. Press Tab.
|
3. | Type a for an AutoNumber data type. Click in the Caption property in the Field Properties pane and type Employee ID.
|
4. | In the Description column, type Unique identifier of employee. Click the primary key on the toolbar or choose Edit, Primary Key.
|
5. | Click in the Caption property in the Field Properties pane and type Employee ID.
|
6. | Choose File, Save As. Save the table as tblEmployees. Press OK.
|
7. | Click in the Field Name column of the next empty row. Type SocSecNum. Select the Text data type. In the Description column, type Employee Social Security Number. Click Save.
Text was chosen because the field will include dashes between numbers.
|
8. | Click in Input Mask in the Field Properties section. Click the three-dot button. Choose Social Security Number and click Next twice. Click With the Symbols in the Mask, Like This. Click Next and click Finish.
|
9. | Click Caption. Type SSN. Set Required to Yes. Set AllowZero Length to No.
|
10. | Click in the next empty Field Name. Type EmplLastName. Choose Text. Set Caption to Last Name, Required to Yes, and Allow Zero Length to No.
|
11. | In the next empty row, type EmplFirstName. Choose Text. Set Caption to First Name, Required to Yes, and Allow Zero Length to No.
|
12. | In the next empty row, type EmplStreetAddress. Choose Text. Set Caption to Street Address, Required to Yes, and Allow Zero Length to No.
|
13. | In the next empty row, type EmplCity. Choose Text. Edit the Field Size to 20. Set Caption to City. Enter a Default Value of Wilmington. Set Required to Yes and Allow Zero Length to No.
|
14. | In the next empty row, type EmplState. Choose Text. Enter a Description of Use Post Office 2-letter abbreviation. Edit the Field Size to 2. Set Format to > so the abbreviation will always be displayed as capital letters. Set Caption to State. Enter a Default Value of de. Set Required to Yes and Allow Zero Length to No.
|
15. | In the next empty row, type EmplZip. Choose Text. Enter a Description of Use USPS 9-digit code. Save the table. Click Input Mask and click the three-dot button. Choose Zip Code and click Next twice. Click With the Symbols in the Mask, Like This. Click Next and click Finish. Set Caption to ZIP, Required to Yes, and Allow Zero Length to No.
|
16. | In the next empty row, type EmplBio. Choose a Data Type of Memo. Enter a Description of Include education and previous employers. Set Caption to Biography, Required to No, and Allow Zero Length to Yes.
|
17. | In the next empty row, type EmplPhoto. Choose a Data Type of OLE Object. Enter a Caption of Photo. Set Required to No.
|
18. | In the next empty row, type HireDate Choose a Data Type of Date. Enter a Description of First day of work. Set Format to Long Date, Caption to Hire Date, Validation Rule to >10/1/04, Validation Text to Must be after October 1, 2004, and Required to Yes.
|
19. | In the next empty row, type EmplWebsite. Choose a Data Type of Hyperlink. Enter a Description of Employee's Personal URL. Enter a Caption of URL.
|
20. | In the next empty row, type HourlyWage. Choose a Data Type of Currency. Enter a Caption of Hourly Wage. Set Required to Yes.
|
21. | In the next empty row, type Overtime. Choose Yes/No. Enter Description of Is employee willing to work overtime? Enter Caption of Overtime?.
|
22. | In the next empty row, type VacationDays. Choose a Data Type of Number. Enter Description of Allowed number of vacation days. Choose Field Size of Integer. Enter a Caption of Vacation Days, a Validation Rule of <=10, and Validation Text of Must not exceed 10.
|
23. | In the next empty row, type SickDays. Choose Number. Enter a Description of Allowed number of sick days. Enter a Caption of Sick Days. Enter a Validation Rule of <=10 Enter Validation Text of Must not exceed 10.
|
24. | Choose View, Properties. In Table Properties, set Validation Rule to [VacationDays]+[SickDays]<=20. Enter Validation Text of Vacation days plus sick leave days can't exceed 20. Close the property sheet.
|
25. | Insert a row after HireDate. Type Birth Date. Choose a Data Type of Date/Time. Enter a Caption of Birth Date, a Validation Rule of <Date(), and Validation Text of Birth date can't be in the future. Date() is an expression for the current date.
|
26. | Save your work.
|
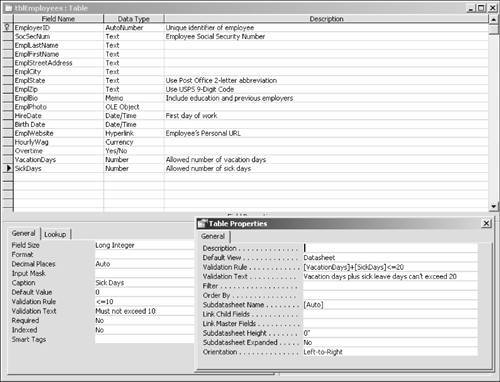
Figure 5.14 shows tblEmployees in Design view (I've included the table's property sheet).
Figure 5.15 shows in Datasheet view most of the fields of the newly created table, which as yet has no records. You can also compare your work with tblEmployees in the database NiftyLionsEndChap5, which can be downloaded from the companion web site.

