Form Overview
| Let's first get an idea of the internal workings of a form before you start building any form objects. The Nifty Lions DatabaseFor this chapter, you'll use the Nifty Lions database that's among the files you downloaded. This database is for a small mail-order company that specializes in clothing, jewelry, novelty items, and other items with a lion motif. Download NiftyLionsChap11.mdb to a convenient folder on your hard drive and open it. (NiftyLionsChap11End.mdb shows the database after all exercises in this chapter have been completed.) The database is modeled on the Northwind sample database and has most of the same tables and fields. But I hope the simpler names and fewer records make it a little easier to work with. Let's briefly review its relationships, as shown in Figure 11.1. (For a more hands-on view, choose Tools, Relationships to open the Relationships window.) All tables are related to at least one other, with referential integrity enforced. Because one order can have many items, and one item can be in many orders, tblMerchandise and tblOrders have a many-to-many relationship. A third table, tblOrderDetails, has been created as a linking table to bring them together. Figure 11.1. The relationships of the Nifty Lions database. Understanding a Form/SubformForms are often accompanied by subforms. Let's take a closer look at the form/subform shown in Figure 11.2.
Figure 11.2. A form/subform created from several tables.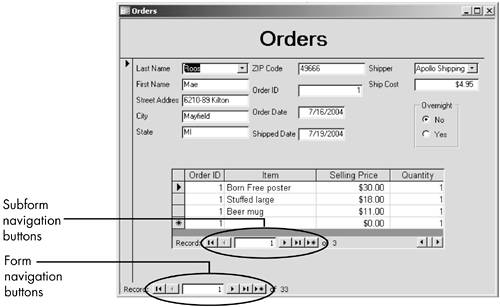 The form won't win any design prizes, nor does it have all the data you might want on an orders form. But it will be useful for exploring key form tools and functions. The form combines data from several tables, including Orders, Customers, Shippers, and Order Details. As you'll see throughout the chapter, to combine fields from several tables in a single form robustly, the tables must be tightly bound through relationships. The scheme in the Relationships window demonstrates that such integration exists. At the top of the form are fields that show the name and address of the customer, as well as key order data such as date shipped. At the bottom is a datasheet that shows the order details for each order. The datasheet is the subform. I use form to refer to the entire form (both form and subform), main form to refer to the fields on top, and subform to refer to the datasheet. Note that there are two sets of navigation buttons. The buttons all the way at the bottom are for the form; they are used to move to specific orders. The navigation buttons in the middle of the form move the focus from record to record in the order details subform. This second set of navigation buttons is not overly useful here because each order has relatively few order detail records. But for longish datasheets whose records remain partially hidden, the buttons are helpful. Detail SectionClick the View button at the far left of the Form View toolbar to go to Design view (see Figure 11.3). As is true with most forms, the Detail section is by far the most important and contains nearly all of the form's actual substance. Directly below the Orders title are the label/text box pairs that determine the content of the main form. The label on the left (Last Name, First Name, and so on) is just a caption, a mere string of text that tells you what's in the field. The text box on the right controls the content and display of the actual field values. Let me re-emphasize this important distinction: The label control simply contains static text that describes the field; the text box contains the actual values. Figure 11.3. The Orders form in Design view.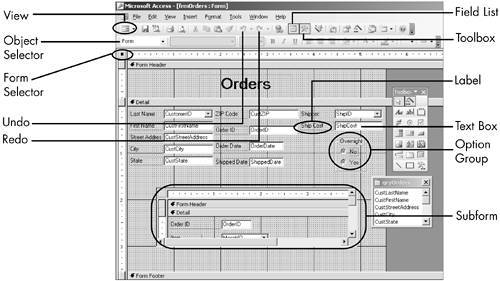 The Overnight control is an option group, which I describe later in the chapter. Below the fields is the large OrderDetails subform control. Later in the chapter, you'll re-create it. Form Header/Footer SectionsThe Form Header appears once at the top of the form and is usually used for a title, as it is here. The Form Footer appears once at the end. Currently, it doesn't exist: Its height is 0 and, by extension, there are no controls. You might use the footer for command buttons or perhaps some general instructions on using the form. The form header/footer always appear as a couple. They can be toggled on and off (that is, made to appear and disappear) by choosing View, Form Header/Footer. But if you select this command while the sections are in view, Access deletes both the sections and their controls (you will get a warning message before deletion). Page Header/FooterThe mechanics of the Page Header/Footer are similar to those of the Report Header/Footer. They differ markedly in their content and objectives, however, as the following exercise demonstrates:
The Data SourceIn a form, controls have property sheets, sections have property sheets, and the form itself has a property sheet. You can find the data source of the form's records in, you guessed it, the form property sheet.
|
EAN: 2147483647
Pages: 169