How to Create a Preboot Bundle
| Preboot bundles are associated with ZENworks imaging and make it possible to take or deliver an image to a managed device. A preboot bundle requires that you take two steps to apply the image to the device. The extra steps are there to ensure that you really want that action to take place on the device. All preboot bundles may result in actions that destroy the data on the drive as part of the imaging process. The first step involves creating and assigning a bundle to a device. In the second step you either launch the Perform the Preboot Task action or edit the preboot work snapshot on the device summary page. Complete the following steps to create a Preboot bundle in ZENworks 7 Linux Management:
Complete the wizard to create the preboot bundle. The steps of the wizard are described in the following sections. Preboot Bundle Creation Wizard: Bundle TypeOn this first page you need to select the preboot bundle type to create. Press Next. This moves you to the next step of the wizard. Preboot Bundle Creation Wizard: Preboot TypeFigure 7.9 displays the following step of the wizard. Figure 7.9. Step 2 of Preboot Bundle Creation Wizard. During this step you must select the type of preboot bundle you want to create. Select one of the following types:
After you choose the type of Preboot bundle, press Next. The following sections describe the wizard steps for each type of preboot bundle. AutoYAST Preboot Bundle CreationThe AutoYAST Preboot bundle represents a network installation of a SuSE Linux system onto the assigned managed device. AUTOYAST PREBOOT BUNDLE CREATION WIZARD STEP 3After you press Next on the initial page, this wizard page asks you to name and place the bundle in your desired folder (see Figure 7.10). Figure 7.10. General information page of Preboot Creation Wizard.
Enter the following information:
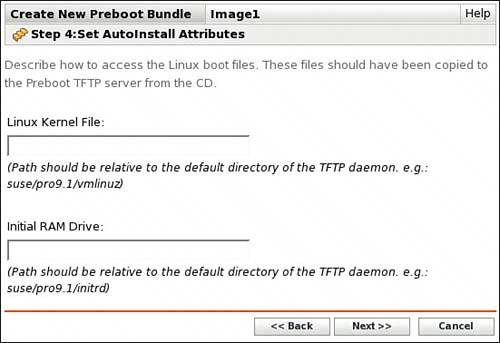
Press Next. This advances the wizard to where you specify the location of the kernel files and other files for the AutoYAST process. AUTOYAST PREBOOT BUNDLE CREATION WIZARD STEP 4In this step you must specify the path to the files necessary for the AutoYAST process. Figure 7.11 shows an example of this screen. Figure 7.11. Bundle Wizard page creation of AutoYAST bundle, path files.
On this page enter the following values:
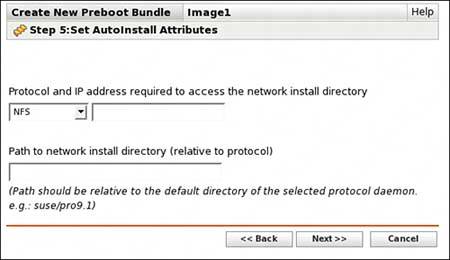
Press Next to advance to the next page in the wizard. AUTOYAST PREBOOT BUNDLE CREATION WIZARD STEP 5This step enables you to specify the protocol, server address, and path to the network install directory where your system can be found. Figure 7.12 shows an example of this page of the wizard. Figure 7.12. undle Wizard page creation of AutoYAST bundle, AutoInstall Attributes for Install Directory.
Enter the following information into the page:
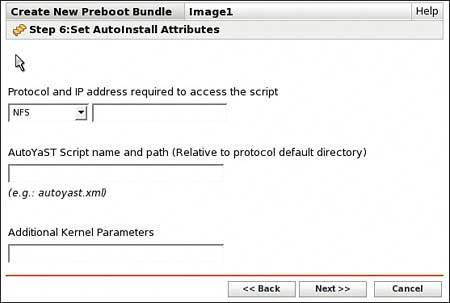
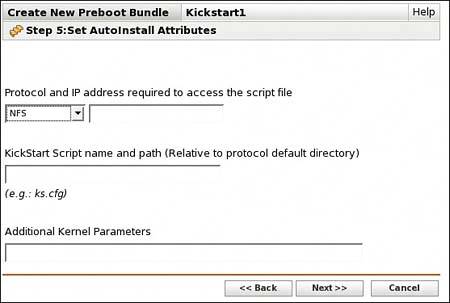
Press Next to advance to the next page in the wizard. AUTOYAST PREBOOT BUNDLE CREATION WIZARD STEP 6This step enables you to specify the protocol, server address, and path to the AutoYAST script on your network. Figure 7.13 shows an example of this page of the wizard. Figure 7.13. Bundle Wizard page creation of AutoYAST bundle, AutoInstall Attributes for AutoYAST script.
Enter the following information into the page:
Press Next to advance to the next page in the wizard. AUTOYAST PREBOOT BUNDLE CREATION WIZARD: SUMMARYThis step in the wizard provides a summary of your Preboot bundle. Review the summary page and press Back to return to a previous page to make changes, Cancel to terminate the bundle creation, or Finish to complete and create the bundle. After you press the Finish button, the ZENworks Control Center displays whether the bundle was created successfully. Press OK to return to the ZENworks Control Center. KickStart Preboot Bundle CreationThe KickStart preboot bundle represents a network installation of a RedHat system onto the assigned managed device. KICKSTART PREBOOT BUNDLE CREATION WIZARD: NAMINGThis wizard page asks you to name and place the bundle in your desired folder (refer to Figure 7.10). Press Next. This advances the wizard to where you specify the location of the kernel files and other files for the KickStart process. KICKSTART PREBOOT BUNDLE CREATION WIZARD: PATHSIn this step you must specify the path to the files necessary for the KickStart process. Figure 7.14 shows an example of this screen. Figure 7.14. Bundle Wizard page creation of KickStart bundle, path files.
On this page enter the following values:
Press Next to advance to the next page in the wizard. KICKSTART PREBOOT BUNDLE CREATION WIZARD: SERVERThis step enables you to specify the protocol, server address, and path to the KickStart script on your network. Figure 7.15 shows an example of this page of the wizard. Figure 7.15. Bundle Wizard page creation of KickStart bundle, AutoInstall Attributes for KickStart script.
Enter the following information into the page:
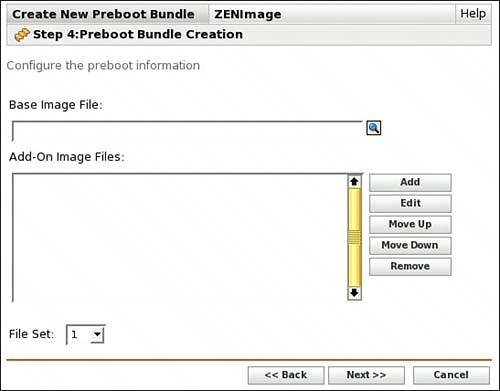
Press Next to advance to the next page in the wizard. KICKSTART PREBOOT BUNDLE CREATION WIZARD: SUMMARYThis step in the wizard provides a summary of your Preboot bundle. Review the summary page and press Back to return to a previous page to make changes, Cancel to terminate the bundle creation, or Finish to complete and create the bundle. After you press the Finish button, the ZENworks Control Center displays whether the bundle was created successfully. Press OK to return to the ZENworks Control Center. ZENworks Image Preboot Bundle CreationThe ZENworks Image Preboot bundle represents an image that has been created with the ZENworks Image Explorer or an image that was taken from an existing device and stored on the ZENworks server. ZENWORKS IMAGE PREBOOT BUNDLE CREATION WIZARD: NAMINGThis wizard page asks you to name and place the bundle in your desired folder (refer to Figure 7.10). Press Next. This advances the wizard to where you specify the base and optional add-on image files. ZENWORKS IMAGE PREBOOT BUNDLE CREATION WIZARD: IMAGE FILEIn this step you must specify the path to the image (.zmg) file that contains the base image and any additional add-on image files to include in the imaging process. Figure 7.16 shows an example of this screen. Figure 7.16. Bundle Wizard page creation of ZENworks Image bundle, base and add-on files.
When a ZENworks Image is placed on a system, the base image is first placed onto the drive. The placing of a base image is, by default, destructive and removes any data and partitioning that may have been on that drive. After the base image is applied to the device, the add-on images, which are never destructive, are applied to the disk drive. On this page enter the following values:
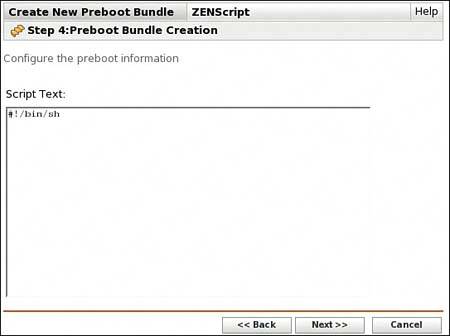
Press Next to advance to the next page in the wizard. ZENWORKS IMAGING PREBOOT BUNDLE CREATION WIZARD: SUMMARYThis step in the wizard provides a summary of your Preboot bundle. Review the summary page and press Back to return to a previous page to make changes, Cancel to terminate the bundle creation, or Finish to complete and create the bundle. After you press the Finish button, the ZENworks Control Center displays whether the bundle was created successfully. Press OK to return to the ZENworks Control Center. ZENworks Script Preboot Bundle CreationThe ZENworks Script Preboot bundle represents a script that will be executed in the ZENworks Imaging environment on the device. ZENWORKS SCRIPT PREBOOT BUNDLE CREATION WIZARD: NAMINGThis wizard page asks you to name and place the bundle in your desired folder (refer to Figure 7.10). Press Next. This advances the wizard to where you specify the script commands you want executed. ZENWORKS SCRIPT PREBOOT BUNDLE CREATION WIZARD: SCRIPTThis step enables you to enter the script that you want launched. Figure 7.18 shows an example of this screen. Figure 7.18. Bundle Wizard page creation of ZENworks Image bundle, script.
On this page enter the script into the text box. Press Next to advance to the next page in the wizard. ZENWORKS SCRIPT PREBOOT BUNDLE CREATION WIZARD: SUMMARYThis step in the wizard provides a summary of your Preboot bundle. Review the summary page and press Back to return to a previous page to make changes, Cancel to terminate the bundle creation, or Finish to complete and create the bundle. After you press the Finish button, the ZENworks Control Center displays the success or failure of the bundle creation. Press OK to return to the ZENworks Control Center. |


EAN: 2147483647
Pages: 147
- The Second Wave ERP Market: An Australian Viewpoint
- Context Management of ERP Processes in Virtual Communities
- Distributed Data Warehouse for Geo-spatial Services
- Intrinsic and Contextual Data Quality: The Effect of Media and Personal Involvement
- Relevance and Micro-Relevance for the Professional as Determinants of IT-Diffusion and IT-Use in Healthcare