Printing PDFs
PDF documents can be printed out of Acrobat with many variations. The print options available depend upon the printer driver you select because each device supports different types of output. Many desktop non-PostScript printers, for instance, support only composite printing and no separations. Here I will use the Adobe PDF printer driver, because it includes a wide range of options, to demonstrate the printing process, and I will discuss some common variations along the way. As I proceed, I ll focus on the print variables that are of special interest to printing PDF documents and provide brief comments on standard printing choices.
-
Choose File > Print. The Print dialog appears (Figure 13.2).
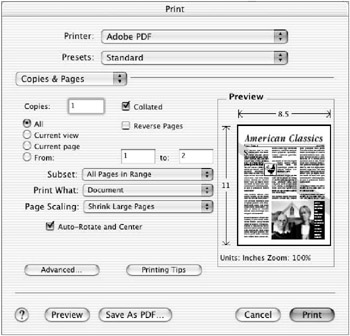
Figure 13.2: Acrobat s main Print dialog -
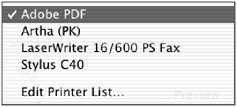
The first step in this dialog is to select a printer driver. This is a critical initial step because the printer driver you select will determine which print capabilities and variables will be available. From the list of available drivers (here, the Printer drop-down menu at the top of the dialog), choose the output device on which you intend to print your PDF. Here I will select Adobe PDF as if I will print this to another PDF file.
Note The look and actual content and arrangement of the menus ,check boxes,and fields will depend upon which operating system (Windows or Mac),which version of the OS,and which specific printer driver you have selected.Some terminology will be different as well.On a Mac you may have PDF or Print Options, while in Windows the terminology may be Preferences or Properties. And different versions of Windows and Mac operating systems will look different as well.You will likely have to root around a bit to get used to the specific look and organization of your Print windows .
-
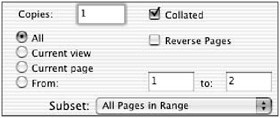
From the unnamed drop-down menu, choose the Copies & Pages option.
-
Specify the number of copies and which page(s) to print, but also notice that you have the choice of printing either the Current Page (active view) or just the Current View (such as a zoomed-in view) in addition to standard pages.
-
Acrobat also provides a Print What menu, which allows you to select from a list of possible PDF document components such as comment and form fields in addition to the standard document. The contents of your choice will be displayed in the Preview window to the right.
Note A separate Print With Comments command is covered later in this chapter.
-
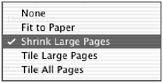
The Page Scaling menu provides the ability to not just scale all pages but scale and tile individual pages, such as oversized pages. This is a handy feature, since a PDF document can support pages of various sizes.
-
Check the Auto-Rotate And Center check box if you have pages with different orientations and would like them to all print in one orientation. This too is a handy option, since a PDF supports multiple page orientations.
Printing to a PostScript File
At some point, you need to tell the Print dialog box whether you want to actually print out a document or save the document as a file, such as a PostScript file (often known as print to disk ). These settings are typically found in a menu associated with the main Print window.
To print to a PostScript file, in the main Print dialog, click the unnamed dropdown menu and choose Output Options, as shown in Figure 13.3.
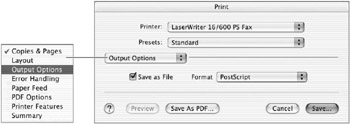
Figure 13.3: Print dialog Output Options
| Note | You can still change the printer driver in this dialog,but as I mentioned earlier it is best to do this at the beginning of the print setup. |
To save your file to disk, select the Save As File check box and then, from the Format drop-down menu, choose PostScript. You can save the resulting PostScript file directly into a watched folder for reprocessing into a PDF, open it in Distiller separately, or simply save it for other uses (such as printing on older devices that do not accept PDF documents).
Printing to a PDF File
The Format menu (in the Print dialog Output Options) also offers another choice: PDF. Although the Print dialog supports saving a PDF out as a file, this is usually not recommended if you want to create a dependable PDF file. If you want to save a PDF document out as another PDF file, it is best to use the File > Save As command, covered later in this chapter.
| Note | PDF documents can also be saved as PostScript files from Save As, as we did in the Chapter 12, Editing PDFs. However, the Print method, which I am using here, provides more control of the output, but both are viable methods . |
If you do select to print this PDF as another PDF ”which you might want to do to change the look and content of the PDF (such as printing proof separations) ”you will want to assign the Distiller setting to be used. Here s how:
-
In the main Print dialog, click the unnamed drop-down menu and choose PDF Options. The PDF Options dialog appears (Figure 13.4).
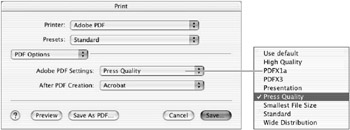
Figure 13.4: Print dialog PDF Options -
From the Adobe PDF Settings drop-down menu, choose the Distiller setting you want to be used for the creation of the PDF document. (See Chapter 4, Creating the PDF You Want, for more information on PDF Settings.)
-
From the After PDF Creation menu, choose whether you would like to have your new PDF opened and, if so, by which application, Acrobat or Reader. This is a handy timesaving option, since it is always a good idea to take look at your PDF after you create it.
Fine-Tuning Print Settings
After you have set up the main Print dialog, you can choose to either go ahead and print your document (or save it to a file) or fine-tune your output. If you are outputting in a commercial print environment and printing directly from Acrobat, or if you want to print separations for proofs or to control the colors that will print, you will likely want to further fine-tune your output.
In the main Print dialog, click the Advanced button. (This may be called a Preferences or Properties button in your dialog.) The Advanced Print Setup dialog appears (Figure 13.5). The list on the left side of this dialog provides several categories of options you can tweak.
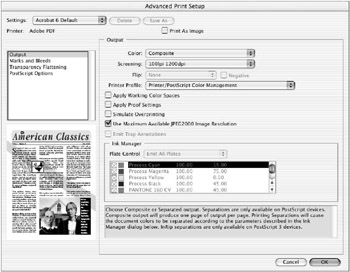
Figure 13.5: Advanced Print Setup
The next few subsections cover the options in each of the categories. When you are through configuring all the print settings, you can save your choices to be loaded again in the future as a set by clicking the Save As button to create a new custom setting.
| Note | If you are unsure of how to apply a particular setting in a specific circumstance, click the option in question and read the description that appears in the very helpful text window at the bottom of the dialog. |
When you have finished with the Advanced Print Setup, click OK and complete the printing process.
Output Options
Select Output from the list on the left. A variety of color and screening- related characteristics will appear. Here are tips on configuring some of these:
Color From this menu, choose whether you want your colors to print as a type of composite (Composite or Composite Gray) or as a type of separation (Separations or In-RIP Separations).
-
Composite All colors present will be output together as one composite page of output for each document page.
-
Composite Gray All colors will be converted to grayscale and output as one composite page of output for each document page.
Note If you select one of the Composite settings, you will have the option of activating two proofing-oriented check boxes: Applying Proof Settings (both Composite modes) and Simulate Overprinting (Composite only), both of which rely on Acrobats 6 s new on-screen proofing capabilities. See the section Previewing PDF Prints at the beginning of this chapter for instructions on controlling on-screen proofing settings.
-
Separations Each color used will be separated and output as a separate output page for each color present on each page.
-
In-RIP Separations Pages will be output initially as composite pages but with each color prepared for separation at a printing device (RIP). In-RIP Separations are supported only on PostScript level 3 devices.
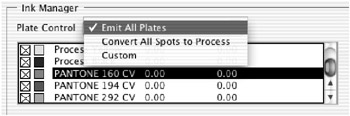
Ink Manager If you select Separations from the Color menu, the Ink Manager area will become accessible. You can control which inks, typically process (CMYK) and Pantone spot colors, will print, as well as which color conversions (such as spot to process) you may want to occur. If you select Custom from the Plate Control menu, you can control the fate of each color separately.
| |
Reproducing a composite PDF as a color-separated PDF is a good way to test to see how the colors will actually separate without having to actually print the PDF. Also note the accommodation for In-RIP Separations, in which composite PDF files are set up to separate at the printing device (RIP), which are becoming increasingly more common. Both Separation choices allow you to control which colors will separate. Note, however, that Acrobat 6 does allow you to preview separations on screen without actually outputting (to PDF or print) the colors to separations. As an old-school (I love technology but don t fully trust it) kind of guy, I still output my pages to color separations (as PDF documents), but as I gain more confidence with Acrobat s new on-screen separation preview, I may relinquish my need to actually see the separations on separate PDF pages. Note: I didn t give up my paper print separations until Acrobat 5!
| |
Color management: Printer Profile In the middle of the Print dialog, you can choose to either use the color management controls here or ignore them. Which options are available here will depend upon your choices in the Color menu. Whether you control your color here or in a previous environment such as Photoshop will largely depend upon your workflow. If you, like me, create and control most of the images that go into your documents, and you create most of your own page layout documents, then you will likely control your colors during image capture in Photoshop and/or your page layout application. In other words, you don t want Acrobat mucking around with your colors. In this kind of front-end-controlled color workflows you will want to select Same As Source (No Color Management).
If, on the other hand, your workflow involves lots of documents and images arriving from various sources (such as in a newspaper or other multisource publication), and you are putting them all together in a PDF for output, then you might want to control the color in Acrobat in order to attempt to apply some semblance of color consistency to the color chaos. So you might select a print profile consistent with your output device, such as U.S. Web Uncoated v2.
Apply Working Color Spaces If your workflow and color management system require that every color object be assigned (tagged with) a color profile, you can click this check box to apply the color profile you selected from the Printer Profile menu as your source profile for untagged color objects.
JPEG2000 Check the Use Maximum Available JPEG2000 Image Resolution check box if you want your JPEG2000 (J2K) format images to print at their highest resolution. The JPEG2000 image format supports multiple resolutions , and checking this box will ensure that the highest-available resolution is used. Select this for the highest-quality output devices, such as for prepress, or if you are not satisfied with the default results.
| |
The fate of any nonprint colors such as RGB or index colors that may still be in the PDF is uncertain during printing. They may be converted to process, typically CMYK (using who- knows -what algorithm), converted to grayscale, or not printed at all. Even the spot-to-process conversion presented here is suspect, since there is no agreed-upon set of spot-to-process conversion values. So for the most dependable and predictable results, it is a good idea to have all colors previously assigned to either the process or spot colors you want, prior to printing. Acrobat plug-ins such as Enfocus PitStop can make the reassignment of color values in a PDF a relatively fast and easy process.
| |
Marks And Bleeds Options
To see the next category of options, choose Marks And Bleeds from the list on the left side of the main Print dialog (Figure 13.6).
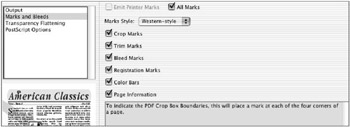
Figure 13.6: Marks And Bleeds options
Select the items you would like to have printed; check All Marks if you want them all. Again, if you are not sure what an item is, click it and read about it in the text information area at the bottom of the window.
| Note | One of the terrific features of a PDF document is that the document and its contents can be printed at 100 percent as a PDF file, regardless of what marks or color bars you want to show. You are not restricted to an 8.5 ³ —11 ³ page with a 1/4 ³ margin as you are with many desktop printers. |
Transparency Flattening Options
Next, choose Transparency Flattening (Figure 13.7) from the category list on the left side of the main Print window. Here are some tips on setting up these options:
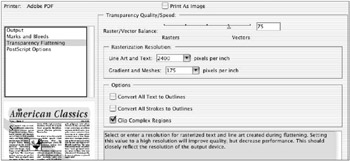
Figure 13.7: Print dialog Transparency Flattening options
Raster/Vector Balance Many graphics and even page layout applications now support saving images with both vector- and pixel (raster)-based elements along with transparency. These combination graphics can be very complex and sometimes difficult to output. Flattening these complex images can reduce printing complexity. The Rasters/ Vectors slider allows you to determine how much vector information, and therefore complexity, will be allowed into the final version of the PDF or print. The higher this value is, the higher the quality of the final output (and the more RAM and processing time are required). This value should be between 75 and 100 for the best results. If you are generating PostScript errors from your print output device, you can lower this value; if complex areas of your pages are not printing well, you may want to raise it. If your output device just refuses to print your PDF, try checking the Print As Image check box, which will convert everything to pixels (100 percent raster) to minimize the document complexity.
Rasterization Resolution These two menus in this section are used to control the resolution at which various types of vector elements will be rasterized, such as vector (PostScript) text, line art gradients, and meshes. For the highest-quality text and line art edges, select the maximum optical resolution of your output device (1200 for desktop, 2400 “3600 for commercial printing). Gradients and meshes should be set to output at the line screen at which other raster images will be printed (85 “120 for desktop devices and 150 “175 for commercial printing). If your Raster/Vector Balance is set to 100, a minimum amount of rasterization of vector elements will occur.
| Note | Choose Advanced >Transparency Flattener Preview to create a simulated preview of how the various Transparency Flattening settings will affect the printed document. |
Convert All Text To Outlines and Convert All Strokes To Outlines Checking these boxes will simplify PostScript-based images (text and stroked art) when an image is flattened, thereby simplifying the printing process. However, converting to outlines may result in the fattening of text and line art edges, particularly if the edges are thin and/or serif-like. I avoid selecting these options unless I am receiving PostScript errors during printing.
Clip Complex Regions I select this option if I have complex overlapping vector and raster art and the edges of my overlapping artwork and images are not printing accurately. But be aware that checking this box may result in slower printing or PostScript errors because of the complexity of the paths created.
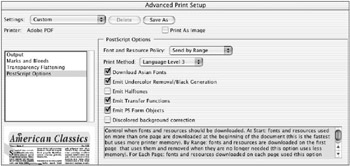
PostScript Options
For the next category of options, choose PostScript Options from the list on the left side of the main Print dialog (Figure 13.8). The settings in this window determine which elements will be downloaded to the printer memory and when. Here are some guidelines on setting them up:
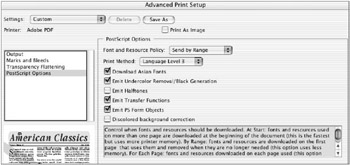
Figure 13.8: PostScript Options
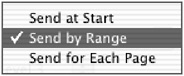
Font And Resource Policy This option controls when fonts and other repetitive resources are downloaded to the printer. I typically select Send By Range because this will download font and other data initially and then remove the data once it is no longer needed.
Print Method Here you set the level of PostScript code to be used during printing. Historically there are three levels, although only two appear here. Most newer PostScript printers will be Language Level 3. When in doubt about a printer or if you repeatedly receive PostScript errors, choose Language Level 2.
The remaining options are a checklist of items and information to be included. I typically check all of these except Emit Halftones (halftoning should be determined at the RIP) and Discolored Background Correction (I turn this on only in rare cases with certain desktop printers that create background color casts). Remember that if you are unsure of the meaning of these various choices, click a selection and read its description in the lower text information window.
Printing over the Internet
Acrobat 6 provides the ability to print your PDF files over the Internet through a service called PrintMe. This service allows you to print to PrintMe-enabled devices from any Internet-connected device. Here s how to get started:
-
Open the PDF document you would like to print over the Internet.
-
Make sure you re online.
-
Choose File > PrintMe Internet Printing. The initial PrintMe signup /login window appears (Figure 13.9).
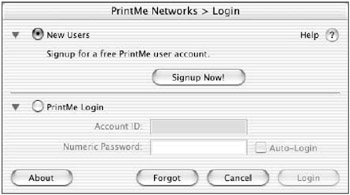
Figure 13.9: The PrintMe login dialog -
Click the Signup Now button and follow the instructions.
EAN: 2147483647
Pages: 102