23.8 Questions
|
| < Day Day Up > |
|
23.7 Exercises
-
Using Xrefs whenever possible, create the drawing in Figure 23.7.1a.
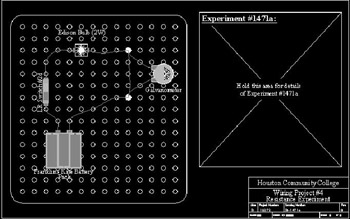
Figure 23.7.1a: MyCircuit1d.dwg1.1
Use the following references (included in the C:\Steps\Lesson23 folder):
1.1.1
Title block
1.1.2
Battery
1.1.3
Lamp
1.1.4
Galvanometer
1.1.5
MyBoard (you created this in Exercise 23.1.1.1)
1.1.6
title info (insert this as a block to use the attributes)
1.2
Create layers as needed (you'll need a wire and a text layer)
1.3
Save the drawing as MyCircuit1d.dwg in the C:\Steps\Lesson23 folder.
-
Create the drawings in Figures 23.7.2a and 23.7.2b, using Xrefs whenever possible.

Figure 23.7.2a: Pump Config 1.dwg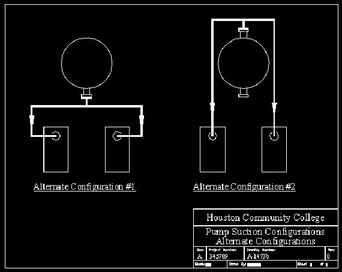
Figure 23.7.2b: Pump Config 2.dwg2.1
Use the following references (included in the C:\Steps\Lesson23 folder):
2.1.1
Title block-a
2.1.2
Other drawings you might wish to create
2.1.3
title info (insert this as a block to use the attributes)
2.2
Create layers as needed (you'll need a pipe and a text layer)
2.3
Save the drawings as Pump Config 1.dwg and Pump Config 2.dwg in the C:\Steps\Lesson23 folder.
-
Create the drawings in Figures 23.7.3a and 23.7.3b, using Xrefs whenever possible.
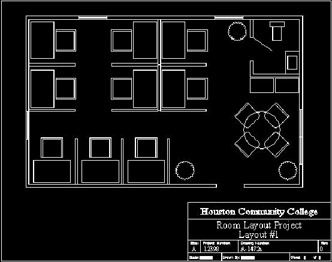
Figure 23.7.3a: Floor Plan Layout1.dwg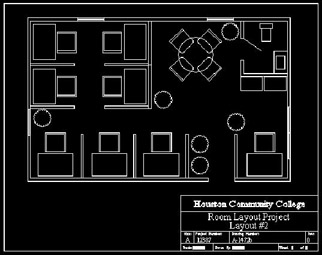
Figure 23.7.3b: Floor Plan Layout2.dwg3.1
Use the following references (included in the C:\Steps\Lesson23 folder):
3.1.1
Title block-a (you'll need to scale it for ¼"=1'-0" drawing on an 11"x8½" sheet of paper)
3.1.2
Desk&chair
3.1.3
Plant
3.1.4
Room
3.1.5
Table&chairs
3.1.6
Vending machines
3.1.7
Wall panel
3.1.8
title info (Insert this as a block to use the attributes. You'll need to scale it as well.)
3.2
Create layers as needed
3.3
Save the drawings as floor plan layout1.dwg and floor plan layout2.dwg in the C:\Steps\Lesson23 folder.
-
Open the cutting table.dwg file in the C:\Steps\Lesson23 folder. Create the 11"x17" layout shown in Figure 23.7.4a.
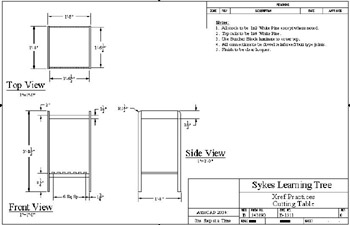
Figure 23.7.4a: Cutting Table-
Xref the ANSI B title block from AutoCAD's template folder.
-
Create appropriate layers, text styles, linetypes, etc.
-
Use the title info.dwg attributed block in the C:\Steps\Lesson23 folder to fill in the title block information.
-
-
Open the Wheel.dwg file in the C:\Steps\Lesson23 folder. Create the 8.5"x11" layout shown in Figure 23.7.5a.
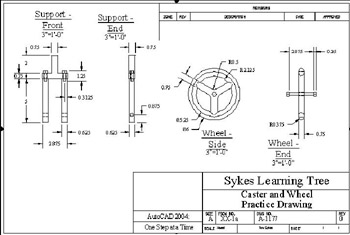
Figure 23.7.5a: Wheel.dwg-
Xref the ANSI A title block from AutoCAD's template folder.
-
Create appropriate layers, text styles, linetypes, etc.
-
Use the title info.dwg attributed block in the C:\Steps\Lesson23 folder to fill in the title block information.
-
-
Open the table lamp.dwg file in the C:\Steps\Lesson23 folder. Create the 8.5"x11" layout shown in Figure 23.7.6a.
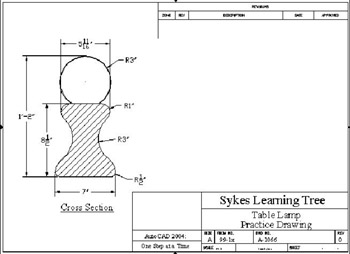
Figure 23.7.6a: Table Lamp-
Xref the ANSI A title block from AutoCAD's template folder.
-
Create appropriate layers, text styles, linetypes, etc.
-
Use the title info.dwg attributed block in the C:\Steps\Lesson23 folder to fill in the title block information.
-
-
Open the planter.dwg file in the C:\Steps\Lesson23 folder. Create the 8.5"x11" layout shown in Figure 23.7.7a.

Figure 23.7.7a: Round Planter
-
Xref the ANSI A title block from AutoCAD's template folder.
-
Create appropriate layers, text styles, linetypes, etc.
-
Use the title info.dwg attributed block in the C:\Steps\Lesson23 folder to fill in the title block information.
-
-
Open the patio planter.dwg file in the C:\Steps\Lesson23 folder. Create the 8.5"x11" layout shown in Figure 23.7.8a.
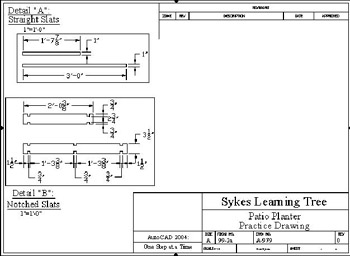
Figure 23.7.8a: Patio Planter-
Xref the ANSI A title block from AutoCAD's template folder.
-
Create appropriate layers, text styles, linetypes, etc.
-
Use the title info.dwg attributed block in the C:\Steps\Lesson23 folder to fill in the title block information.
-
-
Open the OnArtesia.dwg file in the C:\Steps\Lesson23 folder. Create the 17"x23" layout shown in Figure 23.7.9b.
Figure 23.7.9a: Title Block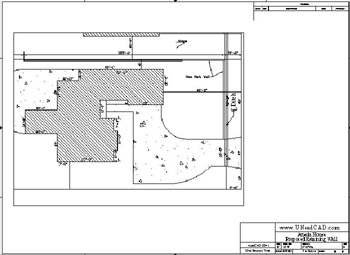
Figure 23.7.9b-
Xref the ANSI C title block from AutoCAD's template folder.
-
Create appropriate layers, text styles, linetypes, etc.
-
Use the title info.dwg attributed block in the C:\Steps\Lesson23 folder to fill in the title block information. Use the information in Figure 23.7.9a to help you.
-
|
| < Day Day Up > |
|
EAN: 2147483647
Pages: 96
- Structures, Processes and Relational Mechanisms for IT Governance
- Integration Strategies and Tactics for Information Technology Governance
- Measuring and Managing E-Business Initiatives Through the Balanced Scorecard
- Measuring ROI in E-Commerce Applications: Analysis to Action
- Governance Structures for IT in the Health Care Industry