22.4 Plotting the Layout
|
| < Day Day Up > |
|
22.3 Using Text in Paper Space
In a drawing that uses Paper Space, place all text in Paper Space unless it's part of the model. The reasoning behind this general rule is this: Placing text in Paper Space is easier than placing text in Model Space.
Let me explain.
Remember how difficult you found sizing text in Model Space? You had to consider the size that you wanted the text to be at plot time and the scale at which you would plot. Then you had to work some mathematical wizardry to determine the size of the text to use in your drawing. You had to do all of this before placing any text.
Try this formula to determine text height in Paper Space: The height you want the text to be when you plot equals the height you make your text. It just can't get any simpler than that!
But wait! AutoCAD has included a tool that greatly simplifies the Paper Space to Model Space (and vice versa) translation of text sizes. When you determine that text simply must go into Model Space, use the SpaceTrans command to help you determine its size. This transparent command works anytime AutoCAD asks you for a size. Look at its sequence (this sequence is seen when the command is given from Model Space):
Command: dt
Current text style: "TIMES" Text height: 0'-0"
Specify start point of text or [Justify/Style]:
Specify height <0'-0">: 'spacetrans
>>Specify paper space distance <1">: [tell AutoCAD how large you'd like the text to be in Paper Space]
Resuming TEXT command.
Specify height <0'-0">: [AutoCAD automatically translates the size into Model Space increments]
Specify rotation angle of text <0>: [continue with the Text command]
Enter text:
Spacetrans determines the appropriate Model Space size for the text and responds to the Specify height prompt for you. (The prompts are slightly different when translating from Paper Space to Model Space.)
You'll see this in action in our next exercise. Let's add a bit of text to our drawing.
| Note | You can use either the Text or MText command to place text in Paper Space. |
Do This: 22.3.1 Adding Text in Paper Space
-
Open the flr-pln22b-new.dwg file in the C:\Steps\Lesson22 folder.
-
Be sure you're in Paper Space.
-
Follow these steps.
TOOLS
COMMAND SEQUENCE
STEPS

Command: dt
1. On the TEXT layer, add the callouts shown in Figure 22.3.1.1a. Large text is 3/16" and smaller text is 1/8". (Use the Times text style that has already been set up for you.)
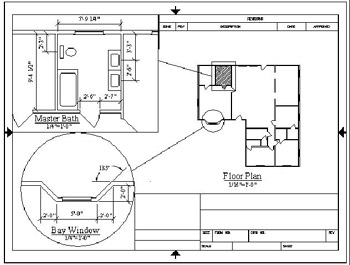
Figure 22.3.1.1a2. Now fill out the title block as shown in Figure 22.3.1.2a. Text sizes are ¼", 3/16", and 1/8". Feel free to use your own school's name.

Figure 22.3.1.2a
Command: qsave
3. Save the drawing but don't exit.

Command: ms
4. Now let's add some text to Model Space. We'll have AutoCAD size it for us. First, activate Model Space and make the right viewport current.

Command: dt
Current text style: "TIMES" Text height: 0'-0 1/8"
Specify start point of text or [Justify/ Style]: c
Specify center point of text:
5. Begin the Text command and center the text in the den (refer to Figure 22.3.1.8a).
Specify height <0'-0 1/8">: 'spacetrans
6. Now enter the SpaceTrans command transparently.
>>Specify paper space distance <1">: 3/32
Resuming TEXT command.
Specify height <0'-0 1/8">: 18.00000000
7. Tell AutoCAD to make the text height 3/32". AutoCAD makes the translation and enters the text height for you.
Specify rotation angle of text <0>:
Enter text: Den
Enter text: [enter]
8. Complete the command, entering the text Den as shown in Figure 22.3.1.8a.

Figure 22.3.1.8a9. Complete the text entries as detailed in Figure 22.3.1.8a.

Command: qsave
10. Save the drawing.
Take a moment and toggle between the Model tab and the Layout (My First House) tab of your drawing. Notice which objects exist as part of the model and which don't. Only those objects that you created through the viewports in Model Space exist on the Model tab. Everything else exists as part of the paper on which you'll plot your model.
Once the dimensions are drawn and the text placed – the i's dotted and the t's crossed – it's time to plot the drawing. Let's look at that next.
|
| < Day Day Up > |
|
EAN: 2147483647
Pages: 96