WebSnap Login
In the previous demo we used WebSnap to produce a Web server application that could be used to browse, edit, and search (I didn't show that) the biolife table. This time, I want to extend that example in two ways. For one thing, I want to show how to produce a master-detail relationship using the well-known customer and orders tables. But first, I want to use some kind of authentication, using a login form (and as a consequence, managing a list of known users and passwords at the same time).
WebSnap Application
To start the new WebSnap application, click File, New ”Other, and go to the WebSnap tab of the Object Repository for the WebSnap application icon. This will result in the WebSnap Application Wizard, which needs some specific options set (compared to last time, when we mainly used the default settings). I want to select the Web App Debugger executable with DrBob42 as CoClass name again.
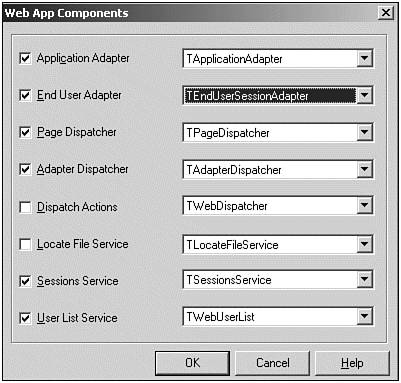
The second group of options specifies the Application Module Components. We'll leave this set to a Page Module (instead of a regular Data Module). However, this time we need to click the Components button to add some additional components that we need for this example. We need to select the End User Session Adapter (drop down the End User Adapter combobox and select the TEndUserSessionAdapter ), Session Service, and User List Service (the only two we don't need are the Dispatch Actions and Locate File Service), resulting in Figure 22.12.
Figure 22.12. Specific Web App components.
The third group of options are the Application Module Options. I always use Home as the name for the first page (instead of PageProducerPage1 ), but I leave all other Page Options set at their default. This is the starting page of the application, so it can be a general welcome to anyone , without the need to login.
After you click OK, a new WebSnap application is generated. Along with a bit more than that, actually. You'll noticed an empty new form as well as your page module. The empty form is generated because we selected the Web App Debugger server type. The best thing to do now is to save your project, renaming Unit1 (the empty form) to MainForm.cpp , Unit2 (the page module) to pmHome.cpp , and the project itself to WAD.bpr (again ”you might want to save everything in a new directory).
You can resize the main form, add a nice label to it (to remind you that ”when you see it ”the new WAD WebSnap application is running).
WebSnap Page Module
The WebSnap Page Module for the first (Home) page contains a few more components than last time. Apart from the PageProducer , we now also have WebAppComponents , ApplicationAdapter , EndUserSessionAdapter , PageDispatcher , AdapterDispatcher , SessionService , and a WebUserList , as can be seen in Figure 22.13.
Figure 22.13. Home page module.
WebUserList
We actually need to start with the latter to create a list of "known" users, their passwords, and ( optionally ) their specific access rights and permissions. So, double-click the WebUserList to get into the WebUserList->UserItems editor. You can add new users, their password, and access rights here. I always leave the latter empty, but in real-world situations, the access rights field can be a convenient way to make a distinction between normal users and administrators (or database managers), for example.
Press Ins or click the left button to add a new UserItem . Then, select a UserItem and use the Object Inspector to assign values to the AccessRights (left empty), Password , and UserName .
For now, I've just added a few users and their passwords, resulting in the following list of five users and their passwords, as can be seen in Figure 22.14.
Figure 22.14. WebUserList editor.
Login Page Module
After we have a list of users and passwords, we can start to make the official Login page of our WebSnap application. For this, we need to add a new WebSnap Page Module (the usual way).
We need to make a few changes in this dialog (see Figure 22.15). First of all, the Producer Type must change from a regular PageProducer to an AdapterPageProducer . Second, the Name property of the Page options should be set to Login (or something like that). The Title will automatically follow the changes in the Name .
Figure 22.15. New WebSnap Page Module.
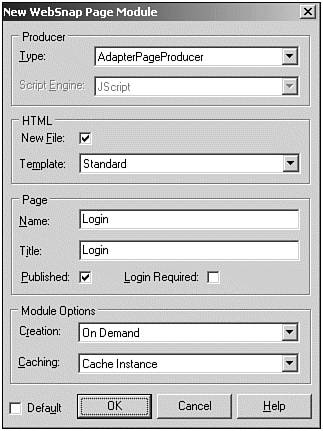
Note that we should not check the Login Required option at this time because this is the login dialog itself. Or at least, we'll make it the Login dialog in just a second.
When you click OK, a new Page Module is created, with only an AdapterPageProducer inside. Save this file in pmLogin.cpp , and go to the WebSnap tab of the C++Builder 6 component palette to drop a TLoginFormAdapter on the Login Page Module.
LoginFormAdapter
The LoginFormAdapter knows about Login names , passwords, and the next page that a user wants to visit (if the login was successful). Remember last time when we connected dataset fields via a DataSetAdapter to adapter fields from the AdapterPage Producer ? Well, the LoginFormAdapter will show a slightly different way to connect to an AdapterPageProducer .
To see the internal fields of the LoginFormAdapter , just double-click it so the Field Editor starts. Then, select Fields and right-click it and select Add All Fields. This results in three (explicitly) persistent fields: AdaptUserName , AdaptPassword , and AdaptNextPage . You can select each individual adapter field and change some properties, such as the DisplayLabel for the AdaptUserName (change it from UserName to simply User ). If you've decided to leave the Password field empty for one or more of your users (in the WebUserList ), this is generally no problem. However, I always want to enforce the use of passwords, and you can do so (at design time), by setting the PasswordRequired property of the LoginFormAdapter component to true .
Login Form
The three new adapter fields will now need to be connected to the AdapterPage Producer , resulting in a visual Login form that we can use. To actually build the Login Form, we need to go back to the AdapterPageProducer on the Login Page Module (after all, it's the Page Producer that generates the HTML). If you double-click the AdapterPageProducer you get the Web Page Editor.
In the Web Page Editor, select the AdapterPageProducer (it's the only component anyway), and right-click with the mouse to get the Add New Components dialog. Alternately, you can press the Ins key or press the button in the upper-left corner of the Web Page Editor. In whatever way you do it, make sure you select the AdapterForm . Then, for the AdapterForm , right-click it and add an AdapterCommandGroup as well as an AdapterFieldGroup (note that you can do a multiselect in the Add Web Component dialog).
We'll now get two design time warnings that are easy to solve (see Figure 22.16).
Figure 22.16. Web Page surface designer editor.
Select the AdapterCommandGroup component, and assign the AdapterFieldGroup to its DisplayComponent property. Next, select the AdapterFieldGroup component and assign the LoginFormAdapter to its Adapter property. This last step will not only remove the last warning, but will also result in a preview of the Login form. Note the UserName field, which only displays the label User (as we specified earlier).
You might want to move the AdapterFieldGroup up in the list of the AdapterForm (if only to make sure the Login button itself ”which is part of the AdapterCommandGroup ” is shown under the three input fields).
Incorrect Login
Before we continue to test this, we need to do a few more things. First of all, we need to have some pages to select as Next Page that actually require Login. We'll do that in a moment. What we need to do first is to make sure that the user will get some useful feedback when an attempt to login has failed. For that, or generally any error situation, we need an AdapterErrorList (which ”as you probably can guess ” displays a list of error messages). Select the AdapterForm component, click Ins, and select an AdapterErrorList to give Login (and general error) feedback. As usual, we get a design time warning that the Adapter property of the AdapterErrorList is not assigned yet, therefore, we should assign it to the LoginFormAdapter (just like we did with the AdapterFieldGroup ), see Figure 22.17.
Figure 22.17. Final preview of Login form in the Web Page Editor.
The main visual difference (at design time) between the AdapterErrorList and the AdapterFieldGroup or AdapterCommandGroup is that the former isn't displayed in the left pane, but only in the right pane of the Web Page Editor. It's not such a big deal if you think about it because it only means that the AdapterErrorList cannot get any child components of its own (whereas the AdapterFieldGroup and AdapterCommandGroup can).
But what did we just do with the AdapterErrorList ? Nothing, really, it seems. We only assigned the Adapter property back to the LoginFormAdapter . Which means that if anything goes wrong, it will be displayed inside the HTML that is produced by the LoginFormAdapter . And that means the same Login form where the user tried to login, as we will see later, when we're finally ready to try to Login to our WebSnap application.
EndUserSessionAdapter
And that's not all, because we now have to tell the WebSnap application that the Login page is ready to be used. In other words, should anyone (who is not yet logged in) want to enter a page with the Login Required option set, this person must be sent to the Login page we just made. To specify the Login page, we must go back to the first Page Module (the pmHome unit), select the EndUserSessionAdapter component, and set its LoginPage property to Login (the name of your Login Page Module).
You can now save everything and run the WAD application. Remember that you have to start the Web App Debugger to view and login to the WebSnap application. For a more interesting demo (with more than just the login and home page), we will add session support to our WebSnap application.
| |
| |
| Top |