A Tour of Web Matrix
|
Now you've done all of the installation tasks, it's time to start looking into Web Matrix, to see exactly what features it has, and how to use them. This will be a quick tour around the interface so you know what each section is, and how it's used. The specifics of each area will be investigated in later chapters, as each becomes relevant.
New Item Dialog
Let's start with the New Item dialog. This is what you see when you want to create a new ASP.NET file, and is the first thing you see when you run Web Matrix:
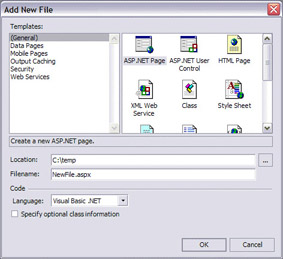
At the top we have two sections for templates – one for the type of template, and one for the template itself. Underneath that we have two text entry areas, where you can specify the location of the file, and its name. You should make sure you leave the file suffix (.aspx in this case) at the end of the file name, since Web Matrix doesn't automatically add one.
In the Code section at the bottom of the screen, there is a selection list to pick the language you want to use when writing code. We're going to be using Visual Basic .NET in this book (the other language you could use is C#). Finally there is a checkbox to allow you to specify advanced features for the new file. This is useful if you need to change the default class name and namespace for the file – we'll be keeping the defaults so you should leave this unchecked unless told to change it.
Templates
Templates in Web Matrix act just like templates in other tools, such as Microsoft Word or Front Page. They provide a default for the style and content of the page. In some cases with Web Matrix the templates provide almost all you need to create great web pages. There are six template types, or groups:
-
(General). General templates for all types of ASP.NET pages. These don't have much in the way of content or code.
-
Data Pages. Data pages, containing grids and lists. These have lots of code already in place, and provide a quick way to have pages that show tables of data from a database.
-
Mobile Pages. For creating pages to be used on mobile devices, such as phones. The Mobile Internet Toolkit needs to be installed for this, which is Step 3 on the Web Matrix install page. We won't be looking at mobile devices in this book, but for more information have a look on the Wrox website – there are several books that cover this in detail.
-
Output Caching. Pages that are cached in memory, and are therefore faster.
-
Security. Login and logout pages, for creating secure websites.
-
Web Services. Pages that can be called remotely by other applications. Web services are Internet applications that just provide functionality, and have no interface, allowing companies to use your code. For example, Amazon has a web service that allows you to programmatically access its database, search for files, access your wish list, and so on.
You'll see many of these in use as we go through the book, but feel free to have a play with them yourself.
To learn about the rest of the interface, let's show you the main areas of Web Matrix. To do that we need to create a new Web page, so select the (General) tab, and from the templates pick ASP.NET Page. You'll now need to specify the name and location for the file. You can leave the name of the file set to NewFile.aspx if you like, but change the directory for your file to C:\BegWebMatrix – you may need to create this directory if it doesn't already exist.
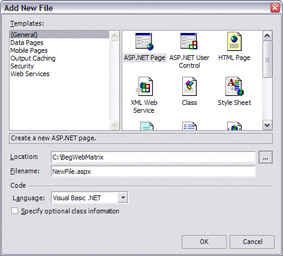
We recommend using a separate directory so that the web pages you create as you work through this book are kept separate from your other documents. In general, it's a good idea to create a separate directory for each set of files you are working on – this stops you getting them mixed up with each other. Once you've typed in the Location and Filename, press the OK button.
The Main Window
You are now in the main window of Web Matrix, which has several areas:
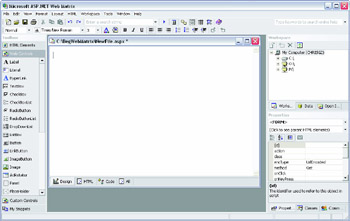
The file that you've just created is shown in the center – this is the Design and Code Editor. To the left, we have the Control Toolbox, which is where the web controls sit. Web controls are the way we provide content on our page – they can create buttons, areas for inputting text, and so on. We'll be covering them in more detail in Chapter 3.
To the right we have the File and Data Workspace, showing the files and directories and databases you are working with. Below that is the Properties pane, showing the properties for a selected item on the Design editor. At the top we have the Editing and Formatting toolbars, allowing you to change files, and modify the formatting and style of controls on your form.
Let's now have a look at these areas in turn.
Design, HTML, and Code Pane
This area is the main work area, and shows you different views of your web page. By default you're shown the Design view, which gives you a visual view of your page. The HTML tab switches you to a view that shows the HTML equivalent of the design, and the Code view shows only the code associated with the page. The All tab shows all views together.
Let's have a go at using these tabs, so you get familiar with how they work.
Try It Out—Putting Controls on a Form
-
If you haven't already got a file open (if you have, skip to Step 3), create a new ASP.NET file. To do this select New from the File menu, hit Ctrl-N, or use the New File toolbar button – that's the one that looks like this:

-
From the New File dialog, make sure the path is set to C:\BegWebMatrix (or any other path you wish to use), enter a name for the file, and press OK.
-
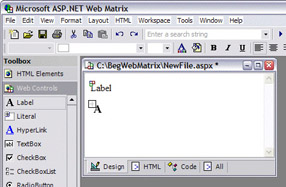
With the new file open, and the Design tab selected, pick a control from the Toolbox on the left. Start with a Label control, and drag it onto the Design surface and drop it there.
-
Do the same with a TextBox, and drop it next to the Label.
-
On the Design surface, place the cursor on the page to the right of the TextBox and press the Return key.
-
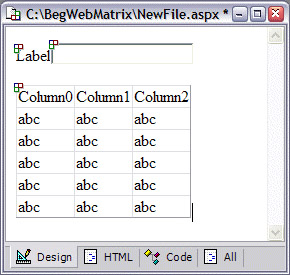
Now drag a DataGrid from the Toolbox and drop it under the Label and TextBox. Your page should now look like this:
-
Click the HTML, Code, and All tabs, and note how what's shown in the window changes. You're still dealing with the same file, it's just that the tabs give you a different view of that file. We'll be using these other tabs more as we go through the book.
Properties and Formatting
At the bottom right of Web Matrix there's the Properties tab, which allows you to set the details on controls. Let's have a quick look at what you can do with these.
Try It Out—Changing the Look
-
Switch the main window back to Design view, and click on the Label.
-
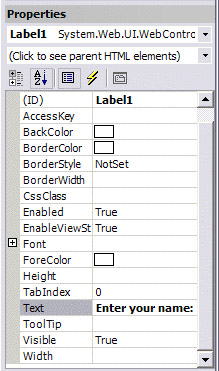
In the Properties pane, you'll notice that there are two columns. The first column shows the name of the property, and the second shows the value. Scroll down to find the Text property, and change the text from Label to Enter your name:
-
From the formatting toolbar, click the bold button – this will turn the text for the
label bold. -
Now pick a different font and size from the drop-down list on the toolbar – I seem to have one called Poor Richard (who Richard is and why we should feel sorry for him is a mystery to me!). We look at fonts in more detail in Chapter 3.
-
Click on the TextBox and move to the Properties window.
-
Pick a color for the BorderColor property, change the BorderStyle to Dashed, and enter 5 for the BorderWidth.
-
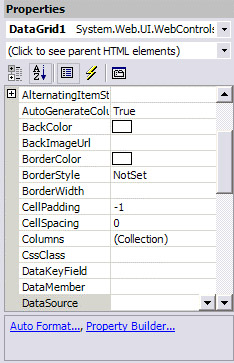
Click on the DataGrid, and move to the Properties window.
-
At the bottom of the properties window you see two links in blue:
-
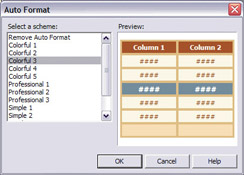
Click the Auto Format… link, to bring up the formatter. This is just like formatting tables in Word:
-
Pick a style of your choice, and click OK.
-
Your page should now look something like this:
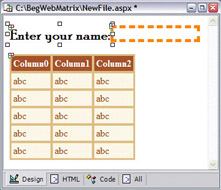
OK, it doesn't look particularly great, but you can see how the properties affect the controls. You can press F5 to run this program in your browser. The first time you do this you'll see a message called Start Web Application – make sure that Use ASP.NET Web Matrix Server is selected and press Start. In the next chapter we'll create a more useful page and run it, so you'll get more practice of controls and properties. Let's now continue with our tour of the Web Matrix interface.
Toolbars and Menus
The toolbars and menus are, for the most part, fairly obvious. However, a brief explanation never goes amiss, so let's start with the menu:
![]()
-
File: Standard type of file menu, allowing addition of new files, saving files, printing, and so on.
-
Edit: Cut, copy, paste, find, replace and so on.
-
View: Allows switching between the different views (Design, HTML, Code, All), as well as some design view features (which are also shown on the design toolbar).
-
Format: Mirrors some functionality of the formatting toolbar, allowing font changes, alignment, and so on.
-
Layout: Allows alignment and sizing of controls.
-
HTML: Allows insertion of standard HTML features, such as a hyperlink or a table. The issue of which controls to use is covered in Chapter 3.
-
Workspace: Allows addition of new items, and connections to remote websites.
-
Tools: Web Matrix tools, such as customization of the toolbox.
-
Window: Cascade, Tile, and so on.
-
Help. Links to the help file and URLs.
The two toolbars are equally sensible. The first is the editing toolbar:
![]()
The second is the formatting toolbar:
![]()
Toolbox
You've already used the Toolbox, but it does warrant a little explanation. It works in much the same way as the Outlook Bar works in Microsoft Outlook, where there are different pop-up tab sections, and only one section is visible at once. There are five sections:
-
HTML Elements, which contains the standard HTML controls
-
Web Controls, which contains the ASP.NET Web Controls
-
Custom Controls, for custom controls written by third parties
-
Code Builders, for wizards that write code for you
-
My Snippets, for snippets of code you want to keep and reuse
The Code Builders section is only viewable when you are viewing code via the Code tab or the All tab. You'll see examples of all of these in later chapters of the book. They all work in the same way though – you drag from the Toolbox onto your page. When in design view, the control appears on the design surface. When in code view, dragging a Code Builder starts a wizard that writes code, which is then inserted into the code at the position you dragged to (so, make sure you drag these onto an empty line). It's worth having a play with these, just so you are familiar with what they do. Don't worry about messing up your file, since you don't have to save it when you quit Web Matrix.
Workspace and Data
The Workspaces area at the top right of Web Matrix deals with files and data. Here there are three tabs:
-
Workspace, showing a view on your current disk (or FTP site if that's what you're using)
-
Data, showing connections to databases, and the tables within the databases
-
Open Items, showing a list of files currently open
Using the Workspace is covered in the next two chapters, and the Data tab is covered Chapter 8.
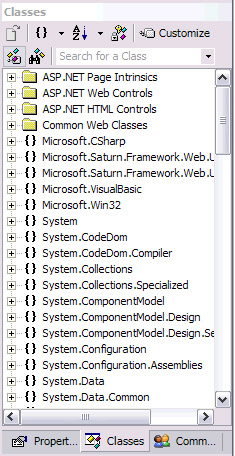
Classes and Community
The two windows we haven't yet looked at are the Classes and Community tabs, which sit alongside the Properties window. The first of these shows all of the underlying classes that make up the .NET Framework. Some of these you may use as you get more experienced, some you may never use, and some just aren't relevant to ASP.NET. However, it's useful for exploring, and to understand what classes are available for use. Classes and code are covered in Chapters 4 to 6.
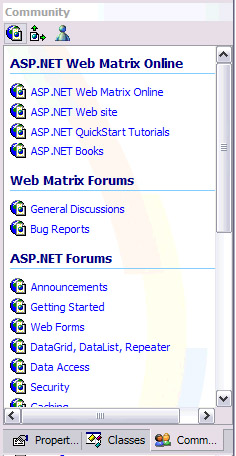
The Community window gives you links to the best places on the web for ASP.NET resources. Among these are the forums from http://www.asp.net/, where you can find a great many people available to help with any ASP.NET related trouble you might be having, and also, some of the ASP.NET development team from Microsoft hang out there.
|
EAN: 2147483647
Pages: 141