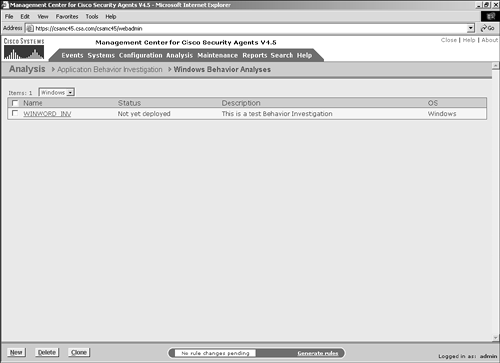
| The application behavior investigation process begins with configuration tasks on the central CSA MC system. This portion of the process defines the application or process you want to watch. This application may be a known application you are now developing policies to control or an unknown process discovered through application deployment investigation (which you learned about in Chapter 10, "Application Deployment Investigation"), antivirus reporting, or other means. Regardless of how the process was discovered, as a security practitioner, it is imperative that you fully understand in detail the applications that interact with your systems and resources. When configuring a behavior analysis job, you access the appropriate configuration pages on the CSA MC and enter the necessary parameters.The following steps configure a sample application behavior investigation to demonstrate the configuration tasks: Step 1. | Open the behavior analysis job listing by choosing Analysis > Application Behavior Investigation > Windows Behavior Analyses. Figure 11-1 shows a sample job listing.
Figure 11-1. Application Behavior Analysis Job Listing 
Note You can perform application behavior investigation on both Windows and UNIX systems, unlike application deployment investigation, which you can perform only on Windows systems. To configure an analysis job for the appropriate operating system, access the corresponding configuration page on the CSA MC. | Step 2. | Click the New button at the bottom of the listing page to open the behavior analysis configuration page.
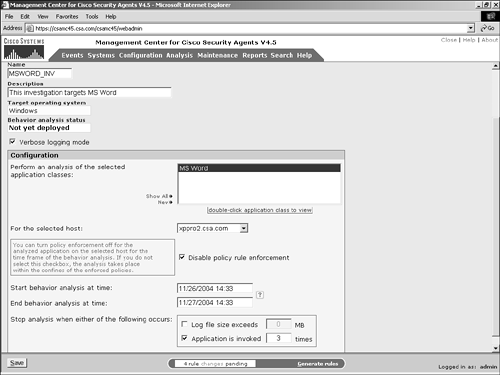
| Step 3. | Enter the name and description for the analysis, as shown in Figure 11-2. This information displays on the reports regarding the investigation after the analysis is complete. The information also displays in the listing page and aids in differentiating the various jobs and reports after several have been completed.
Figure 11-2. Application Behavior Analysis Configuration 
| Step 4. | Observe and verify that the entries in the Target Operating System and Behavior Analysis Status fields for this job are correct. You cannot edit these fields, but the information must be correct to have a successful analysis. The behavior analysis status will change over the life cycle of the behavior analysis job.
| Step 5. | Optionally, check the Verbose Logging Mode check box. Verbose logging reports every time a resource is accessed rather than suppressing the repeated events. Verbose logging can prove helpful in determining not only what resources were accessed during the investigative process but also how often they were accessed.
| Step 6. | Choose or create an application class that identifies the application or process you want to investigate. As a best practice, only analyze the behavior of a single process at a time to identify specifically related resource access. For this example, create an application class that specifically watches Microsoft Word (msword.exe). The Show All link displays all the application classes defined in the CSA MC, and the New link opens an additional window that enables you to create a new application class.
| Step 7. | Choose the host from the drop-down list; by doing so, you identify the host that should run the analysis job.
| Step 8. | Disable or enable policy rule enforcement. When the remote agent begins the analysis process, it may continue to enforce local policy that might prevent the application from accessing required resources. If you want to disable policy enforcement mechanisms from preventing any access this application might require, check the Disable Policy Rule Enforcement check box.
Caution Disabling local policy enforcement can be dangerous when the application or process you are analyzing is of unknown origin. You should disable only the policy enforcement mechanism when you are absolutely sure there will be no negative impact as a result of the lower security level. You might decide to disable policy enforcement only when the host is located in a controlled and closely monitored quarantine segment of the network. | Step 9. | Choose the start and end times for the behavior analysis job. Remember that the job will only begin to collect data on the remote system after the agent receives the job as a result of polling. If the agent receives the job after the analysis end time that was set, the job will not run on the agent.
| Step 10. | As an alternative to the time settings for analysis completion, you can set end parameters based on the size of the log file created or the number of times the application is executed.
Note If you set more than one termination parameter, such as time, log file size, and application invocations, the first parameter to hit its termination limit causes the analysis job to terminate. | Step 11. | Click the Save button to complete the configuration process.
| Step 12. | The final step required before the agent will receive the job from the CSA MC is a successful rule generation.
|
Before you move on to the agent portion of the behavior investigation process, you need to understand a few points regarding the CSA MC configuration parameters. During the initial configuration, the time settings are drop-down boxes with limited options such as Now, 1 hour, and 24 hours. After saving the job, those options change to text fields relating to the previously selected drop-down options translated into real-time parameters, such as 11/26/2004 14:33. You can edit these fields further to have more specific start and end time parameters with either literal exact timing or relative times, such as tomorrow. Another important concept regarding investigation timing is which parameters you should use to determine the end time. It is not always a best practice to use the time fields as the determining factor for when a job should complete. If the system is not online or may not poll during the interval specified, the job may not run. Also, it is expected that the application in question will be run through a full and complete usability test to identify all resources required by the application. If the application being analyzed is both a web browser and FTP client, but the only portion of the application used during the time interval is the FTP client, you will not be able to report back the necessary system interaction required to use and safeguard the web browser. The time parameter may best be used as the terminating factor when the application is a server-based component guaranteed to be available during the test. The number of invocations and log file (256 MB is both the default and maximum size) options are better used for client-type applications. When using multiple types of terminating factors, remember that the first one to hit the limit terminates the job, so set the options accordingly. NOTE You can run only one behavior analysis job on a system at a time. You can run multiple jobs across your computing environment simultaneously, however.
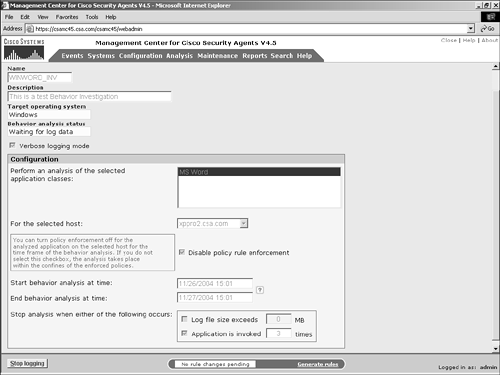
Another way to stop the investigation process is to force its termination prior to hitting one of the predefined termination limits after the job has been deployed. To do this, enter the behavior analysis job by clicking its name on the list. When you are in the job view, you can see a new button on the bottom of the page labeled Stop Logging, as shown in Figure 11-3. Click this button to send a termination notice to the agent requesting the job to end and requesting the logged data that resulted from the investigation process. Figure 11-3. Early Termination of a Behavior Analysis 
|


