Audit Trail Reporting

 < Day Day Up > 

As with any security enforcement tool, it is very important to have an auditing mechanism available to monitor usage. In some cases, having auditing capabilities is not a nicety but rather an absolute requirement that assists with legal compliance. Auditing also assists with understanding what policy changes have been made and which administrator made the changes.

The CSA MC can use role-based access control (RBAC). RBAC enables you to give multiple users unique user IDs to access, configure, and monitor the MC with varying levels of rights. You learn about setting up users in the Network (VPN)/Security Management Solution (VMS) environment in Chapter 14, "CSA MC Administration and Maintenance," but for now assume the users are already created and focus on the auditing capabilities of the CSA MC.

To view basic auditing information, choose Reports > Audit Trail to display a screen listing all audited events, as shown in Figure 9-2. By default, this page displays audit events from the most current to the oldest. You can change the order to show the oldest events first by clicking Earliest just above the audit event listing. As with the other event database views, you can apply a filter to the audit information to customize the information presented onscreen. The current filter parameters display at the upper-left corner of the report page. The generic view always displays all events.

Figure 9-2. CSA MC Audit Trail Report


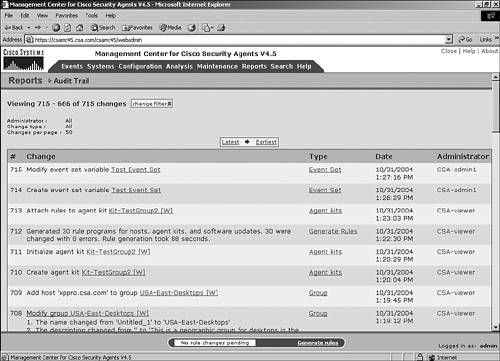
The information presented as part of the Audit Trail report is formatted much like the event log. Audit log rows are separated by alternating color bands to simplify viewing. Each row is formatted the same, with information in each row separated by columns of specific audit event information. The audit event columns are as follows:

  • # This column shows the number of the event in the current filtered or unfiltered view. The higher the number, the more recent the event in comparison to the other events.

  • Change This is the change that took place. Every audited action taken by an administrator is known as a change. The entity that was configured as part of this audit event is clickable, and choosing the item within this report causes the specific configuration page to appear.

  • Type This column denotes what type of change took place. Changes are grouped together in major categories such as Event Set, Generate Rules, Agent Kits, Group, Alert, Rule Module, and so on. The Type field is a clickable link that presents the specific top-level item page. For example, click Event Set in this column to see the Event Set Configuration top-level page.

  • Date This is the specific date and time of the audited event.

  • Administrator This column lists the administrator user ID who made the change associated with this audit event.

To apply a filter to the audit trail view, click the Change Filter link at the top of the page. When you attempt to change the filter, a pop-up box displays, as shown in Figure 9-3. You can change the following filtering information:

  • Start Date and End Date Format this information as you would when defining filters for the event log and Event Monitor, which you learned about in Chapter 8. You can use the following formats and wording:

    • Specific start date formatted as hh:mm:ss with AM/PM as options. If you do not specify AM/PM, then hh should be in the 24-hour format. Both minutes and seconds are optional, with only hours required.

    • Specific start date formatted with month and day information as mm/dd/yy (day and year are optional) or as monthname dd, yy (day and year optional).

    • Relative time using keywords ago, today, now, last, yesterday, day, week, month, year, hour, minute, or second.

    • Example 1:

      Start Date = 22 hours ago

      End Date = 13 minutes ago

    • Example 2:

      Start Date = yesterday

      End Date = 3 minutes 5 seconds ago

    • Example 3:

      Start Date = 10/05/2000 22:04:00

      End Date = now

  • Administrator Choose a specific administrator account from the drop-down menu to filter the view to include actions taken by that specific individual only. By default, this is set to All.

    Note

    Auditing is only as accurate as your password enforcement. If a login ID is used by more than one person or can be compromised, the audit trail will remain intact but you cannot guarantee who was logged in to the system with that ID at any given time.


  • Change Type Choose the specific change type from the drop-drown list menu that you want to view in this audit report.

  • Changes per Page Set the number of audit events you want to display per page. By default, this is set to 50 per page.

Figure 9-3. Audit Trail Filter Parameters
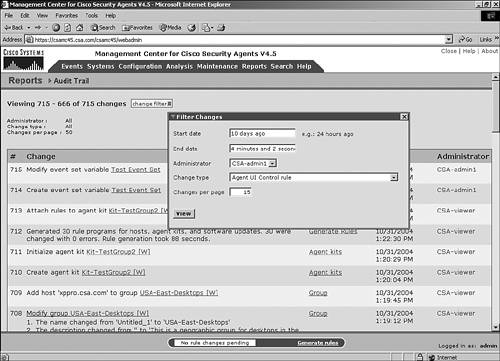

     < Day Day Up > 


    Cisco Security Agent
    Cisco Security Agent
    ISBN: 1587052059
    EAN: 2147483647
    Year: 2005
    Pages: 145
    Authors: Chad Sullivan

    flylib.com © 2008-2017.
    If you may any questions please contact us: flylib@qtcs.net