| After you have successfully installed and configured a Windows Server 2003 remote access server and worked your way through the Routing and Remote Access console so that you understand the options, you face the hard part: managing the server with remote access configured. To successfully maintain the remote access server, you need to understand how packet filters work; how to handle routing interfaces, devices, ports, and protocols; and how to manage the remote access clients. Managing Packet Filters Objective: Manage remote access. One of the most interesting features of Windows Server 2003 is the ability to implement packet filters. A packet is a portion of a message that is transferred across a network. For example, when you download Windows Server 2003 Service Pack 1, the file is broken into many smaller packets to be transmitted to your computer, and then it is reassembled after all the packets have been delivered. A packet filter acts as a crude form of firewall, permitting or denying traffic based on rules set in the filter. Packet filters work by looking at the makeup of each packet, comparing that composition to the list of filters, and then making a decision about whether to forward or drop the packet based on those rules. Step by Step 6.7 walks you through the creation of a packet filter by using the Windows Server 2003 Routing and Remote Access console. Note that inbound packets are those being sent to the server and outbound packets are those being sent from the server. Step By Step 6.7. Using the Routing and Remote Access Console to Create a Packet Filter 1. | Log on to Windows Server 2003 by using the Administrator account or another account that has administrator privileges.
| 2. | Open the Routing and Remote Access console by selecting Start, Administrative Tools, Routing and Remote Access.
| 3. | Select Remote Access Policies in the left pane and then right-click the remote access policy created in Step by Step 6.5. Select Properties from the menu. The Remote Access Policy Settings dialog box appears.
| 4. | Click the Edit Profile button. The Edit Remote Access Profile dialog box appears. In the IP Filters section of the IP tab (refer back to Figure 6.40), click Input Filters. The Inbound Filters dialog box appears, as seen in Figure 6.45.
Figure 6.45. Inbound filters can be set on a variety of packet-based conditions. 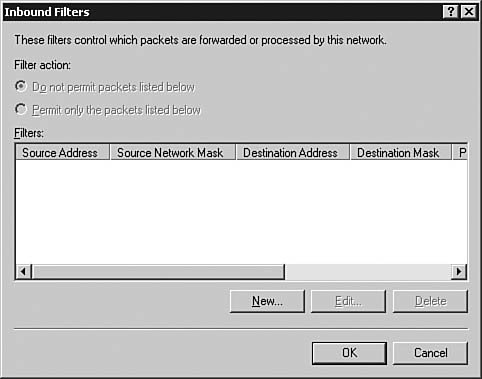
| | | 5. | Click New to create a new packet filter. The Add IP Filter dialog box appears, as seen in Figure 6.46.
Figure 6.46. To create an input filter, you need to know the source IP address or network, subnet mask, and protocol type to be filtered. 
| 6. | Complete the fields as shown in Figure 6.46, prohibiting a single Class C network from sending packets to the Windows Server 2003 host. Click OK to create the filter. Figure 6.47 shows the newly created filter. Click OK to return to the Routing and Remote Access console.
Figure 6.47. Any packet filters you have created appear on the Inbound Filters dialog box. 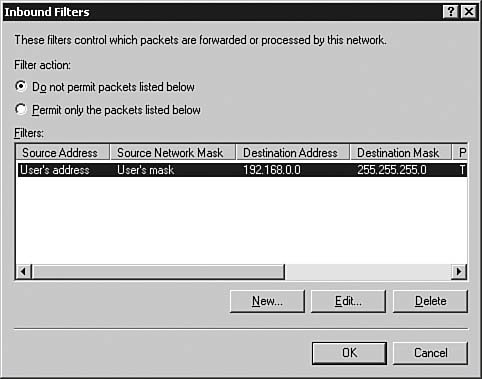
|
Exam Alert: Don't Confuse Input and Output Filters An input filter configured by using the Windows Server 2003 Routing and Remote Access console deals with the packets that the Windows Server 2003 host receives. These filters act only on packets that are received by the router, either allowing or dropping the packets based on the filter configuration. A packet that is not permitted by a receive filter will be dropped before it can be received by the router. Output filters determine whether packets will be sent by the router. The router will receive the packet, and if the packet is permitted by the filter, it is sent. If the filters do not permit the packet to be sent, it is dropped.
Managing RRAS Routing Interfaces Objective: Manage remote access. Another important component with which you need to be familiar is the routing interfaces used by Windows Server 2003 RRAS. A routing interface is a physical or logical interface over which unicast or multicast packets can be forwarded. Windows Server 2003 supports three types of routing interfaces: LAN A LAN interface is a physical interface to a LAN connection such as Ethernet or Token Ring. These interfaces are identified by the NIC and are always active. They do not typically require authentication to permit connectivity. Demand-dial A demand-dial interface is a logical interface that represents a point-to-point connection. The point-to-point connection can be either a physical connection (a modem-to-modem connection using an ISDN line) or a logical connection (an Internet-based router-to-router VPN connection). Demand-dial connections can be persistent (that is, established and then staying connected) or on-demand (that is, connected as needed and then disconnected when the need is gone). Demand-dial interfaces typically require authentication as part of the connection process. IP-in-IP tunnel An IP-in-IP tunnel interface is a logical interface that represents a tunneled point-to-point connection. IP-in-IP tunnel interfaces do not require an authentication process for connection to occur. This type of interface sends IP packets through the tunnel by encapsulating them with an additional IP header. This allows IP packets that would not ordinarily traverse a network to be routed from one part of the network to another.
To effectively manage the routing interfaces of a Windows Server 2003 RRAS, you need to be familiar with how to get additional information on an interface and how to manage the interface configuration. Step by Step 6.8 walks you through how to get additional information on an interface and where to find the configuration settings. Step By Step 6.8. Reviewing the Management Information and Configuration Settings of a LAN Routing Interface 1. | Log on to Windows Server 2003 by using the Administrator account or another account that has administrator privileges.
| 2. | Open the Routing and Remote Access console by selecting Start, Administrative Tools, Routing and Remote Access.
| 3. | In the left pane, select General. A list of all the interfaces appears in the right pane, as seen in Figure 6.48.
Figure 6.48. The General folder shows all the interfaces available to RRAS, along with their types, addresses, and statuses. 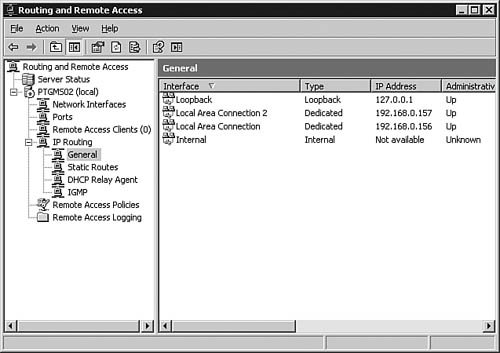
| | | 4. | Right-click the Local Area Connection 2 interface. (If you have more than one LAN adapter, select any of them.) From the context menu that appears, you can update routes, show the TCP/IP information for the interface, show any IP address translations, and show the routing table, TCP connections, and UDP listeners. You can also obtain this information by using a variety of command-line tools. Select Properties to open the Local Area Connection 2 Properties dialog box, as seen in Figure 6.49.
Figure 6.49. The Local Area Connection 2 Properties dialog box allows you to manage the configuration of a LAN routing interface. 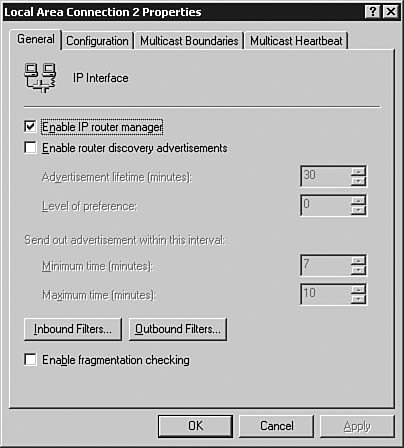
| | | 5. | The General tab of the Local Area Connection 2 Properties dialog box allows you to configure the use of the IP Manager, enable IP router discovery advertisements, configure packet filters, and set the router to check for fragmentation. Click the Configuration tab, as seen in Figure 6.50, to continue.
Figure 6.50. The Configuration tab of the Local Area Connection 2 Properties dialog box allows you to set the IP address characteristics of the interface. 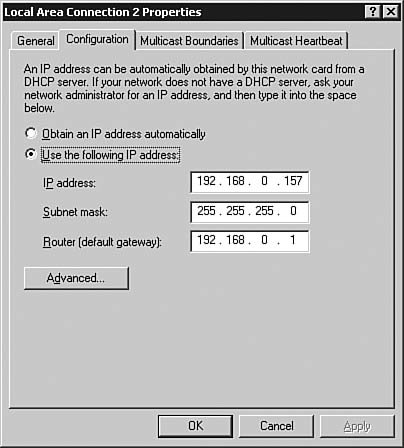
| | | 6. | The Configuration tab allows you to configure the interface to use DHCP to obtain an address or to set a static IP address and router gateway on the address. Click Advanced to see the Advanced IP Addressing dialog box, as shown in Figure 6.51.
Figure 6.51. The Advanced IP Addressing dialog box allows you to perform more complex IP address configurations. 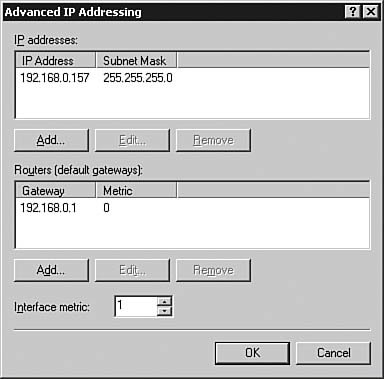
| 7. | The Advanced IP Addressing dialog box allows you to set multiple IP addresses and routers (default gateways) on a single interface. Click OK to return to the Local Area Connection 2 Properties dialog box. Select the Multicast Boundaries tab, as seen in Figure 6.52, to review the multicast configuration options.
Figure 6.52. The Multicast Boundaries tab is useful only in a network that supports multicast routing. 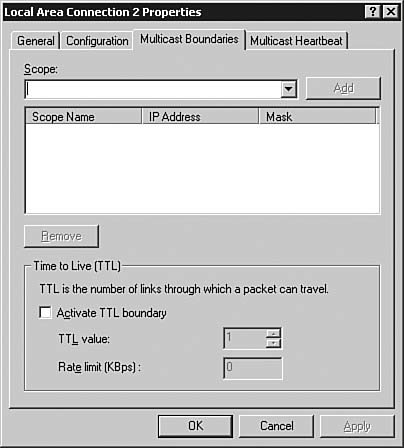
| | | 8. | From the Multicast Boundaries tab, you can set a multicast scope and a time-to-live (TTL) boundary. You should configure these options only if you have a thorough understanding of the multicast routing in use on the network. Select the Multicast Heartbeat tab, as seen in Figure 6.53, to review additional multicast options.
Figure 6.53. The Multicast Heartbeat tab has options that are useful only in a network that supports multicast routing. 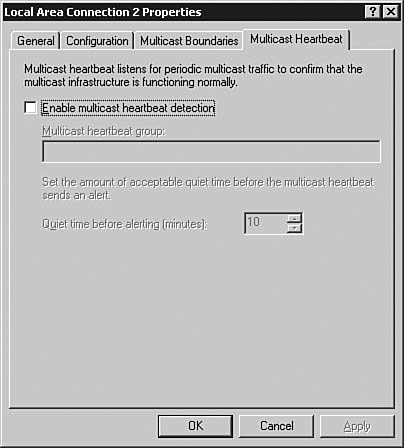
| 9. | On the Multicast Heartbeat tab, you have the ability to configure a multicast heartbeat, so if your server ever loses connection to the multicast traffic on the network, the server sends an alert. Click OK to return to the Routing and Remote Access console.
|
Managing Devices and Ports Objective: Manage remote access. The next piece of the remote access puzzle is working with the devices and ports that need to be managed. A device is hardware or software that Windows Server 2003 RRAS uses to provide ports for demand-dial and remote access connections. A device can be a physical unit, such as a modem, or a virtual connection, such as a VPN connection. A port is defined in RRAS as a channel of a device that is used to support remote access connections. Exam Alert: Devices and Ports For the exam, be sure to remember that the device is typically the hardware and the port is the software used to access the hardware. The only exception to this rule is in a VPN connection, where both the device and port are software.
Step by Step 6.9 reviews the configuration and status of a Layer 2 Tunneling Protocol (L2TP) VPN port by using the Routing and Remote Access console. Step By Step 6.9. Reviewing the Configuration Settings of an L2TP VPN Device and the Status of the Associated L2TP Port 1. | Log on to Windows Server 2003 by using the Administrator account or another account that has administrator privileges.
| 2. | Open the Routing and Remote Access console by selecting Start, Administrative Tools, Routing and Remote Access.
| 3. | In the left pane, select Ports. A list of all available ports appears in the right pane, as seen in Figure 6.54.
Figure 6.54. The Ports folder contains all the ports available to Windows Server 2003 RRAS. 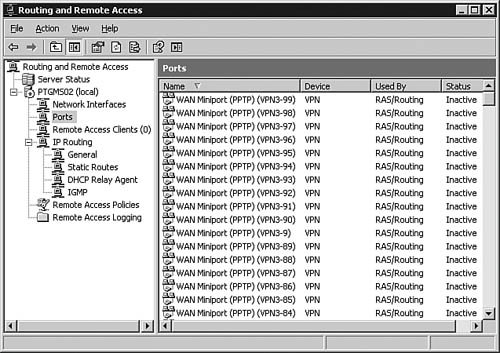
| | | 4. | Right-click the Ports folder and select Properties. The Ports Properties dialog box, as seen in Figure 6.55, appears.
Figure 6.55. The Ports Properties dialog box shows all the devices configured in Windows Server 2003 RRAS. 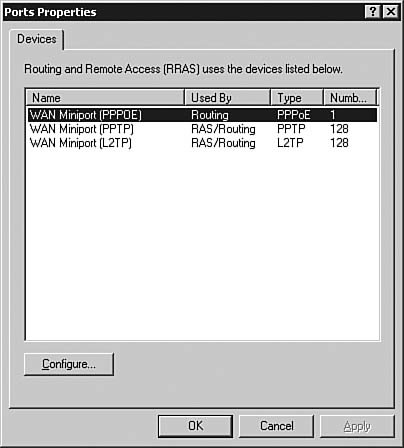
| | | 5. | Select the WAN Miniport (L2TP) device and click Configure. The Configure Device dialog box, as seen in Figure 6.56, appears.
Figure 6.56. The Configure Device dialog box allows you to control how a device can be used and how many ports are associated with it. 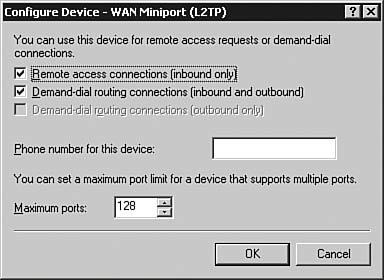
| | | 6. | Review the configuration settings and then click OK and then click OK again to return to the Routing and Remote Access console. In the console, right-click one of the Point-to-Point Tunneling Protocol (PPTP) ports and select Status from the context menu. The Port Status dialog box, as seen in Figure 6.57, appears.
Figure 6.57. The Port Status dialog box provides extensive information about the actual status of a port. 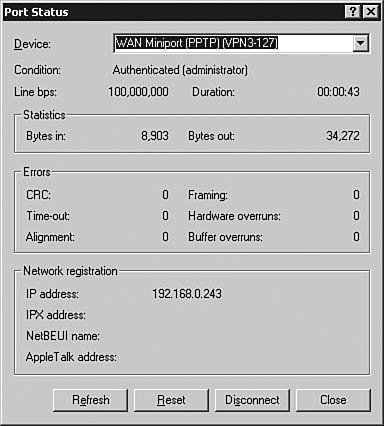
| | | 7. | The Port Status dialog box gives you valuable information about the line condition, speed, connection duration, connection statistics, errors, and network registration information. Click OK to close the Port Status dialog box and return to the Routing and Remote Access console.
|
Generally you will be asked to check on the status of a port rather than actually manage it. When a remote access server is in production, you spend almost all your time reviewing logs and checking port status to troubleshoot remote access issues. Managing Routing Protocols Objective: Manage remote access. The installation and management of TCP/IP routing protocols is covered in detail in Chapter 7, "Implementing, Managing, and Troubleshooting Routing." This chapter takes a look at how to install and manage non-TCP/IP routing protocols on the Windows Server 2003 RRAS. Windows Server 2003 supports the following non-TCP/IP routing protocols: AppleTalk This protocol provides routing information for Apple/Macintosh computers. Microsoft TCP/IP version 6 For companies that are working to be early adopters of the latest generation of IP addressing, Windows Server 2003 supports IP version 6. NWLink NWLink is typically used when there are legacy IPX/SPX systems on the network. NWLink was originally created by Novell as part of their server operating system, and support for NWLink is still required in many environments.
Step by Step 6.10 looks at how to implement the AppleTalk protocol and its associated routing. You need to have the AppleTalk protocol installed on the server prior to trying Step by Step 6.10. Exam Alert: On Which Protocol Should You Concentrate? Given the prevalence of TCP/IP on almost all networks, the material in Chapter 7 is more applicable to a production environment than is the information in this chapter. For the purposes of the exam, you need to be familiar with the high-level information on installing, managing, and supporting all the routing protocols, including, but not limited to, TCP/IP.
Step By Step 6.10. Managing AppleTalk Routing Interfaces 1. | Log on to Windows Server 2003 by using the Administrator account or another account that has administrator privileges.
| 2. | Open the Routing and Remote Access console by selecting Start, Administrative Tools, Routing and Remote Access.
| 3. | In the left pane, select AppleTalk Routing. (If the protocol was installed with the RRAS console open, you need to restart the console to get the new protocol to appear.) A list of interfaces available for AppleTalk routing appears in the right pane, as seen in Figure 6.58.
Figure 6.58. After the AppleTalk protocol has been installed on a local area connection, the AppleTalk Routing option is available in the Routing and Remote Access console. 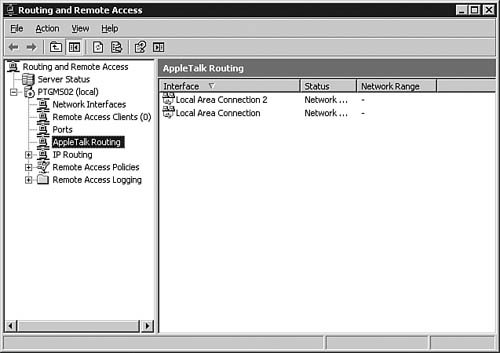
| 4. | Before configuring the network adapters, you will need to enable AppleTalk routing. Right-click the AppleTalk Routing node and select Enable AppleTalk Routing from the context menu.
| | | 5. | Right-click Local Area Connection 2 in the right pane and select Properties. The Local Area Connection 2 Properties dialog box, as seen in Figure 6.59, appears.
Figure 6.59. AppleTalk routing is easy to configure, requiring only an address range and zone name. 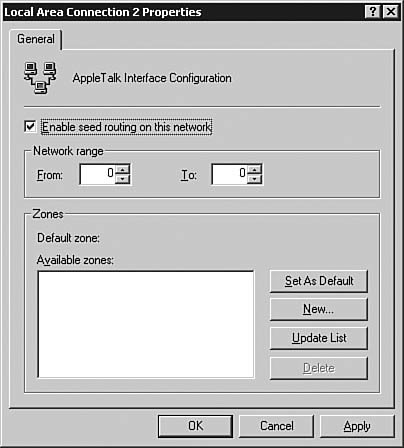
| 6. | Select Enable Seed Routing on This Network to make the server an AppleTalk seed router. A seed router initializes and broadcasts routing information about any directly connected networks. A seed router tells other routers where to send packets destined for the attached network(s). Each physical network must have one or more seed routers to broadcast the routing information for that network.
| 7. | In the Zones section, click New to create a zone to be broadcast. The New Zone dialog box, as seen in Figure 6.60, appears. A zone is a logical grouping of nodes used to simplify network browsing. Enter a zone name in the Zone Name field and click OK to add the zone.
Figure 6.60. You should use an intuitive zone name to assist users in finding resources. 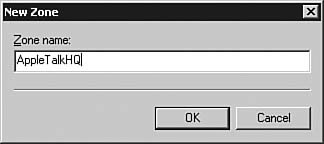
| | | 8. | The Local Area Connection 2 Properties dialog box now shows the new zone, as seen in Figure 6.61. Click OK to complete the configuration and return to the Routing and Remote Access console.
Figure 6.61. The Available zones list shows all the configured zones being broadcast by the server. 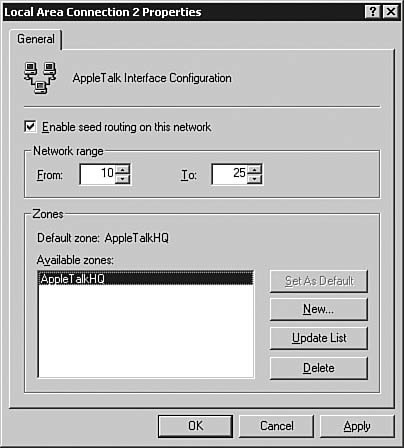
|
Managing RRAS Clients Objective: Manage remote access. Now that you have set up a remote access server, you need to take a look at the other side of the equationsetting up a client to connect to the server. Step by Step 6.11 demonstrates how to set up a Windows XP client to use a PPTP VPN connection to connect to a Windows Server 2003 server configured for remote access VPN connections. You need to make sure that your remote access policy permits connections to complete this exercise. Step By Step 6.11. Configuring a Windows XP Professional Host to Connect to a Windows Server 2003 Server Running RRAS and Using a PPTP VPN | | 1. | Right-click the My Network Places icon on the desktop and select Properties. The Network Connections window, as seen in Figure 6.62, appears.
Figure 6.62. The Network Connections window shows all the available connections on the system. 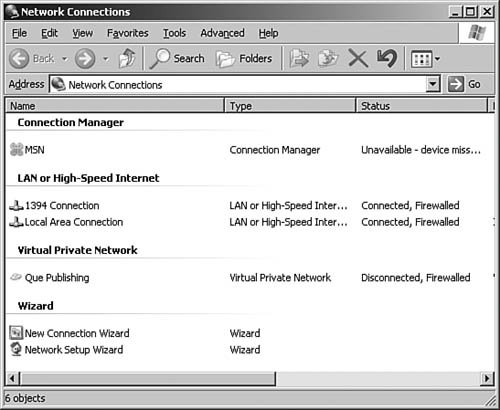
| 2. | Double-click the New Connection Wizard. The New Connection Wizard opens. Click Next to continue.
| 3. | The Network Connection Type dialog box of the wizard, as seen in Figure 6.63, appears.
Figure 6.63. The Network Connection Type dialog box offers four options for setting up connections. 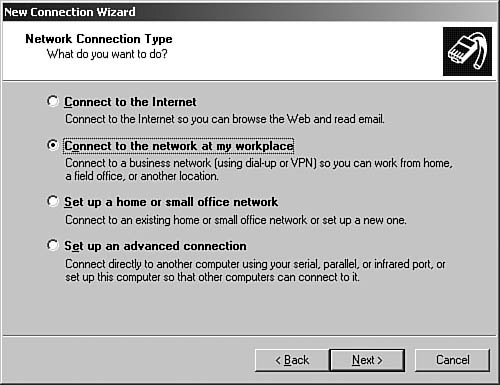
| | | 4. | Select Connect to the Network at My Workplace and click Next. The Network Connection dialog box of the wizard, as seen in Figure 6.64, appears.
Figure 6.64. The Network Connection dialog box allows you to select the transport type for a new connection. 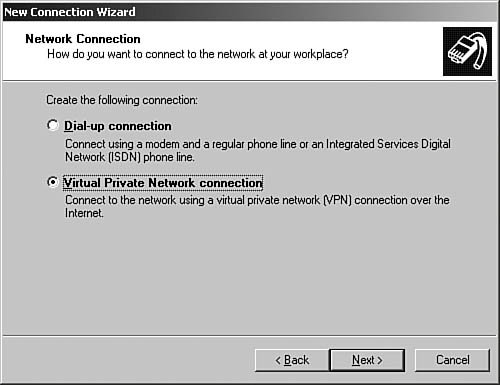
| | | 5. | Select Virtual Private Network connection and click Next. The Connection Name dialog box of the wizard, as seen in Figure 6.65, appears.
Figure 6.65. You should choose an intuitive name for a VPN connection. 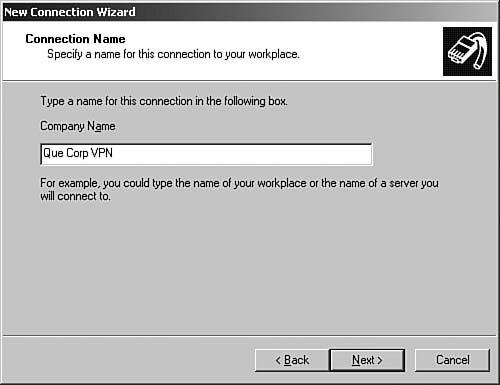
| | | 6. | Type a name for the connection in the Company Name field and click Next to continue. The Public Network dialog box of the wizard, as seen in Figure 6.66, appears.
Figure 6.66. You can automate a VPN connection by having the VPN connection also dial your ISP. 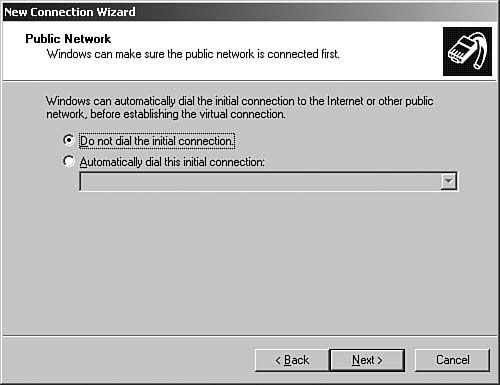
| | | 7. | In the Public Network dialog box, you have the option to have the VPN connection make the initial public network connection for you. Select Do Not Dial the Initial Connection and click Next to continue. The VPN Server Selection dialog box of the wizard, as seen in Figure 6.67, appears.
Figure 6.67. The VPN Server Selection dialog box is used to identify the remote VPN server, either by IP address or DNS name. 
| | | 8. | On the VPN Server Selection screen, enter the DNS name or IP address of the VPN server to which you are trying to connect. Click Next to continue. The Completing the New Connection Wizard dialog box, as seen in Figure 6.68, appears.
Figure 6.68. The Completing the New Connection Wizard dialog box allows you to create a desktop icon for the new connection. 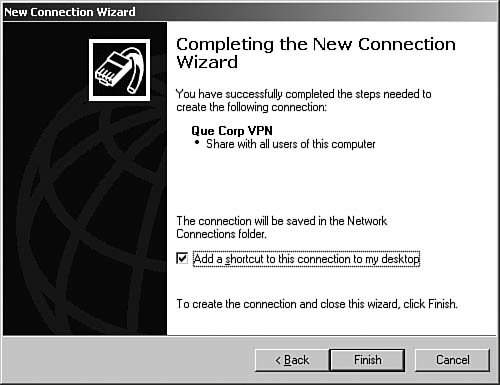
| | | 9. | Click Finish to complete the configuration. The Connect dialog box, as seen in Figure 6.69, appears automatically.
Figure 6.69. The Connect screen allows you to log in to the remote VPN server. 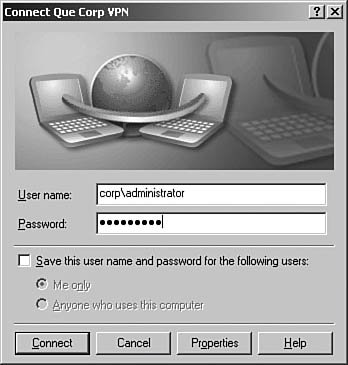
| 10. | Enter the username and password for an account that is authorized to connect via remote access and click Connect to open the connection. Under no circumstances should you ever select Save This Username and Password for a Connection of This Type. Not only is the storage of the password weak, but if your system is ever compromised, this would give the attacker an open invitation to attack your internal network.
| | | 11. | If your connection is successful, a taskbar pop-up appears. If you do not successfully connect, you should see the section "Troubleshooting User Access to Remote Access Services" later in this chapter to work out why the connection failed.
| 12. | Click the Connection Complete taskbar pop-up to open the connection status window, which gives you a snapshot of what is happening with the connection. Click the Details tab to get specific information about the connection.
|
The steps for installing a remote access client in the Windows 2000 Professional operating system are virtually identical to those used in Step by Step 6.11. If you want to install a client on an older Microsoft operating system, you need to download the client from the Microsoft website. Note Remote access protocols supported by Windows Server 2003: Remote access authentication protocols supported by Windows Server 2003: Password Authentication Protocol (PAP) Challenge Handshake Authentication Protocol (CHAP) Shiva PAP (SPAP) Microsoft CHAP (MS-CHAP) MS-CHAP version 2 (MS-CHAPv2) Extensible Authentication Protocol (EAP), which includes: RADIUS
|