Installing and Configuring the DNS Server Service
| Objective: Install and configure the DNS Server service.
Manage DNS.
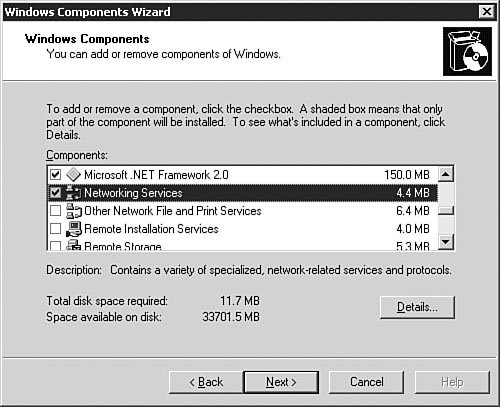
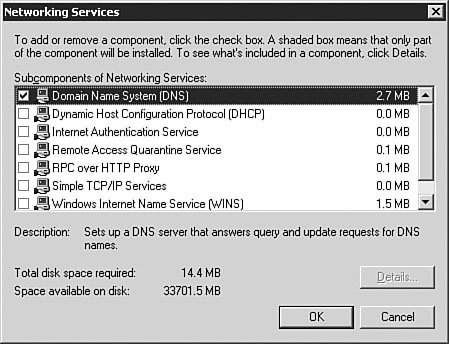
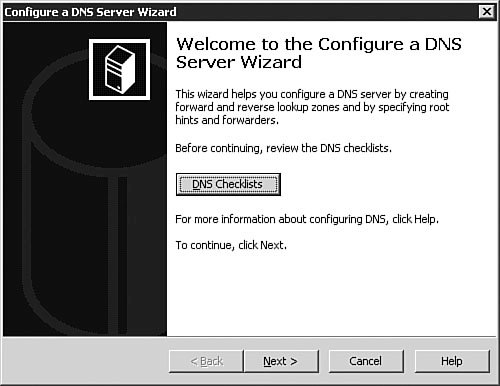
Now that you have a solid background on DNS, you can install, configure, and test the Windows Server 2003 DNS server service. The following sections show how. Installing the DNS Server ServiceTo install the Windows Server 2003 DNS server service, follow the procedure outlined in Step by Step 3.2. Note: Using a Dynamic IP Address If you are using a dynamically assigned IP address on the system on which you are installing DNS, you will get a warning message stating that you should use static IP addresses only for a DNS server. You are then given the option to set a static IP address from there. If this occurs in a lab environment or you have a reservation for the server on your DHCP server so that it will always have the same dynamic IP address, you can ignore this warning. If you are using dynamic addressing for production servers, you might want to rethink that IP address strategy. For the purpose of this exercise, you can ignore the warning. Step By Step3.2. Installing the DNS Server Service
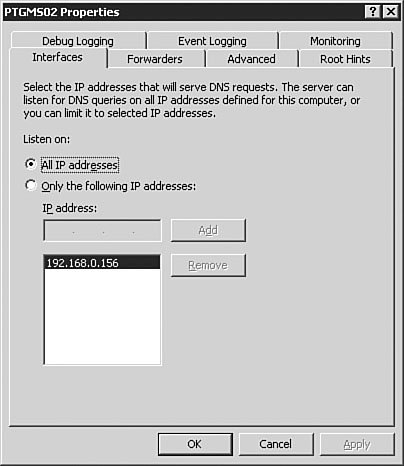
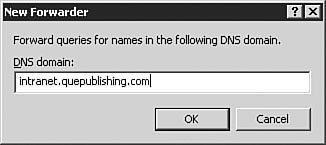
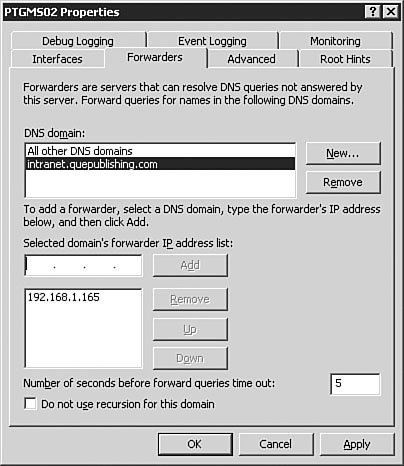
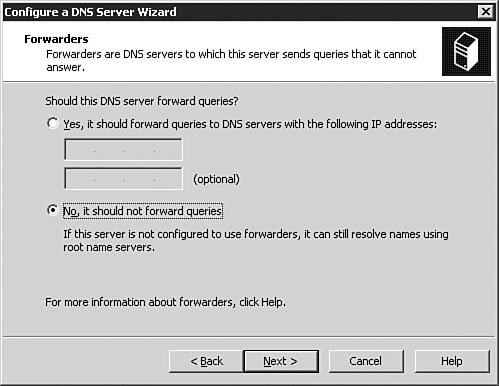
You can also use the Manage Your Server utility (see Figure 3.5) to install DNS. We won't go through all the steps in doing so, but you should know that it is another option. This application opens following the installation of Windows Server 2003, and you can reopen it by selecting Start, Manage Your Server. Figure 3.5. The Manage Your Server utility provides a very simple, easy-to-use interface for configuring a server for a variety of roles, including DNS server. Examining DNS Server OptionsWindows Server 2003 DNS is complex and has many configuration options. The best way to understand these many options is to examine them one group at a time, as we will do in the following sections. To get to these options, you will need to first open the DNS management console by clicking Start, Control Panel, Administrative Tools, DNS. The DNS console seen in Figure 3.6 will open. Figure 3.6. The DNS console is used to manage the DNS service, including setting options and creating and managing zones.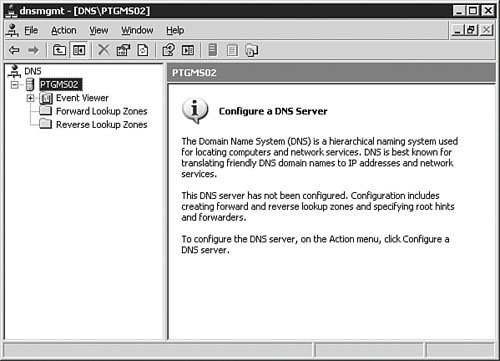 The server Properties dialog box, seen in Figure 3.7, is opened by right-clicking the DNS server in the left pane of the DNS console and selecting Properties from the context menu. The DNS server Properties dialog box appears. Figure 3.7. The DNS server Properties dialog box is used to configure and manage all DNS server parameters. The Interfaces TabFigure 3.7 shows the Interfaces tab of the DNS server Properties dialog box. From this screen, you can set the server options that determine which of the network interfaces of the server will respond to DNS queries. You can either specify all interfaces or choose specific interfaces to respond to queries. When would you need to choose specific interfaces to respond to queries? There are two circumstances in which you might not want your server to respond to DNS queries on all interfaces. The first circumstance involves the use of a dedicated, non-routable network used for system-to-system data transfers and data backup. This type of network is commonly found in large data centers, where traffic such as database synchronization and network-based backups is kept off the production network to reduce the network overhead and to avoid saturating network interfaces used by end users to access applications. If your DNS server is connected to the production network for DNS queries and to the backup network for data backups, you might not want the connection to the backup network to respond to queries. This configuration keeps additional overhead off the interface to the backup network. Another circumstance in which you might not want DNS resolution to respond to multiple interfaces on a Windows Server 2003 DNS server is when the server is connected to multiple discrete networks that utilize different DNS server records. One possible example of this might be a Windows Server 2003 that is connected to an extranet network and an internal network. You might not want that server to respond to DNS queries on the extranet network because you might want to avoid exposing internal name resolutions to customers or business partners who connect to the extranet. The Forwarders TabFigure 3.8 shows the Forwarders tab of the DNS server Properties dialog box. As discussed earlier in this chapter, a DNS forwarder is a DNS server that passes recursive DNS requests to another DNS server; in other words, it forwards them to another DNS server. On the Forwarders tab, you can set the server(s) to which DNS queries should be forwarded. Figure 3.8. The Forwarders tab is used to configure where the server will send DNS requests if another DNS server will be supplying some or all of the DNS resolution for that server. Let's say you have a single internal domain called intranet.quepublishing.com. You need to forward any queries to that domain directly to the primary DNS server for the intranet.quepublishing.com domain. The Windows Server 2003 DNS service allows you to configure forwarding for a single domain, a group of domains, or all domains. Earlier versions of the Windows DNS service supported forwarding only for all domainsit was an all-or-nothing proposition. Being able to split forwarding between multiple servers while still resolving some domains locally is known as intelligent forwarding. Exam Alert: Conditional Forwarding Because the ability to do intelligent forwarding is a new capability with Windows Server 2003 DNS, you need to be familiar with how it works and when you might need to use it. To configure a single-domain DNS forwarder, you follow the procedure outlined in Step by Step 3.3. Step By Step3.3. Setting Up a DNS Forwarder
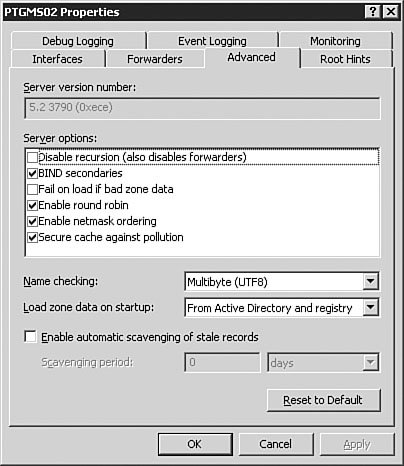
Note: Deleting Your Forwarder To avoid conflicts with later Step by Steps, you should go back and delete the forwarder you just configured. Caution: Recursion and Forwarding If you disable recursion by selecting Do Not Use Recursion for This Domain in the DNS server Properties dialog box, you will not be able to use a forwarder. Forwarding DNS requests requires that the DNS server be able to make recursive queries. The Advanced TabFigure 3.11 shows the Advanced tab of the DNS server Properties dialog box. Figure 3.11. You typically access the obscure settings on the Advanced tab of the DNS server Properties dialog box only if you are running a nonstandard DNS implementation. The Advanced tab's settings include the following:
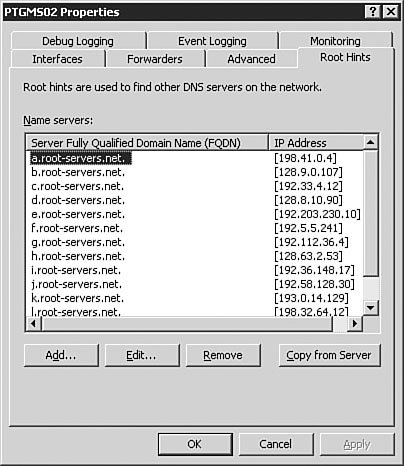
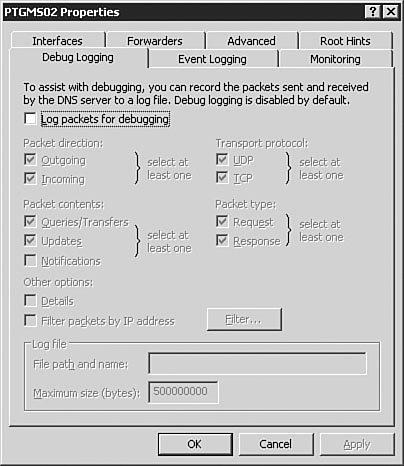
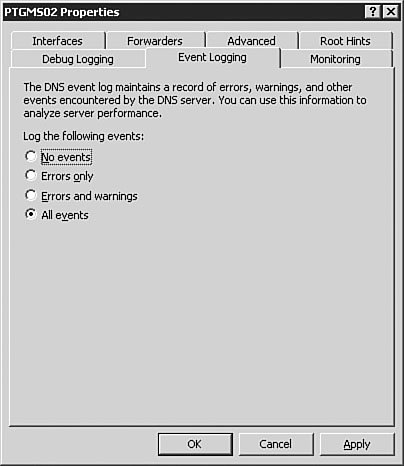
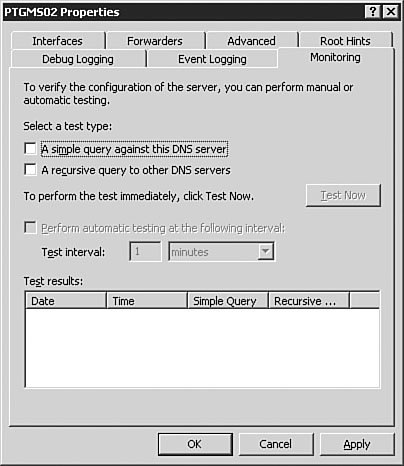
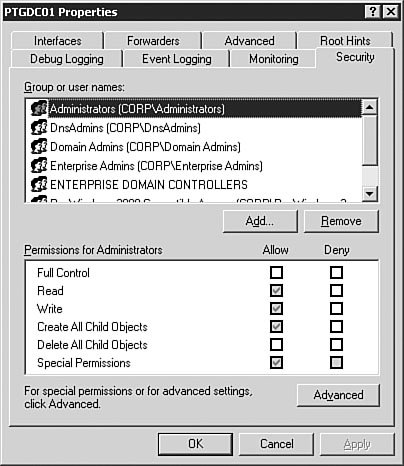
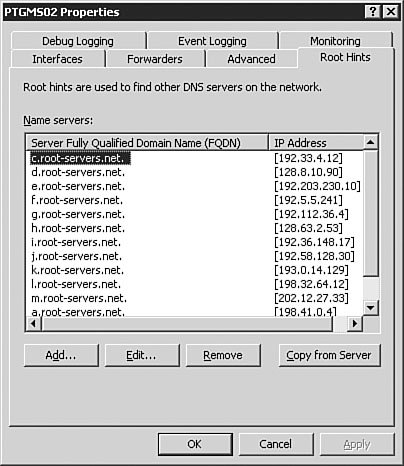
A good general rule for the Advanced tab is to leave the settings alone until you have a very good understanding of the intricacies of DNS. These settings can have unanticipated results on DNS resolution if you are not absolutely sure of what each setting does. The most common reason you will configure a setting on the Advanced tab is to enable and configure scavenging of stale records. The Root Hints TabFigure 3.12 shows the Root Hints tab of the DNS server Properties dialog box. The root hints identify the DNS servers that hold the root of the DNS tree. Because the Windows Server 2003 DNS server cannot use the DNS name of a root server to find a root server, it must have a static list of root servers so that it can find the root of the tree to find a DNS server to resolve its request. For example, if you were trying to connect to www.quepublishing.com, you would need to start at the root of the name, com, to find the DNS server that is authoritative for the quepublishing.com domain. The root hints contain the addresses of the DNS servers that are authoritative for the TLDs, including com. The authoritative root server for com would direct the request to the DNS server that was authoritative for the quepublishing.com domain, and that DNS server would resolve the query. Figure 3.12. The Root Hints tab of the DNS server Properties dialog box contains the list of DNS servers that are authoritative for the TLDs. The Debug Logging TabFigure 3.13 shows the Debug Logging tab of the DNS server Properties dialog box. Debug logging is discussed in more detail later in this chapter in the "Monitoring the DNS Service" section, but at this point, you should know that it is used to do detailed logging of DNS traffic and is typically used only when troubleshooting DNS issues with the server. Its limited use is due to the amount of data logged. Figure 3.13. The Debug Logging tab of the DNS server Properties dialog box provides detailed logging information about DNS traffic. The Event Logging TabThe Event Logging tab of the DNS server Properties dialog box (see Figure 3.14) offers more traditional logging than the Debug Logging tab. The log file for these events can be found at %SystemRoot%\system32\dns\dns.log. %SystemRoot% is usually the Windows system file directory. Event logging is discussed in more detail later in this chapter in the "Monitoring the DNS Service" section. Figure 3.14. Event logging records information on errors, warnings, and other DNS-related events. The Monitoring TabFigure 3.15 shows the Monitoring tab of the DNS server Properties dialog box. The Monitoring tab allows you to automate the testing of the DNS service, which is discussed in detail later in this chapter, in the "Testing the DNS Service" section. Figure 3.15. The Monitoring tab of the DNS server Properties dialog box allows you to automate the testing of the Windows Server 2003 DNS service. The Security TabThe Security tab of the DNS server Properties dialog box allows you to configure the rights to the DNS service (see Figure 3.16). This tab should look familiar to you because it is the standard rights assignment screen for any rights, from those for the file system to those for DNS privileges. If you want certain users or groups to have permissions on the DNS service, you can assign their rights from the Security tab. Figure 3.16. If you want to configure granular privileges for DNS, you can do so on the Security tab of the DNS server Properties dialog box. Note: The Security Tab The Security tab will not be available for configuration on DNS servers that are not installed on a Domain Controller. With the DNS service installed at a basic level, let's take a look at setting up a caching-only server. Configuring Caching-Only ServersCaching-only servers are used to speed up client computer DNS queries by gathering a large number of cached records based on client computer DNS queries. A caching-only server does not have a copy of the zone table and therefore cannot respond to queries against the zone unless they are already cached. A caching server is not authoritative on any zone. Note: Room for Cached Information All the cache entries on a caching-only server are stored in RAM. You need to be sure that your caching server has plenty of RAM; otherwise, it will not be effective. Let's assume that you have an existing Windows Server 2003 DNS server and you want to convert it to a caching-only server that can resolve internal DNS entries. The procedure outlined in Step by Step 3.4 guides you through this process. Exam Alert: Doing It the Easy Way By default, when you install the Windows Server 2003 DNS service, it automatically acts as a caching-only serveralbeit one that is able to resolve only Internet-accessible DNS entriesuntil you start creating zones and setting parameters. Caution: This Step by Step Is Optional You do not need to complete this Step by Step if you have only one DNS server available. If you opt to complete this Step by Step, you should not delete the Root Hints as instructed in Step 6. Additionally, you should delete the record you created during this Step by Step after you are done. This will ensure that your DNS server will be ready to perform the rest of the exercises in this and following chapters. Step By Step3.4. Creating a Caching-Only DNS Server
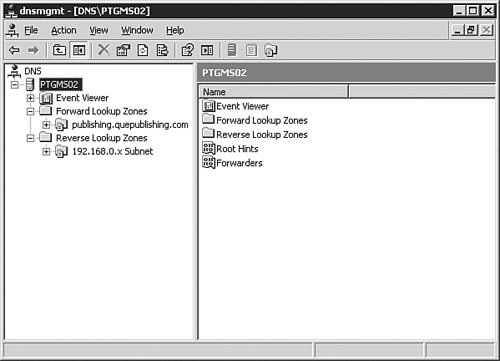
To verify that the caching function is working, you can ping several hosts by DNS name from a workstation configured to use your caching-only DNS server for DNS resolution. This builds the cache. Then you should go to another workstation that is also using the caching-only server for DNS and ping the same hosts. This time, the response should be much quicker because the DNS server will be able to get the DNS name of the host from the cache instead of forwarding the request to another DNS server. We have discussed how to set the server options. Now let's talk about configuring DNS zones so that the new server can perform name resolution. Configuring ZonesAlthough it is possible to manually configure the text files that DNS creates, the DNS console makes it much easier to manage the DNS namespace configuration. When you first install your DNS server, you will need to configure your DNS server with its first zones before it works properly. We will look at how to do this by using the wizard and then take a look at how to do this if you need to add additional zones later. Exam Alert: The DNS Console Equals the MMC The DNS console is really nothing more than the MMC with the DNS Management snap-in installed. Microsoft provides this version of the MMC to make managing systems easier for new users of Windows Server 2003, so don't be confused if you see references to the MMC in the exam. That's all the DNS console is. Using the MMC and Manually Adding Snap-ins
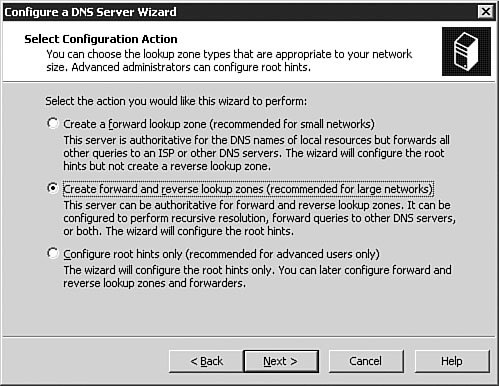
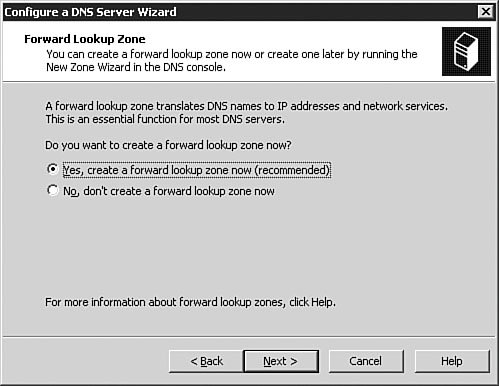
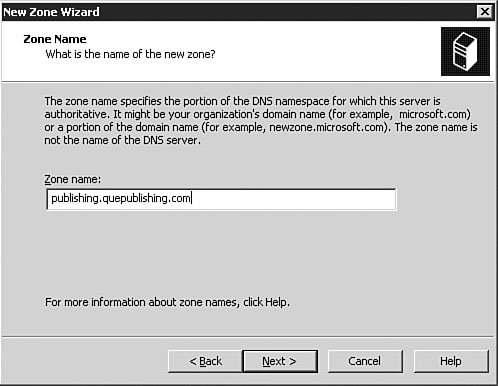
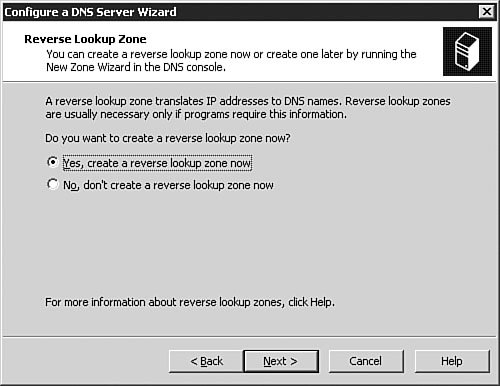
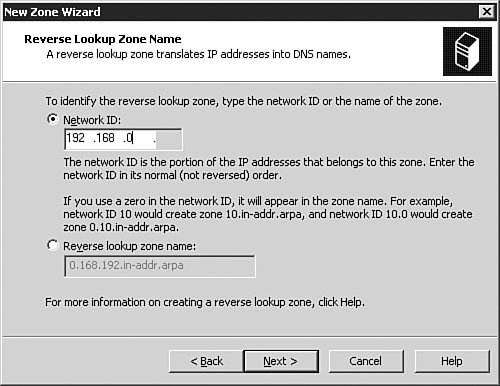
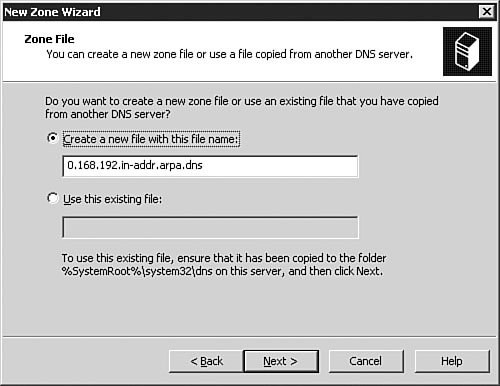
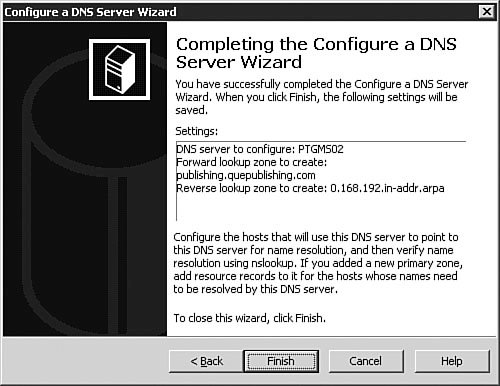
As discussed earlier in this chapter, the most common types of DNS zones are forward lookup zones, which are used to translate hostnames to IP addresses, and reverse lookup zones, which provide IP-address-to-hostname translations. Now let's look at how you would set up a new forward lookup zone and a new reverse lookup zone on a DNS server. To configure the zones on your DNS server for the first time, you follow the procedure outlined in Step by Step 3.5. Step By Step3.5. Configuring a Forward Lookup Zone and a Reverse Lookup Zone
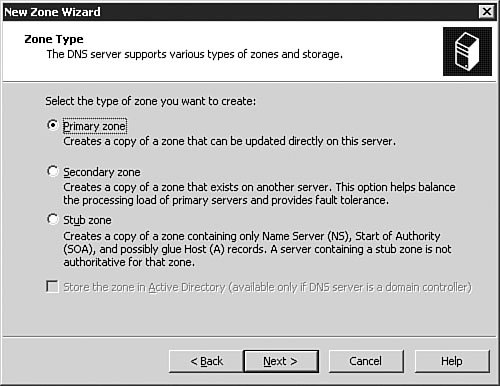
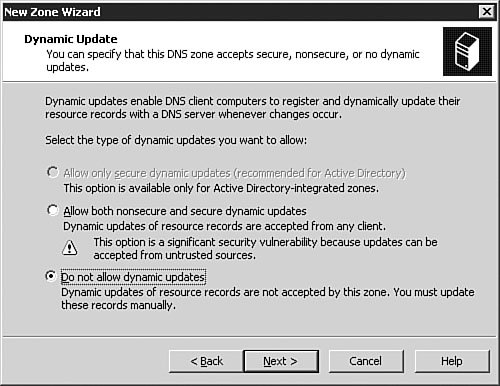
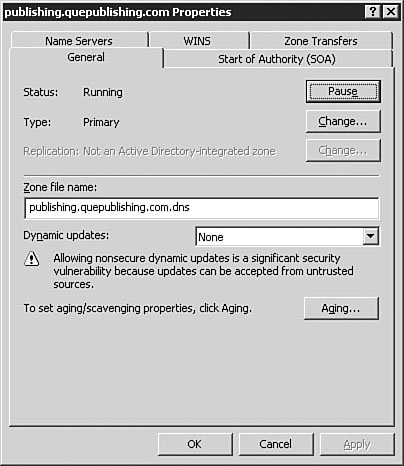
Exam Alert: Changing DNS Names Used with Active Directory When choosing a domain name to use when installing DNS, it is always a good idea to register a domain name with the appropriate domain name registration agency and use that name even if your internal network is isolated (that is, not connected to the Internet). Doing so ensures that your domain name is not in use somewhere else. A famous example of this is the xyz.com domain, used in some old Windows documentation as a sample domain. Someone actually has that domain registered and is using it. If you set up Active Directory by using this domain name and are connected to the Internet, you can cause conflicts. The good news is that with Windows Server 2003, you can rename the domain without breaking Active Directorythis is a new feature with this release of Windows. The fact that the DNS name used with Active Directory can now be changed would make an excellent exam question. Now that you have created new forward and reverse lookup zones by using the Configure a DNS Server Wizard, we'll look at configuring zone options in more detail. We will also come back to these zones later in the chapter and look at how they can be converted into Active Directory-integrated zones (provided that your DNS server is also a Domain Controller) in the "Integrating Active Directory and DNS" section of this chapter. Examining Zone OptionsFor the most part, once they have been created and configured, DNS zones pretty much work without any problems. In this section, we examine the basic zone options available to you and how they are configured. To access a zone's options, you simply need to select the zone, right-click it, and select Properties from the context menu. The Properties dialog box opens to the General tab, as seen in Figure 3.33. Figure 3.33. The zone Properties dialog box allows you to fully manage the configuration and status for a domain. The General TabFrom the General tab, as seen in Figure 3.33, you can configure basic options about how the zone itself operates and behaves. If for some reason you needed to stop name resolution from occurring against that zone, you could click the Pause button to pause the zone. This could be useful when configuring changes or troubleshooting the zone. The Change button in the Type section of the tab allows you to change the zone type, such as from a primary zone to a secondary zone or from a primary zone to a stub zone. Beware that changing a standard primary zone to a secondary zone has the implications of leaving no primary zone afterwards, so you will need to change a secondary zone to a primary zone for DNS to work correctly. On DNS servers that reside on a Domain Controller, the Change button in the Replication section of the tab will be available to you. You can change how the zone is replicated, such as from a standard primary zone to an Active Directoryintegrated zone, and also configure the scope of replication within Active Directory. We will examine these options later in the "Integrating Active Directory and DNS" section of the chapter. You can also configure and change the zone file name, the type of dynamic updates that the zone will process, and the aging and scavenging properties for the zone. Under normal circumstances, there should never be a reason to change the zone file name; however, the ability to do so exists. We examine the configuration of dynamic updates in the next section and the configuration of aging and scavenging later in the "Configuring Aging/Scavenging" section of this chapter. Configuring Zones for Dynamic UpdatesOne of the major advantages of running a Windows Server 2003 network is the capability to use DDNS. To configure a DNS zone for dynamic updates, you follow the procedure outlined in Step by Step 3.6. Step By Step3.6. Configuring a Zone for Dynamic Updates
DDNS is specified in RFC 2136, "Dynamic Updates in the Domain Name System (DNS UPDATE)." It is the foundation of a successful Active Directory implementation. As discussed in this chapter, DNS is used to resolve a name to an IP address, or vice versa, using a defined hierarchical naming structure to ensure uniformity. DDNS takes that architecture to the next level. This section describes the Windows Server 2003 implementation of the dynamic update process. In Windows Server 2003, client computers can send dynamic updates for three types of network adapters: DHCP adapters, statically configured adapters, and remote access adapters. We will examine these configurations in more detail in the next section, "Configuring DNS Client Computers." DDNS integrates DHCP and DNS, as described in RFC 2136. Every time a computer requests a new address or renews its address, the computer sends an option 81 and its fully qualified domain name to the DHCP server and requests that the DHCP server register an entry in the reverse lookup DNS zone on its behalf. The DHCP client computer also requests an entry in the forward lookup zone on its own behalf. The end result is that every DHCP client computer has an entry in the DNS zones, both forward and reverse. This information can be used by other Windows Server 2003 computers in place of WINS for identifying the names and IP addresses of other hosts. Note: Option 81 Option 81 (also known as the FQDN option) allows the client computer to send its FQDN to the DHCP server when it requests an IP address. By default, the dynamic update client computer dynamically registers its resource records whenever any of the following events occur:
By default, the dynamic update client computer automatically deregisters nametoIP address mappings whenever the DHCP lease expires. You can force a re-registration by using the command-line tool ipconfig. For Windows Server 2003based client computers, you type the following at the command prompt: ipconfig /registerdnsThis command also works for Windows XP and Windows 2000 computers. Now let's take a quick look at the dynamic update process and see how a Windows Server 2003 host gets dynamically registered with DNS. A dynamic update occurs in the following manner:
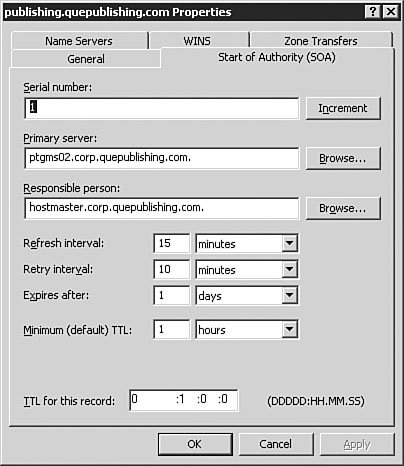
The Start of Authority (SOA) TabFrom the Start of Authority (SOA) tab, as seen in Figure 3.34, you can configure the fields that appear on the SOA record. Each DNS zone has one and only one server that is considered to be the primary name server for that zone (even in Active Directoryintegrated zones where all DNS servers are otherwise considered equal). The root name server of a domain is the name server that is acting as the SOA for that DNS zone and is the one referenced by the Windows Server 2003 DNS services as the primary server. The SOA record is the first record in the database, and it has the following format: IN SOA <primary server> <contact email> <serial number> <refresh time> <retry time> <expiration time><time to live> Figure 3.34. The Start of Authority (SOA) tab allows you to configure the SOA record. These are the sections of the SOA field (in the order in which they appear on the tab in Figure 3.34):
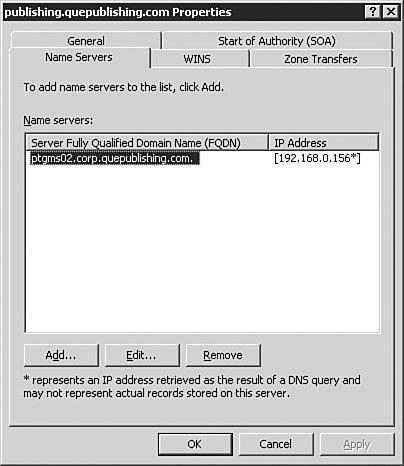
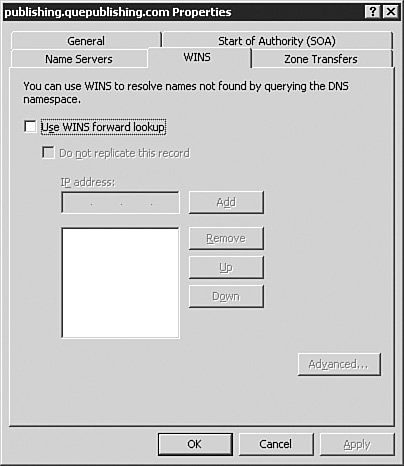
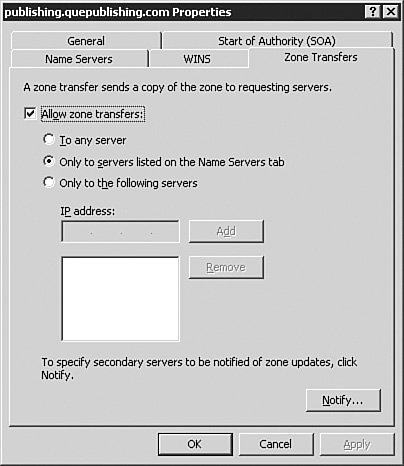
Note: Don't Use a Standard Email Address for the SOA One very important fact about the contact email in the SOA is that it does not use the standard Internet email format. Instead, you replace the @ symbol in the email address with a period. For example, billg@microsoft.com would be billg.microsoft.com in the zone file. The Start of Authority (SOA) tab also has a configuration field that allows you to configure a different TTL for the SOA record itself, if desired. The Name Servers TabFrom the Name Servers tab, as seen in Figure 3.35, you can configure which name servers are to be considered authoritative for the zone. For standard zones, this will include the server that holds the primary zone and all servers that hold secondary copies of the zone. For Active Directoryintegrated zones, this will include all DNS servers that hold the zone. Figure 3.35. The Name Servers tab allows you to add and remove authoritative name servers for the zone. You can manage the list of authoritative name servers using the Add, Edit, and Remove buttons on this tab. The WINS TabFrom the WINS tab, as seen in Figure 3.36, you can configure the zone for WINS lookup integration. If your network still relies on WINS, then you will likely need to configure the options on this tab to provide the best name resolution services available to your clients. We discuss this integration in Chapter 4, "Implementing and Managing WINS." Figure 3.36. The WINS tab allows you to configure the zone for WINS integration if you need to support legacy WINS clients. The Zone Transfers TabFrom the Zone Transfers tab, as seen in Figure 3.37, you can configure how the zone will perform zone transfers. Figure 3.37. The Zone Transfers tab allows you to configure the zone transfer properties. In most cases, the default selection of Only to Servers Listed on the Name Servers Tab will be the best selection. However, there are times when you may need to change the selection. The available options are as follows:
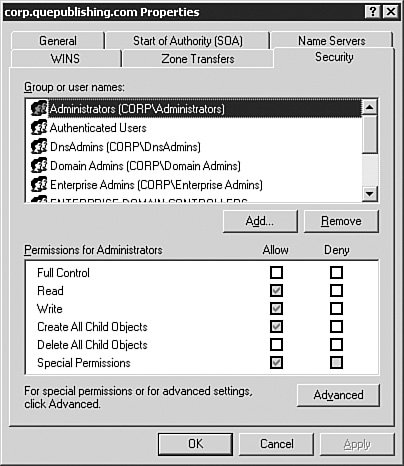
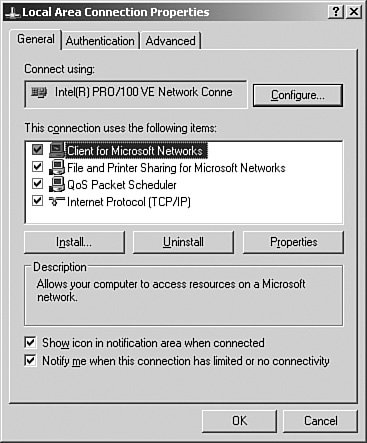
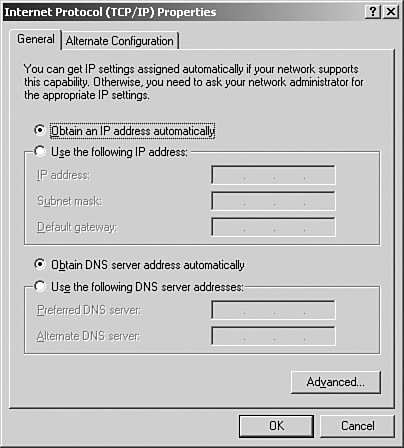
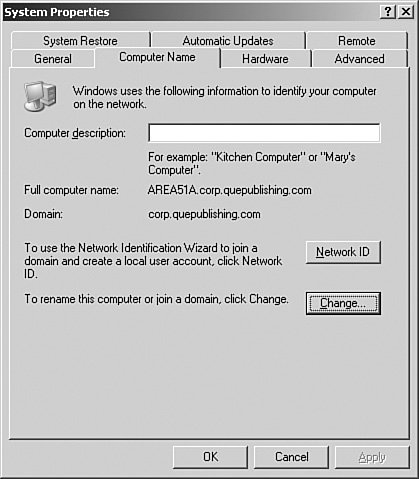
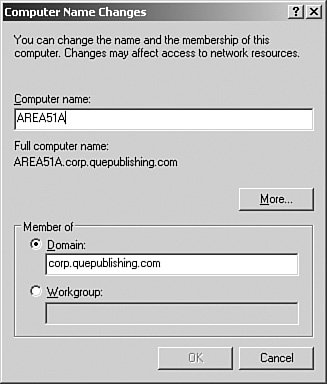
The Security TabFrom the Security tab, as seen in Figure 3.38, you can configure additional zone security. Recall that the Security tab in the server Properties dialog box does not appear unless the DNS server is running on a Domain Controller. Likewise, the Security tab in the zone Properties dialog box will not appear unless the zone is an Active Directoryintegrated one, which is discussed in the "Integrating Active Directory and DNS" section later in this chapter. Figure 3.38. The Security tab will be available only for Active Directoryintegrated zones. Now that you have finished the basic configuration of a Windows Server 2003 DNS server and its zones, let's move on and examine additional DNS-related management and configuration tasks you'll need to understand. Configuring DNS Client ComputersNow that you have installed and configured the DNS server portion of Windows Server 2003 DNS, you should take a look at how to properly configure DNS on a Windows XP Professional client computer. The key to configuring DNS on a Windows XP client computer (and on a Windows 2000 client computer as well) is to keep in mind that DNS is installed in two places. First, DNS is configured as part of the TCP/IP interface. If you have ever installed DNS on a Windows NT 4.0 or Windows 2000 computer, this process should be familiar. Exam Alert: You Need Windows XP or Windows 2000 for DDNS Remember that the Windows 9x and Me operating systems were designed for use by home users, who do not typically need to register with a DNS server to interact with Active Directory appropriately. These operating systems do not participate in DDNS. For that reason, this chapter looks only at the business operating systems, such as Windows XP Professional and Windows 2000. The second place you may need to configure DNS on a client computer is in the System Properties dialog box. The DNS information configured here is used as the DNS suffix for building FQDNs and is similar to the suffix information configured under the Internet Protocol (TCP/IP) Properties dialog box on other Windows operating systems. It is also used as part of the process for registering a computer in DDNS. Step by Step 3.7 describes how to configure the Internet Protocol (TCP/IP) Properties. Step By Step3.7. Configuring a Windows XP Professional DNS Client Computer
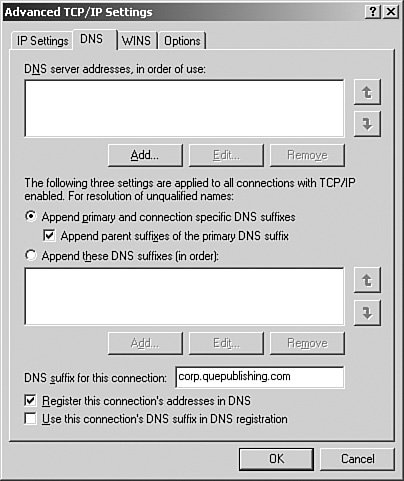
A number of advanced TCP/IP options can be configured in the Advanced TCP/IP Settings dialog box in conjunction with the DNS client computer. They include the following:
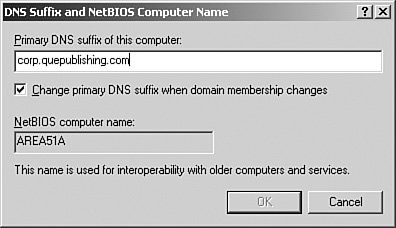
Note: What If I'm Using Windows 2000 Professional? The steps for configuring DNS registration on a client system have not changed in Windows XPthey are the same steps used in Windows 2000. If you know these steps in one operating system, you know them for both. Note: Append These DNS Suffixes Although you can enter in additional DNS suffixes manually on the Advanced TCP/IP Settings DNS tab, it's worth noting that this configuration is usually best made by using Group Policy. To modify the DNS settings in the System Properties dialog box, follow the procedure outlined in Step by Step 3.8. Step By Step3.8. Modifying the DNS Settings for Active Directory Integration
Note: Default DNS Suffix By default, you should never need to change the primary DNS suffix of a Windows XP or 2000 Professional computer in an Active Directory domain. You will not need to change it because the default primary DNS suffix is the local primary DNS suffix, which is the DNS name of the Active Directory domain to which the computer is joined. Configuring the DNS suffix as seen in Step by Step 3.8 is an advanced configuration action. It's worth noting that the primary DNS suffix can also be controlled through Group Policy. Testing the DNS ServiceHow can you test to make sure DNS is working? Several methods (ping, nslookup, or a Web browser) allow you to quickly check whether DNS is working. The following sections discuss them in order of complexity. Using ping to Test the DNS ServiceThe first application for testing DNS is the ping utility. ping, as discussed in detail in Chapter 1, "Configuring and Troubleshooting TCP/IP Addressing," allows you to send an Internet Control Message Protocol (ICMP) message to a TCP/IP host. If you use the correct flag with it, ping can also perform name resolution as part of its testing procedure. The correct syntax for the ping command is the following: ping <destination address>A sample ping session might look like this: ping ptgdc01.corp.quepublishing.com Pinging ptgdc01.corp.quepublishing.com [192.168.0.155] with 32 bytes of data: Reply from 192.168.0.155: bytes=32 time<1ms TTL=128 Reply from 192.168.0.155: bytes=32 time<1ms TTL=128 Reply from 192.168.0.155: bytes=32 time<1ms TTL=128 Reply from 192.168.0.155: bytes=32 time<1ms TTL=128 Ping statistics for 192.168.0.155: Packets: Sent = 4, Received = 4, Lost = 0 (0% loss), Approximate round trip times in milli-seconds: Minimum = 0ms, Maximum = 0ms, Average = 0ms A number of other switches can be used with the ping utility, as described in Chapter 1. From the earlier example, you can see several things. First, because your ping returns the IP address 192.168.0.155, you know that DNS is functional. The rest of the information has to do with network latency and has little application for this chapter. Using nslookup to Test the DNS ServiceThe next utility we need to look at is nslookup. nslookup is a standard command-line tool that is provided in most DNS server implementations, including Windows Server 2003. nslookup offers the capability to perform query testing of DNS servers and obtain detailed responses at the command prompt. This information can be useful for diagnosing and solving name resolution problems, for verifying that resource records are added or updated correctly in a zone, and for debugging other server-related problems. You can use nslookup by typing nslookup at a command prompt and pressing Enter. You can run nslookup with the options listed in Table 3.3. In the table, identifiers are shown in uppercase and each [ ] indicates an optional parameter.
Note: Displaying nslookup Options You can display these options by typing nslookup at a command prompt, typing ? at the interactive prompt, and then pressing Enter. Exam Alert: Knowing nslookup Because nslookup is the standard tool for troubleshooting DNS, you should be familiar with its capabilities and options for the exam. Also, be sure to remember that nslookup will not function correctly without properly configured and operating reverse lookup zones. Note: Knowing the nslookup Modes You should be familiar with the fact that nslookup functions in both interactive and noninteractive modes. You use noninteractive mode when you need only a single piece of information. If you are not familiar with nslookup, the options just described are probably clear as mud. The best way to get a thorough understanding of the nslookup options and flags is to try them out. However, for a simple test of DNS using nslookup, select a hostname you know is in DNS and type the following: nslookup ptgdc01.corp.quepublishing.comThis command returns the following: Server: ptgdc01.corp.quepublishing.com Address: 192.168.0.155 Name: ptgdc01.corp.quepublishing.com Address: 192.168.0.155 In this example, you used the name of the DNS server for the test. You can use any host in the DNS table. The first name and address returned are the name and address for the DNS server you are querying. If this server does not have a PTR record in a reverse lookup zone, the server name is returned, along with the following message: ***Can't find server name for address (address of configured DNS server): Timed out This does not mean anything is broken; it just means there is no reverse lookup zone configured or no reverse lookup zone entry for this server. If you still get name resolution in the Name/Address section of the response, the DNS server is working. Note: nslookup Is Now on the Menu If you right-click the server in the DNS console, you'll see that Launch nslookup is now one of the options. This helps you identify and use available management/testing tools. Using a Web Browser to Test the DNS ServiceA final method for testing a DNS server is to use a Web browser such as Internet Explorer. You type the FQDN you want to reach into the Address box and press Enter. If DNS is working correctly, the IP address is displayed in the lower-left corner of the application. This occurs even if the host in question is not a Web server. The browser may not connect successfully, but you should see that resolution if DNS is configured correctly.
|


EAN: 2147483647
Pages: 196