User Interface Construction with Glade
| only for RuBoard - do not distribute or recompile |
User Interface Construction with Glade
This section covers the construction of the user interface using Glade. Figures 6.1, 6.2, and 6.3 will be referenced extensively. So you may want to refresh your memory of them or dog-ear their pages.
Starting the frm_main Project
Launch glade from the command line. The UI should be constructed so it can be modified later, knowing that glade will overwrite interface.c , append to callbacks.c , and not touch main.c . Therefore, try not to make changes to files that will be overwritten unless you are willing to document those changes elsewhere so they can be re-created when necessary.
First, set the project options. The name of this application should be set to sesi, making the glade file sesi.glade. Disable Gnome support (tab 1) and gettext support (tab 2). Deselecting these two options will make this project simpler. Gnome support (recall that there is a set of & #9733;_gnome_* functions built on top of GTK+) is not needed in this or any project in this book, and gettext support is used in the internationalization of strings ”again, something that is not needed for these projects because they are targeted at a small number of in-house users.
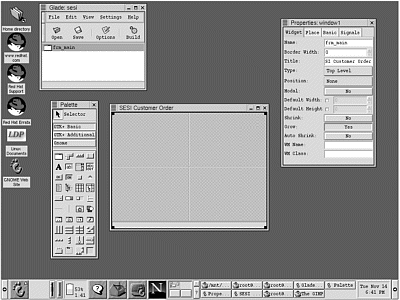
From the palette, select a new window (the top right icon). Name it frm_main in the Properties window and set the title of the window to SESI Customer Order. Then select a vertical packing box and drop it into the newly created window. Set the number of rows to 2 and in the Properties window, set its name to vbox_main. Select a status bar widget from the palette and drop it into the bottom half of the window; change its name to statusbar because this will be the only status bar widget you will use. Then, select a table from the palette and drop it into the top half of vbox_main. Set the number of rows and columns both to 2. Set the table name to table_2_by_2 in the Properties window.
Figure 7.1 shows your progress so far.
Figure 7.1. The starting structure of frm_main.
Filling Out the Left Side of frm_main
Select the vertical packing box from the palette and drop it into the top left section of table_2_by_2. Set the number of rows to 2. Now repeat this action for the top right section of table_2_by_2. For the names of these vertical packing boxes, enter vbox_customer_number and vbox_customer_name, respectively.
Select a vertical button box widget from the palette and drop it into the bottom left section of table_2_by_2. When prompted, set the number of rows to 5 in accordance with Figure 6.1. Name the vertical button box vbuttonbox since these will be the only command buttons on the form.
Now, within the vertical button box you just created, select the top button. Change its name from button2 to cmd_search and set its label to _Search.... Note the use of the underscore character (the _ in the label); this causes the S in Search to be underlined . Windows users will recognize this as the Alt+S combination, and indeed, there is no reason why your application can t conform to this convention.
With cmd_search still selected, click the Basic tab of the Properties window. Press the Accelerators button (the one marked Edit... ) at the bottom of the window. In modifiers, check the Alt box, type S in the Key text box, and click the button to the right of the Signal text box. Select the clicked signal and click OK. You should now have one Accelerator in CList box at the top of the Accelerators dialog box. Now the key combination of Alt+S should activate the cmd_search clicked event.
Repeat the procedure in the previous paragraph for the rest of the buttons. Change button2 s name to cmd_save_edits and its label to read Save _Edits , indicating that Alt+E should activate the clicked signal. button3 should similarly have its name changed to cmd_select_items with Alt+I as the accelerator, button4 changes to cmd_print_order (Alt+P), and button5 becomes cmd_exit (Alt+X).
Next , select a label widget and drop it into the upper-left section of the form, which is also the top of vbox_customer_number. Set the text of the label to Customer Number:. Set the label name to lbl_customer_number and the justification to Left. To finish out the left half of this form, select a combo box and drop it into the open section just below lbl_customer_number. Change the name to cbo_customer_number. At this point, you also need to select the combo-entry widget within cbo_customer_number; you can see the difference by clicking on the combo-entry part of the widget and the drop-down arrow on the right side of the widget. In addition to renaming the entire widget, you also need to change the name of the combo-entry part of the widget to combo-entry_customer_number (refer to Figure 7.6).
Figure 7.6. The difference between a combo widget and its child combo-entry widget.
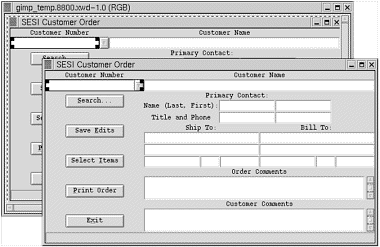
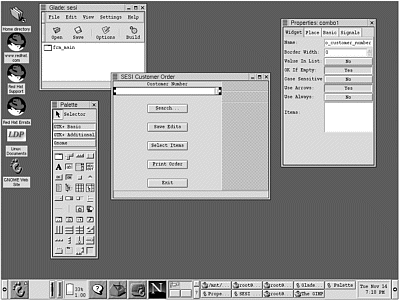
Figure 7.2 shows how the form should look at this point.
Figure 7.2. frm_main with the left half of the window filled out.
Filling out the Right Side of frm_main
Select another label widget and drop it into the open slot at the top on the right side. Change the name to lbl_customer_name and the label text to Customer Name; make it left justified. Now select a Text Entry widget and drop it into the open space immediately below lbl_customer_name. Name it entry_customer_name.
Select the vertical packing box again and drop it into the lower-right section of table_2_by_2, which at this point should be the only open section. Set the number of rows to 6 and the name to vbox_data. Select the table widget and drop it into the top slot of vbox_data. Set it to 3 rows and 3 columns if that is not the default. Then name it table_3_by_3. Select the table widget one more time, and this time drop it into the second slot of vbox_data, right below table_3_by_3. Set the rows to 4 and the columns to 4, and then name it table_4_by_2.
Select the label widget ”twice ”and put one each into vbox_data for lbl_order_comments and lbl_customer_comments. Here is your first change from your design of Figures 6.1 and 6.2. In those, Customer Comments were first, and Order Comments were underneath. As it turns out, the Customer Comments probably won t be changed every order, but the Order Comments could be different every time the customer places an order. So reverse the order of the Order and Customer comments labels and text widgets, making them the opposite of their order in Figure 6.2. This will allow the user to tab into the Order Comments ”which is much more likely than the user changing or adding Customer Comments. When the label widgets are in place, enter the text widgets and change their names to txt_order_comments and txt_customer_comments. Be sure to set the editable property to Yes.
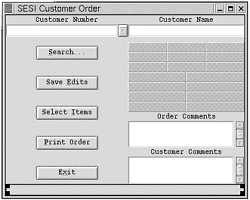
Figure 7.3 shows your application shaping up nicely .
Figure 7.3. The construction of frm_main after you ve filled in the right half of the form.
Finishing the frm_main User Interface
Now you ll move on to fill out table_3_by_3 and table_4_by_2. Select the label widget from the palette and drop it into the upper-left box of table_3_by_3. Change its name to lbl_primary_contact and its text to Primary Contact:. Set the justification to Left and under the Place tab of the Properties dialog box, set Col Span to 3. Place lbl_name_last_first in the second row in the leftmost box of table_3_by_3, and place lbl_title_and_phone in the bottom left box.
Next, you insert the text boxes for the contact s first and last name. Select the Text Entry widget from the palette and drop it into the center box of table_3_by_3; name it entry_last. On the Place tab of the Properties window, set the X Expand button to NO, and then go to the Basic tab and select the Width check box (to true ). Finally, set the value in the Width text box to an even 100. This will make the text box a little narrower; only in the rare case that the person has a very long last name will part of the name be hidden from view. Again, select the Text Entry and repeat the process for entry_first, placing it in table_3_by_3 in the middle row, right box. To finish out table_3_by_3, repeat (again) the two previous steps for entry_title and entry_phone, putting them on the bottom row of table_3_by_3 in the center and far left spaces, respectively.
Fill out labels lbl_ship_to and lbl_bill_to (top row of table_4_by_2) and set their properties as you did for the previous label widgets. Into the middle two rows of table_4_by_2, drop four Text Entry widgets: entry_ship_to_addr1, entry_ship_to_addr2, entry_bill_to_addr1, and entry_bill_to_addr2 (see Figures 6.1 and 6.2 for clarification ). Their default values of 158 are acceptable, and their X Expand buttons should be set to No.
The final part of this form s construction is nearly upon you ”well, the visual part of it, anyway. Drop a horizontal packing box into each of the remaining bottom two spaces in table_4_by_2, where the City-State-ZIP fields will go for the Ship To and Bill To addresses. The widgets you are creating are entry_ship_to_city, entry_ship_to_st, and entry_ship_to_zip, followed by their equivalent *_bill_to_* widgets. Set the *_city widgets to a width of 100, 35, and 70 for city, state, and zip (for both sets of widgets).
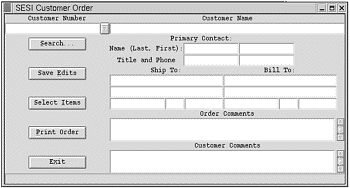
At this point, the visible portion of frm_main is finished; you will add the events shortly. Be sure to hit the Save and Build buttons in Glade. Figure 7.4 shows frm_main as it appears from Glade. You can change the shape of the window (of frm_main) to get some idea of how it will be resized; however, you aren t guaranteed anything until you compile and resize the executable (see the following sidebar, Compiling frm_main ).
Figure 7.4. Completed frm_main.
Compiling frm_mainAt this point, it might be a good idea to compile the application ”which consists of only frm_main so far ”just to see how it behaves. (For example, you want to see if a text box is resizing as desired.) To do that, you will have to do the following: Comment out the two lines in main.c that will cause problems (the lines that reference pixmaps, normally around line 23; these lines reference pixmaps, which won t be used in this application), cd to your project directory, cd to its src subdirectory, and then send the following from the command line (or put it into a shell script): % gcc -Wall -g *.c `gtk-config --cflags --libs` % ./a.out After you do this, you will want to delete main.c and rebuild it from within Glade. If you don t delete it, Glade won t rebuild it, and because this is an intermediate build, you aren t to the point where you want to keep the changes to main.c . |
Setting the Events for frm_main
As you might have noticed, you have not set any of the signal/callbacks or what you might be used to calling events; nor have you started frm_items_ordered (see Figure 6.3). Next, you will set the signals for frm_main, and later you will repeat all these steps for frm_items_ordered.
At this point ”setting the events for frm_main ”you are probably better off to err on the side of caution; that is, you should connect more signals than necessary. Because you are going to build most of your utility functions in a modular way, if it turns out that one signal is better than another for a certain function (by having that function already set), you will have to move only a small amount of code. You will not have to open Glade and search for signals.
Setting the Signals
To start with, connect the delete signal for frm_main; this will be your application shutdown code. Select the main window object of frm_main. You can do this by selecting frm_main in the window titled Glade: sesi. You will know when you have selected the window object because the Properties window will say Properties: frm_main in the title bar.
With frm_main selected, click the Signals tab in the Properties window. Click the button next to the Signal text box to bring up the Select Signal dialog box. Now the question becomes this: Which signals will you use, or potentially use? Remember, for an application this small, there is essentially no penalty for overindulging and selecting too many signals. Figure 7.5 shows the Select Signal window.
Figure 7.5. The Select Signal dialog box.
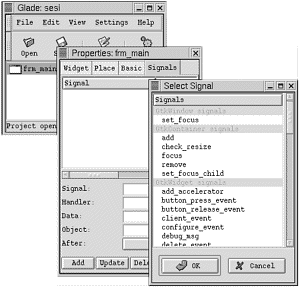
Under GtkWindow signals, highlight set_focus and click OK.This returns values to the Signal and Handler text boxes of the Signals tab in the Properties window. The next step is very important: Click the Add button in the lower-left corner or your signal addition will be lost. This should put a set_focus signal into the list box at the top of the Signals tab. Repeat that procedure for all signals you think you ll use.
In this case, the following signals have been selected in addition to the set_focus event: button_press_event, button_release_event, delete_event, event, hide, key_press_event, key_release_event , and the realize event.The delete event will be the place to call the gtk_main_quit() call, and the others just might come in handy at some point in the future. As I said before, if it turns out not to be the case, the price is an empty function.
Testing Event Sequences by Adding g_print StatementsAt this point, you might want to put a quick g_print() function call in all your callbacks, do a quick compile, and check to see that all the functions are firing when you think they are. To do this, you ll need to open callbacks.c for your project and add a g_print() call, changing the message to indicate which callback function is firing. Follow the compile instructions in the previous sidebar, Compiling frm_main. If you have downloaded the source code from the companion Web site, you will notice that every callback has either a g_print() call or a commented-out g_print() call. I have left those in on purpose; in addition to helping with debugging, they make a good demonstration of event sequences. In fact, doing so confirms a couple of events in GTK+ that you will use to your advantage. When you get to the point that you have the clicked event for cmd_search with a statement in it like this g_print("cmd_search clicked...\n"); you can confirm that Alt+S does indeed activate the cmd_search clicked event and that the keypress event for the window captures all keys. However, this now creates new problems: All keys means all keys, including the Tab key, which the user will probably use extensively. |
Now select the cmd_search button and go to the Signals tab. Again select the button to view the possible signals for a command button. Select the clicked signal under GtkButton Signals, click OK, and then click Add.
Repeat that same action for all the other command buttons on the form. You can look through the list of events for the command button widget, but you won t be using any events other than the clicked event. Also, go ahead and add gtk_main_quit() to frm_main s delete event callback in callbacks.c .
Finally, turn to cbo_customer_number. Recall that when this widget was created, you had to rename both the combo widget and its child combo-entry widget to cbo_customer_number and combo-entry_customer_number, respectively. This distinction will become very important shortly. Figure 7.6 shows the different widgets selected.
With the combo widget selected, select the Properties window and then the Signals tab. Using the button, bring up the signals for the combo widget. Notice that you have the signals for GtkContainer, GtkWidget, and GtkObject. Looking through the list, none will be used in our application. However, if you go back and select combo-entry_customer_number and then bring up the signals, you will see several that will be needed.
Notice that the Select Signal window brings up the GtkEditable signals. Set the signals for activate , changed , delete_text , and insert_text.
Making cmd_save_edits Inactive
Finally, you need to make cmd_save_edits inactive ”or in GTK-speak, insensitive. Select the cmd_save_edits widget, and then open the Property Editor window if it is not already open. Select the Basic tab and set the Sensitive toggle button to No. This sets the initial state of cmd_save_edits to be grayed-out.
At this point, the UI portion of frm_main using Glade is done. Again, it is probably advisable for you to open callbacks.c , enter a g_print() statement for each of the callbacks, and then compile and run the application just to see how everything fits together. Otherwise, it is time to move on to frm_items_ordered.
Creating frm_items_ordered
Chapter 6 did not present a container schematic for frm_items_ordered as it did for frm_main. It will be initially divided by a horizontal frame with the buttons, labels, and text widgets on the left, and the CList widgets on the right. The left side will be divided by vertical packing boxes into which the individual widgets will be added, and the right side will be divided by two more frame widgets.
From the Palette, select a window widget. Then, rather than selecting a horizontal packing widget with two columns, select and drop a horizontal pane widget into the window. This effectively allows the same division as a horizontal packing widget, but it allows the user to size the left and right sides. Be sure to set both the Gutter and Handle properties to 10 and deselect the Position check box; this allows the frame to size as needed instead of setting itself all the way to the left as a default.
Next, select a vertical packing box and drop it into the left side of the window; it asks for the number of rows to create. Referencing Figure 6.3, there is a chance to change the design a bit and simplify the UI at the same time. In Figure 6.3, the top leftmost widgets are in the same row of the vertical packing box, the label Item Num:, and its associated editable widget.What if you put each of these widgets into separate rows in your vertical packing box? There would be no need for a horizontal packing box, and it would not affect the vertical dimensions because the CList widgets on the right side would be longer (vertically) than all the widgets on the left side. While it doesn t give any immediate benefits other than simplifying the UI build process a bit, it doesn t appear to cost anything either. So it will be changed. Looking at Figure 6.3 again, you see a total of nine widgets on the left side. All of those will be placed into their own row within the left vertical packing box, which you will call vbox_left.
Select and drop into vbox_left the following items from top to bottom: a label widget, a text-entry widget, another label, a spin button widget, two command buttons, another label, a frame (and then inside the frame, insert label widget). Finally insert into the bottom row a command button. Rename the top label from label1 (or whatever the default name is) to lbl_item_number and set its text to Item Number:; set the justification and other properties as desired. Name the text-entry widget below it entry_item_number and set its max length to 12, which should be more than enough.
Next change the label in Row 3 to lbl_quantity, change the text to Quantity:, and change any other properties as needed. Name the spinbutton widget in row 4 spinbutton_quantity, and set the default Value: to 1 if it is not already set because this will be the most likely value for any given item.
For the next two command buttons down in the vertical packing box, change the names to cmd_add and cmd_search_for_item and set the label text according to Figure 6.3. For cmd_add, put an underscore before the A in the label to make it the hotkey and connect the Alt+A key combination to the clicked signal by going to the Basic tab in the Properties box and clicking the Accelerators: Edit... button. Check the Alt check box, set the Key to A and the Signal to clicked, and then click Add and Close. Repeat the steps for cmd_search_for_item, making F the hotkey. For both command buttons, set the Border Width property to 5; this improves readability of the UI a bit.
Finally, to fill out vbox_left, set lbl_order_total (the 7th row down) the same way you set the labels in rows 1 and 3. Row 8 now contains a frame widget (without a title), and inside the frame is a label widget. This label widget will be set with the amount of the order total, and because that number cannot be changed except by adding or deleting items, making it a label prevents the user from thinking he can edit it. Set this label to lbl_order_total_numeric and set its default text to 0.00. Also, select the frame surrounding it (probably named frame1, by default) and set its Expand and Fill properties to No.
In row 9, set the properties for cmd_done in the same way you set the command buttons in rows 5 and 6.
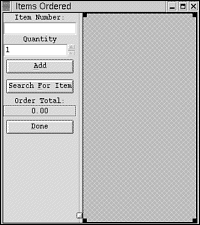
Figure 7.7 shows how frm_items_ordered should look after you finish the left side of the horizontal packing box.
Figure 7.7. frm_items_ordered as it should look after you fill in the left half of the window.
Filling Out the Right Side of frm_items_ordered
Now it is time to fill out the right side of the main horizontal packing box. Again, instead of selecting a vertical packing box widget and dropping it onto the right side with the rows set to 3, you will use vertical pane widgets. As before, this gives the user room for greater customization, and in this case, it helps demonstrate the differences between using packing boxes and panes. Select the vertical pane widget (twice) and place it into the right side of the horizontal pane widget that divides frm_items_ordered. In the top row, select from the palette and drop a CList widget.
For the name of this CList widget, enter clist_items, and then select each of the column header labels in turn. Name them and set their text as shown in Figure 6.3. To avoid confusion, preface the column header label names with clist_items_ ; for example, the leftmost column label should be named clist_items_lbl_item_number. This prevents the possibility of confusing it with lbl_item_number, which is in the upper-left space of this same form. Although such a name is very long, because it s a widget, it will not change after it is created; it will be static for the life of the application, so you only have to set it once. Therefore, the three labels reading across the top of clist_items should be named clist_items_lbl_item_number, clist_items_lbl_description, and clist_items_lbl_price. Returning to clist_items, in the Property Editor under the Basic tab, select the Height and Width check boxes, which forces the CList to be displayed in the correct size. Otherwise the frame object that bounds it on the lower edge will push all the way to the top, effectively hiding clist_items.
Next, place another CList widget into the bottom space on the left side that s created by your two vertical frame widgets. Name it clist_items_ordered, in keeping with your overall naming convention. Change its properties and its column s properties the same way you did for clist_items, but also as depicted in Figure 6.3. That means the first label will be named clist_items_ordered_lbl_item_number, the second clist_items_ordered_lbl_description, and so on. Don t forget to select and set the Height and Width properties on the Basic tab.
Finally, resize both of the CList widgets to show proportionally: clist_items should show five or six lines of available items, whereas clist_items_ordered should show three or four items. Set the Height property of clist_items to 150 and the height of clist_items_selected to an even 100.
The only available space should now be the empty space between the two CList widgets. Into it, drop a horizontal packing box with three columns. I will refer to this as hbox3, the default name on my system; to follow along, you should set yours to the same. For hbox3, set the Border Width to 10, the Size to 3, Homogenous to Yes, and Spacing to 12. On the Place tab, set Shrink to Yes and Resize to No. The rest of the defaults should do fine.
Drop a command button object into the left available spot in hbox3. Set its name to cmd_add_down, and this time for its text, enter Add. At this point, you might be tempted to choose the stock button Down. That option shouldn t be used here because you have disabled Gnome support for this application, and the stock buttons are Gnome functions.
Next, drop another command button into the far right space in hbox3. Name this one cmd_remove, and because none of the stock buttons are what you re after, enter Remove for its label text. Both cmd_remove and cmd_add_down should have their Expand and Fill properties set to No.
Lastly, select a spin button widget and drop it into the center space of hbox3. Name it spinbutton_quantity_down to distinguish it from spinbutton_quantity in the upper-left corner of the form. In the Place tab of spinbutton_quantity_down, the Expand and Fill properties should be set to No.
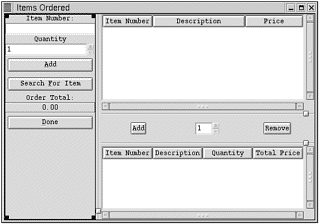
Figure 7.8 shows frm_items_ordered with the UI filled in.
Figure 7.8. frm_itmes_ordered with all widgets added.
Setting the Events for frm_items_ordered
It is time to set the events. Set the same events as with frm_main for frm_items_ordered (at the window level), and set the same for the button widgets. See the Signals tab of frm_main for a list of signals to set. After that, you need to set the signals for the GtkEditable widgets (any text, entry, and in this case, spinbutton controls), as well as the CList widgets.
As you did with the GtkEditable objects on frm_main, set the activate, changed, insert text , and deletetext signals for entry_item_number on frm_items_ordered. Although you could set the same signals for the spinbutton widgets, that won t be done because no actions are tied to the spinbutton widgets. They will be accessed to find out what integer they show, but nothing more will be done.
For the CList widgets, set the select_row, unselect_row , button_press_event , and button_release_event signals. Do so for both CList widgets.
Nearing the end of the UI building process with Glade, the last thing you need to do is build the find customer and find item search boxes. Figure 7.9 shows both windows built with Glade.
Figure 7.9. frm_find_item and frm_find_customer: Note that each still needs a CList widget on the right half to be complete.
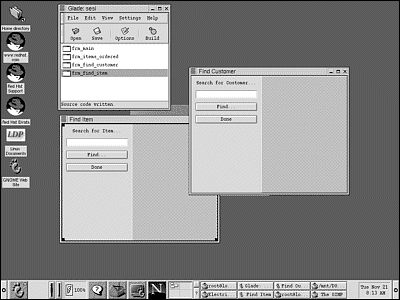
The detailed steps for creating these windows will not be covered here; all the widgets used are defined, and their properties are set along the same lines as were those of the previous widgets. Both are Modal, and their only trapped events are the clicked events of the command buttons and the delete event on the window. frm_find_item should have a CList widget on the right half with three columns, and frm_find_customer should have a CList widget on the right with 17 columns, each corresponding to its related database table. The application will fill in the rows, and if another Find operation occurs, the application will clear and refill the widget.
| only for RuBoard - do not distribute or recompile |
EAN: 2147483647
Pages: 119
- Step 1.1 Install OpenSSH to Replace the Remote Access Protocols with Encrypted Versions
- Step 3.1 Use PuTTY as a Graphical Replacement for telnet and rlogin
- Step 3.2 Use PuTTY / plink as a Command Line Replacement for telnet / rlogin
- Step 4.4 How to Generate a Key Using PuTTY
- Step 5.2 Troubleshooting Common OpenSSH Errors/Problems