Lesson 3: Using Secure Sockets Layer
Lesson 3: Using Secure Sockets Layer
While authentication methods like Integrated Windows authentication can reliably provide access to a page only to authorized users, the information sent between the client and server after authentication is still sent in plaintext in an easily intercepted form. IIS supports Secure Sockets Layer (SSL), a standard for encryption of data over an HTTP connection. SSL can authenticate the server with a certificate and encrypt the data sent in both directions, and it also supports optional client certificates for user authentication.
After this lesson, you will be able to
-
Understand SSL and its support in IIS
-
Obtain, install, and renew SSL certificates
-
Configure SSL encryption and authentication
Estimated lesson time: 30 minutes
Understanding SSL
SSL uses a public-key encryption system, described in Chapter 5, "Certificate Authorities," to transmit encryption keys over the network and establish a secure connection. SSL is often used on Web sites when dealing with confidential information, such as credit card transactions.
SSL uses a 40-bit encryption key by default. Because 40-bit security is no longer considered secure, you should enable 128-bit encryption keys. This requires that browsers support 128-bit encryption. Encryption laws have recently been relaxed, allowing 128-bit encryption to be exported widely. Most current versions of Web browsers now support 128-bit encryption by default.
Obtaining and Installing SSL Certificates
Before you can enable SSL in IIS, you must request and install an SSL certificate. You can obtain an SSL certificate from a certificate authority (CA), either a CA within a private network or an external trusted CA. The Internet Information Services management console includes a wizard that can package a certificate request and send it to a CA to be signed.
If you install a certificate from your own CA, users who do not have your CA in their certificate trust lists will receive a warning message when they connect to your site. To proceed, they will be required to click the Accept button to indicate they trust your certificate. This process can be very confusing to public Internet users. Consider obtaining a Web server certificate from a commercial root CA to avoid interrupting users with this message.
Installing Server Certificates
If you have an online CA, you can request, obtain, and install a server certificate from the IIS Certificate Wizard. To start this wizard, open the Properties dialog box for a Web site, folder, or virtual directory. Click the Directory Security tab, and click the Server Certificate button. The wizard includes three main functions:
-
Create A New Certificate
-
Assign An Existing Certificate
-
Import A Certificate From A Key Manager Backup File
Select the Create A New Certificate option to request a new certificate. You can then choose to prepare a request to be sent later if you are sending the request to a third party, or to send the request immediately if you're transmitting it to a CA that you control. If you send the request immediately, you are prompted for the CA that you want to send the request to.
To obtain a certificate, you will need to specify information that will be stored in the certificate about the site. This includes a site name, organization, organizational unit, domain name, and geographical location information. If any of this information changes later, you will need to request a new certificate.
Requesting Certificates from an External CA
If you are requesting a certificate from a third-party CA, you usually need to save the request as a text file and send it to the CA. To do this, select the Prepare The Request Now, But Send It Later option in the IIS Certificate Wizard. You are prompted for the same information as when requesting from an online CA, and the request is saved to the text file you specify. You can then forward this request file to the Certificate Authority using e-mail or however else the CA tells you to send it.
Once you have received the certificate from the CA, you can install it from the IIS Certificate Wizard. Select the Process The Pending Request And Install The Certificate option, and then locate the CA response, which should be saved in a file with the .cer extension. The certificate is then installed for the site.
Be sure to install the certificate for the same site you used when requesting it. Otherwise the certificate will not be valid.
Managing Server Certificates
Once you have installed a server certificate, you need to configure the SSL settings correctly to require SSL for access. You can also view the contents of a certificate or renew an existing certificate.
Configuring SSL Options
To edit SSL options, open the Properties dialog box for a site or virtual directory. Click the Directory Security tab, and click Edit in the Secure Communications area. The first option in the Secure Communications dialog box allows you to require SSL communications for the site. You can also require 128-bit encryption, although it might not be supported by all clients.
This dialog box also includes options to enable client certificates, client certificate mapping, and certificate trust lists. These are described later in this lesson.
When you have configured the server to require SSL, clients must use https: instead of http: in URLs to access the server, and each client must support SSL at the level of encryption you have specified.
Viewing Certificate Details
You can view three types of information about any installed server certificate:
-
To view basic certificate information, click the View Certificate button on the Directory Security tab in the Properties dialog box. The basic certificate information includes the purpose of the certificate, the server it was issued to, the issuing CA, the dates the certificate is valid, and whether it includes a private key.
-
To view more details about the certificate, click the Details tab. The details include serial number, the algorithm the CA used to sign the certificate, the bit length, and other attributes.
-
To view the chain of authority for the certificate, click the Certification Path tab. You can select a CA in the list and click the View Certificate button to view other certificates. The bottom portion of the dialog box displays a brief status message indicating whether the certificate has any errors, such as its being expired.
Renewing or Removing Certificates
If you click Server Certificate to launch the IIS Certificate Wizard after an existing certificate is installed, the wizard includes an option to renew the certificate, remove it from the server, or replace it with a new certificate.
If you choose to renew the certificate, you are prompted to confirm the identification information. As with creating a certificate, you can either renew directly using an online CA or package a request to send to an external authority.
Authenticating Clients
You can also use SSL to authenticate clients. When SSL is used, you can enable or require client certificates that provide proof of identity for the clients. To use the client certificate features, you must first install a server certificate as described earlier in this lesson.
By using certificates to authenticate clients, you can allow large groups of users to access your system by trusting a root CA that they trust, and mapping those users to a single account based on the trusted root CA. For example, you could have all employees of a specific client mapped to a single trusted certificate and Web account, and manage their permissions on your site using that user account. This is why certificate-based authentication is the best option for extranet users.
Enabling Client Certificates
To enable client certificates, open the Properties dialog box for a Web site or virtual directory, and click the Directory Security tab. Click Edit in the Secure Communications area to open the Secure Communications dialog box. This dialog box allows you to select one of these Client Certificates options:
-
Ignore Client Certificates. Client certificates are not used.
-
Accept Client Certificates. A client certificate is used if the client has one, but the certificate is not required for access.
-
Require Client Certificates. A valid client certificate is required for access to the site. To use this option, you must enable the Require SSL option.
Installing a Client Certificate
When the server is configured to accept or require client certificates, you can install a client certificate on a browser. If you have a local Windows 2000 Server CA, you can do this by accessing the Certificate Services URL http://computername/certsrv.
From the Certificate Services page, you can request a certificate this is a simple process. After the certificate is received from the CA, you can automatically install it on the browser.
Managing Client Certificate Settings
To configure client certificates in Internet Explorer, choose Internet Options from the Tools menu, click the Content tab, and then click Certificates. The Certificates dialog box displays a list of certificates installed on the local computer. You can filter the dialog box by the intended purpose of the certificates. For example, to view only Web client certificates, select Client Authentication from the Intended Purpose list.
To export a certificate to a file, select a certificate in the Certificates dialog box and click Export. You can use this feature with client certificate mapping, described in the next section.
Internet Explorer can export certificates in several formats. To create exported certificates that can be used with IIS for client certificate mapping, select the Base-64 encoded X.509 format. (IIS might not recognize other formats as valid.)
Using Client Certificate Mapping
While client certificates serve to verify the identity of users, requiring client certificates does not restrict access to authorized users. Any user with a client certificate can access the site. You can use the client certificate-mapping feature to map their certificates to user accounts, and then use those user accounts to restrict access to resources based on their identity.
Client certificate mapping creates an association from client certificates to Windows user accounts. You can do this in one of two ways:
-
One-to-one mapping. Maps individual certificates to individual user accounts. Import each client certificate and choose a user account to associate it with.
-
Many-to-one mapping. Configures a list of rules for certificates to match. Each rule includes a user account and password that will be used with certificates that match its conditions.
To enable client certificate mapping, select the Enable Client Certificate Mapping check box in the Secure Communications dialog box. You can then use the corresponding Edit button to open the Account Mappings dialog box and create mappings. The Account Mappings dialog box includes tabbed sections for one-to-one and many-to-one mappings.
To create one-to-one mappings, you need an exported copy of each client certificate.
Using a Certificate Trust List
Along with mapping certificates to user accounts, you can configure a list of trusted certification authorities called a certificate trust list (CTL). If a client connects to the site and has a client certificate signed by one of the CAs listed in the CTL, it is allowed access. Clients with a certificate that does not match a trusted authority will not be allowed to access the site if the Require Client Certificates option is enabled.
To enable CTLs, open the Properties dialog box for a Web site and click the Directory Security tab. Click Edit in the Secure Communications area to open the Secure Communications dialog box, and then select the Enable Certificate Trust List check box. You can then click New to create a new CTL or click Edit to edit the current CTL.
When you create a new CTL, the Certificate Trust List Wizard prompts you for certificates that should be trusted. You can add certificates to this list from the local certificate store or from an imported certificate file.

In this practice, you will request, obtain, and install a server certificate on an IIS server, view SSL certificate information, renew a certificate, and manage client SSL settings. You will need access to a standalone or enterprise CA, as configured in Chapter 5, "Certificate Authorities."
Exercise 1: Configuring SSL in IIS
In this exercise, you obtain and install an SSL server certificate for IIS, view the information stored in the certificate, and renew the certificate.
To obtain and install an SSL certificate
-
In the Internet Information Services management console, select Default Web Site in the console tree.
-
From the Action menu, choose Properties. The Web Site Properties dialog box appears.
-
Click the Directory Security tab.
-
In the Secure Communications area of the dialog box, click Server Certificate. The IIS Certificate Wizard opens and displays an introductory page.
-
Click Next to continue. The Server Certificate page appears, as shown in Figure 12.11.
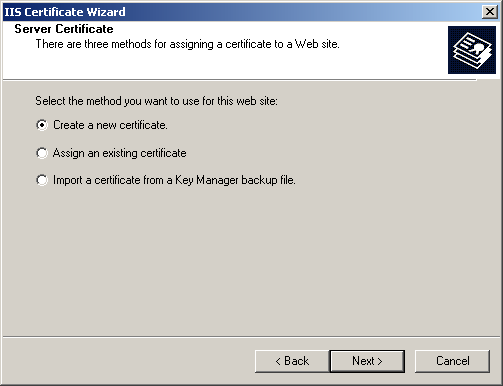
Figure 12-11. Server Certificate options
-
Select Create A New Certificate, and click Next. The Delayed Or Immediate Request page appears, as shown in Figure 12.12. You can either send the request to the CA immediately or send the request later.
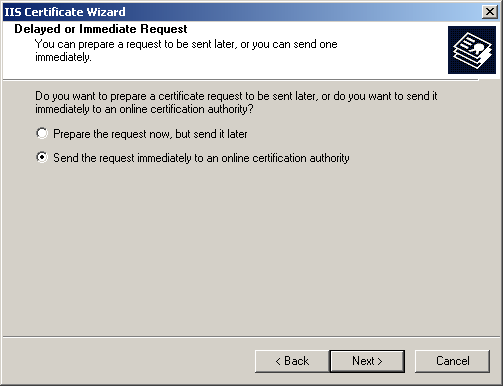
Figure 12-12. Selecting a delayed or an immediate request
-
Select Send The Request Immediately To An Online Certification Authority, and click Next. The Name And Security Settings page appears, as shown in Figure 12.13.
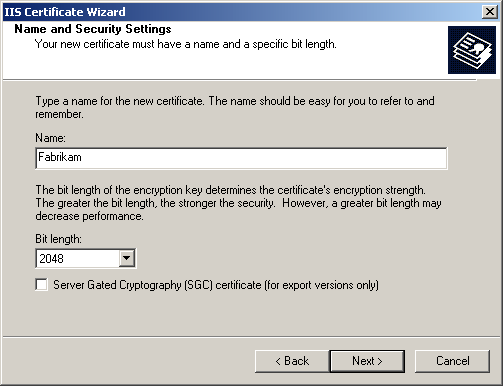
Figure 12-13. Name and security settings for a certificate
-
Type Fabrikam in the Name box.
-
Select 2048 for the Bit Length, and click Next. The Organization Information page appears, as shown in Figure 12.14.

Figure 12-14. The Organization Information page
-
Type Fabrikam in both the Organization and Organizational Unit boxes, and click Next.
-
On the Your Site's Common Name page, type DC01 in the Common Name box, and click Next. The Geographical Information page appears, as shown in Figure 12.15.
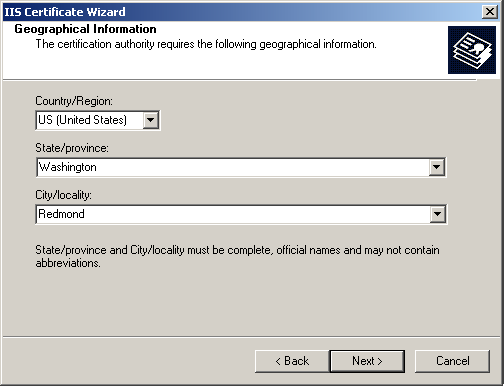
Figure 12-15. The Geographical Information page
-
Select US (United States) from the Country/Region list.
-
Type Washington in the State/Province box and Redmond in the City/Locality box.
-
Click Next to continue. You are prompted to choose a Certification Authority.
-
Select dc01.domain.fabrikam.com\Fabrikam Enterprise Root Certifier from the list, and click Next. A summary of the certificate to be requested is displayed, as shown in Figure 12.16.
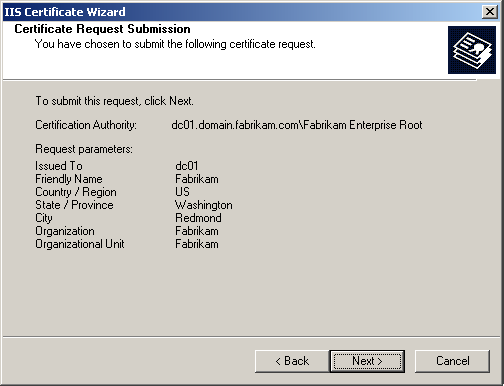
Figure 12-16. The Certificate Request Submission summary page.
-
On the Certificate Request Submission page, click Next to request the certificate. A message appears indicating the request completed successfully.
-
Click Finish to exit the IIS Certificate Wizard.
You have now installed an IIS certificate for the Web site.
To view SSL certificate information
-
In the Internet Information Services management console, select Default Web Site in the console tree.
-
From the Action menu, choose Properties.
-
Click the Directory Security tab.
-
In the Secure Communications area of the dialog box, click View Certificate. The Certificate properties dialog box appears.
-
Click the Details tab to view a detailed list of certificate information, as shown in Figure 12.17.
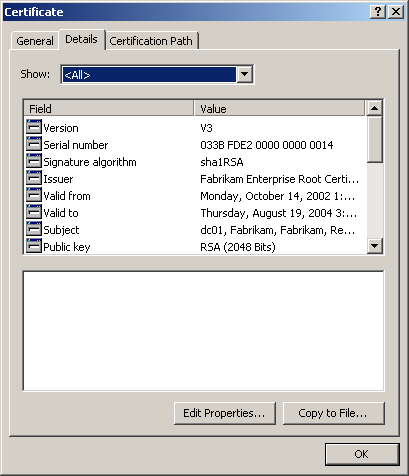
Figure 12-17. Certificate details
-
Click the Certification Path tab to view a path diagram that shows the root CA.
-
Click OK to close the Certificate properties dialog box.
-
Click OK to close the Web Site Properties dialog box.
To renew an SSL certificate
-
In the Internet Information Services management console, select Default Web Site in the console tree.
-
From the Action menu, choose Properties.
-
Click the Directory Security tab.
-
Under Secure Communications, click Server Certificate. The IIS Certificate Wizard displays an introductory message.
-
Click Next to continue. The certificate assignment options are displayed, as shown in Figure 12.18.
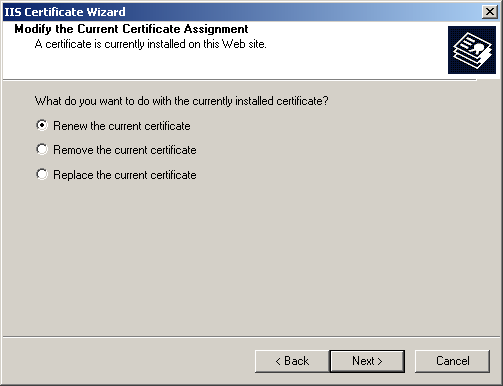
Figure 12-18. The Modify The Current Certificate Assignment page
-
On the Modify The Current Certificate Assignment page, select Renew The Current Certificate, and click Next. The Delayed Or Immediate Request page appears.
-
Select Send The Request Immediately To An Online Certification Authority, and click Next.
-
On the Choose A Certificate Authority page, select dc01.domain.fabrikam.com\Fabrikam Enterprise Root Certifier from the Certification Authorities drop-down list, and click Next. A summary of the renewal information to be sent is displayed.
-
On the Certificate Request Submission page, click Next to request the renewal.
-
Click Finish to close the wizard, and then click OK to close the Properties dialog box.
The certificate is now renewed.
To enable SSL security
-
In the Internet Information Services management console, select Default Web Site in the console tree.
-
From the Action menu, choose Properties.
-
Click the Directory Security tab.
-
In the Secure Communications area of the dialog box, click Edit. The Secure Communications dialog box appears, as shown in Figure 12.19.
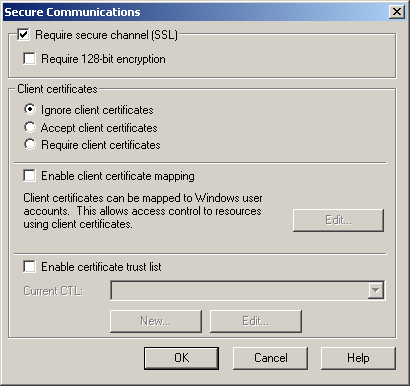
Figure 12-19. The Secure Communications options
-
Select the Require Secure Channel (SSL) check box, and click OK.
-
Click OK to close the Properties dialog box.
SSL is now required for access to the site. Only browsers that support SSL connections can be used.
Exercise 2: Using Client Certificates
In this exercise, you configure IIS to enable client certificates and you install a client certificate in Internet Explorer.
To install a client certificate
-
Perform this procedure from a Windows 2000 or Windows XP client logged on to the domain.
In Internet Explorer, browse to https://dc01/certsrv/. The Microsoft Certificate Services Welcome page appears, as shown in Figure 12.20.

Figure 12-20. The Microsoft Certificate Services Web site
-
Select Request A Certificate, and click Next. The Choose Request Type page appears, as shown in Figure 12.21.
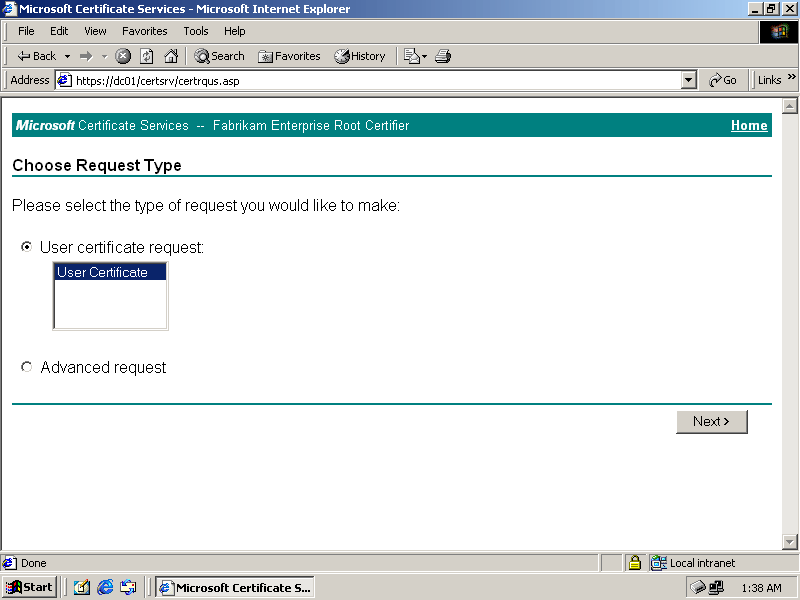
Figure 12-21. The Choose Request Type page
-
Select User Certificate, and click Next.
-
On the User Certificate Identifying Information page, click Submit to request the certificate. The request is sent to the server.
After the certificate is issued, the Certificate Issued page appears.
-
Click the Install This Certificate link to install the certificate on the browser.
The certificate has now been installed.
To view client certificate settings
-
Perform this procedure from the client using Internet Explorer.
From the Tools menu of Internet Explorer, choose Internet Options. The Internet Options dialog box opens.
-
Click the Content tab. The Content options are displayed, as shown in Figure 12.22.
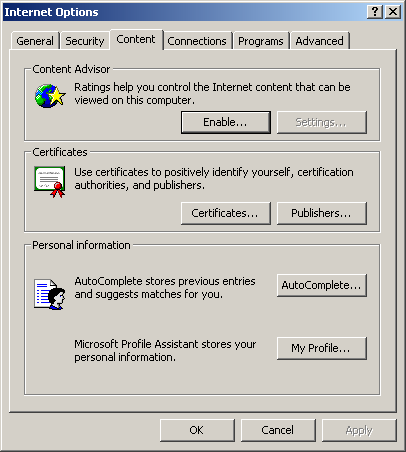
Figure 12-22. The Content tab of the Internet Options dialog box
-
On the Content tab, click Certificates to open the Certificates dialog box.
-
Select Client Authentication in the Intended Purpose drop-down list. The installed client certificate is listed, as shown in Figure 12.23.
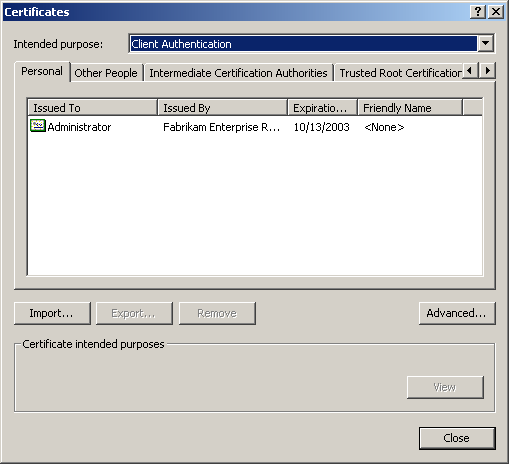
Figure 12-23. Client certificates
-
Select the certificate from the list, and click View. The Certificate dialog box appears.
-
Click OK to close the Certificate dialog box.
-
Click Close to close the Certificates dialog box.
-
Click OK to close the Internet Options dialog box.
Basic information about the certificate is displayed. You can select the Details and Certification Path tabs of this dialog box to display additional information.
To enable client certificates
-
Perform this procedure from the IIS server.
In the Internet Information Services management console, select Default Web Site in the console tree.
-
From the Action menu, choose Properties.
-
Click the Directory Security tab.
-
In the Secure Communications area of the dialog box, click Edit. The Secure Communications dialog box appears.
-
Select the Require Secure Channel (SSL) check box and the Require Client Certificates option. Client certificates are now enabled, as shown in Figure 12.24.

Figure 12-24. Enabling client certificates
-
Click OK.
-
Click OK to close the Properties dialog box.
Client certificates are now required to access the site. You must install a client certificate, as described in the previous sections, to test the site.
To export a client certificate
-
Perform this procedure from the client using Internet Explorer.
In Internet Explorer, choose Internet Options from the Tools menu. The Internet Options dialog box opens.
-
Select the Content tab, and then click Certificates. The Certificates dialog box appears.
-
Select Client Authentication in the Intended Purpose drop-down list. The installed client certificates are listed.
-
Select the certificate from the list, and click Export. The Certificate Export Wizard displays an introductory page.
-
Click Next to continue.
You are asked whether to export the private key, as shown in Figure 12.25. Because this certificate's key cannot be exported, the No option is selected.
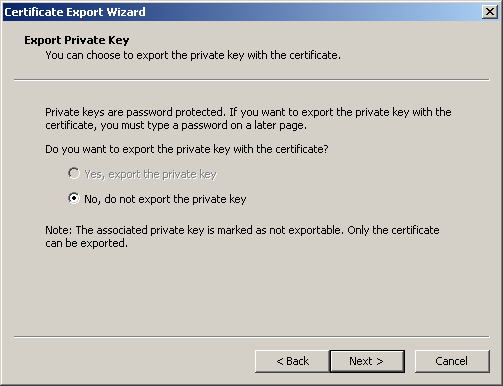
Figure 12-25. The Export Private Key page
-
On the Export Private Key page, click Next to continue. The Export File Format page appears, as shown in Figure 12.26.
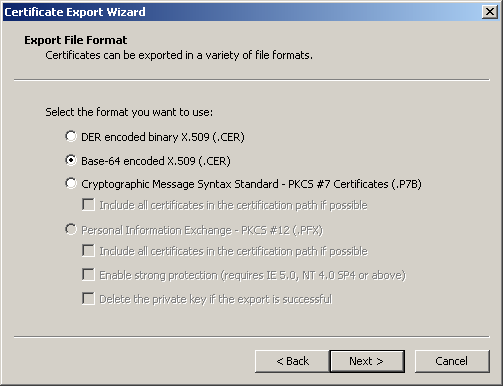
Figure 12-26. The Export File Format page
-
On the Export File Format page, select Base-64 Encoded X.509, and click Next. You are prompted for a file name for the exported certificate.
-
On File To Export page, type c:\user.cer in the file name box, and click Next. The Completing The Certificate Export Wizard page appears.
-
Click Finish to export the file. A message informs you that the export was successful.
-
Click Close to close the Certificates dialog box, and click OK to close the Internet Options dialog box.
To create a one-to-one client certificate mapping
-
Perform this procedure from the IIS server. You will need access to the User.cer file that you exported in the previous procedure.
In the Internet Information Services management console, select Default Web Site from console tree.
-
From the Action menu, choose Properties.
-
Select the Directory Security tab. The Directory Security options are displayed.
-
In the Secure Communications area of the tab, click Edit. The Secure Communications dialog box appears.
-
In the Secure Communications dialog box, select the Enable Client Certificate Mapping check box.
-
Click Edit. The Account Mappings dialog box appears, as shown in Figure 12.27.
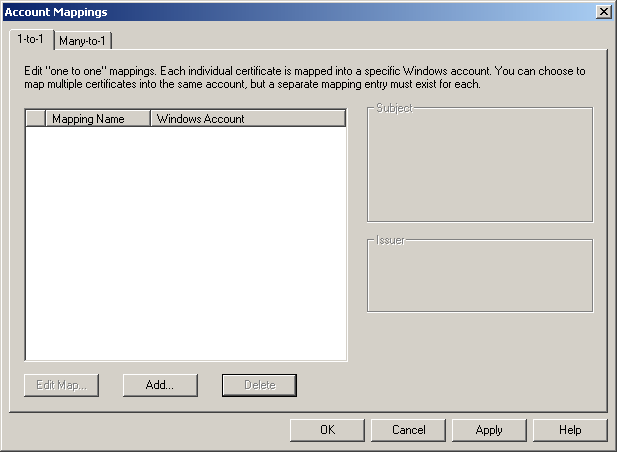
Figure 12-27. The Account Mappings dialog box
-
Click Add to add a one-to-one account mapping. The Open dialog box appears.
-
In the Open dialog box, select the User.cer file you exported in the previous procedure, and click Open. The Map To Account dialog box appears, as shown in Figure 12.28.
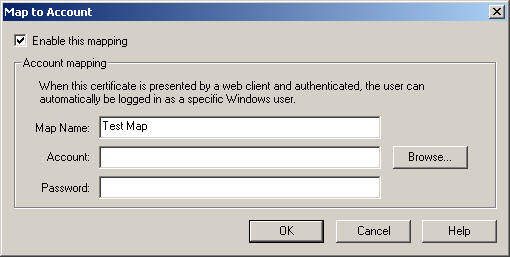
Figure 12-28. The Map To Account dialog box
-
Type Test Map in the Map Name box.
-
Click Browse. The Choose Mapping Account dialog box lists the domain users, as shown in Figure 12.29.
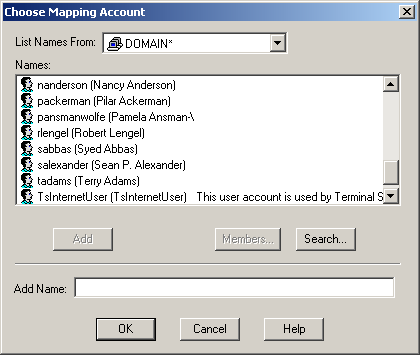
Figure 12-29. A list of available user accounts for the mapping
-
In the Choose Mapping Account dialog box, select user packerman from the list, and click Add.
-
Click OK to return to the Map To Account dialog box.
-
Specify the password for user packerman, and click OK. The Confirm Password dialog box appears.
-
Type the password again and click OK. The new mapping has been added.
-
Click OK to close the Account Mappings dialog box.
-
Click OK to close the Secure Communications dialog box.
-
Click OK to close the Properties dialog box.
To create a many-to-one client certificate mapping
-
Perform this procedure from the IIS server.
In the Internet Information Services management console, select Default Web Site in the console tree.
-
From the Action menu, choose Properties.
-
Click the Directory Security tab. The Directory Security options are displayed.
-
Click Edit in the Secure Communications area of the dialog box. The Secure Communications dialog box appears.
-
Click Edit next to the Enable Client Certificate Mapping check box. The Account Mappings dialog box appears.
-
Click the Many-To-1 tab. The current many-to-one mappings are displayed.
-
Make sure the Enable Wildcard Client Certificate Matching check box is selected, and click Add. As shown in Figure 12.30, the General dialog box appears in which you can describe the rule.
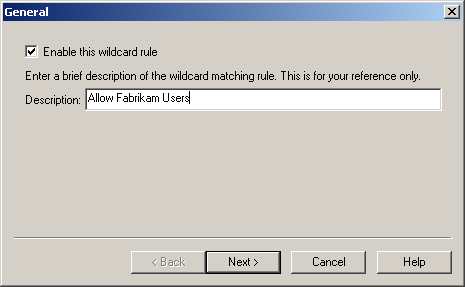
Figure 12-30. Providing a description for a new rule
-
In the General dialog box, type Allow Fabrikam Users in the Description box, and click Next. The Rules dialog box appears.
-
In the Rules dialog box, click New to add a match criterion. The Edit Rule Element dialog box appears, as shown in Figure 12.31.

Figure 12-31. Specifying a new rule element
-
Type Fabrikam in the Criteria box, and click OK. You are returned to the Rules dialog box.
-
In the Rules dialog box, click Next. As shown in Figure 12.32, you are prompted to indicate whether you want the user account to be granted or denied access to the Web site based on the criteria you've established.
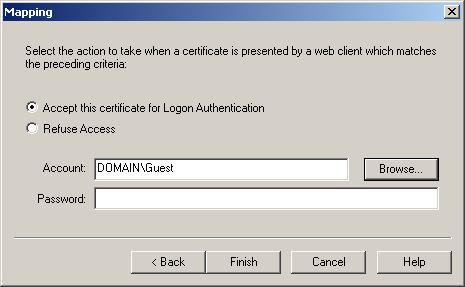
Figure 12-32. Specifying a user account and action
-
In the Mapping dialog box, ensure that Accept This Certificate For Logon Authentication is selected.
-
Click Browse. A list of domain users is displayed in the Choose Mapping Account dialog box.
-
In the Mapping Account dialog box, select the Guest account from the list, click Add, and then click OK.
-
In the Mapping dialog box, click Finish to complete the mapping.
-
Click OK to close the Account Mappings dialog box.
-
Click OK to close the Secure Communications dialog box.
-
Click OK to close the Properties dialog box.
This enables access for users with Fabrikam in the organization box of their client certificate.
To configure a certificate trust list
-
Perform this procedure from the IIS server.
In the Internet Information Services management console, select Default Web Site in the console tree.
-
From the Action menu, choose Properties.
-
Click the Directory Security tab. The Directory Security options are displayed.
-
Click Edit in the Secure Communications area of the dialog box. The Secure Communications dialog box appears.
-
Select the Enable Certificate Trust List check box.
-
Click New next to the Enable Certificate Trust List check box. The Certificate Trust List Wizard displays an introductory page.
-
Click Next to continue. A blank list of trusted certificates appears, as shown in Figure 12.33.
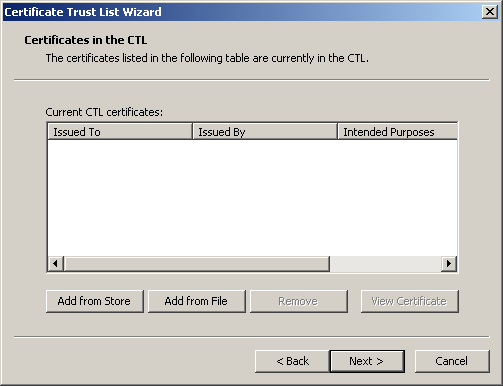
Figure 12-33. Certificates In The CTL page
-
On the Certificates In The CTL page, click Add From Store. The Select Certificate dialog box lists certificates in the server's store, as shown in Figure 12.34.
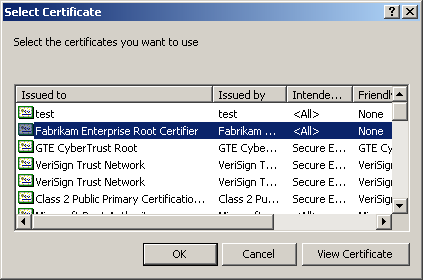
Figure 12-34. The Select Certificate dialog box
-
In the Select Certificate dialog box, select Fabrikam Enterprise Root Certifier, and click OK.
-
On the Certificates In The CTL page, click Next. You are prompted for a name and description for the CTL.
-
On the Name And Description page, type Fabrikam in the Friendly Name box, and click Next. The Completing The Certificate Trust List Wizard page appears.
-
Click Finish to save the CTL. A message box indicates that the wizard succeeded.
-
Click OK to close the Secure Communications dialog box.
-
Click OK to close the Properties dialog box.

The following questions are intended to reinforce key information in this lesson. If you are unable to answer a question, review the lesson and try the question again. Answers to the questions can be found in the appendix.
-
What is required to enable SSL on an IIS server?
-
Which feature allows you to connect user accounts with particular client certificates?
-
When a CTL is in use, which clients are allowed access?
-
Which option do you enable to prevent clients from accessing a site without a client certificate?
-
What are the two types of client certificate mapping?
Lesson Summary
-
SSL (Secure Sockets Layer) is a standard protocol for encrypting communications between Web servers and clients using certificates issued by a certification authority. SSL can also authenticate the server's identity and authenticate clients using client certificates.
-
SSL requires a server certificate installed for the Web site on the IIS server. You can request a certificate from a local CA, or save the request to a file to be sent to an external CA.
-
Client certificates authenticate the identity of Web users. You can either optionally accept client certificates or require them. Each client must request a certificate and install it in their browser. Client certificates can also be mapped to Windows user accounts.
-
You can use a certificate trust list (CTL) to list trusted certification authorities. Clients that have certificates issued by one of the authorities in the CTL will be allowed access to the site.
EAN: 2147483647
Pages: 82