Lesson 3: Using Smart Card Certificates
Lesson 3: Using Smart Card Certificates
Smart cards provide a mechanism for securely storing private keys in a manner that cannot be compromised (without tremendous effort and very expensive equipment) and for associating those private keys with specific individuals. Windows 2000 can store certificates on smart cards to support logging on, digitally signing and encrypting e-mail, and encrypting files on disk.
After this lesson, you will be able to
-
Understand the operation and function of smart cards
-
Deploy smart cards using a smart card enrollment station
-
Log on using smart cards
Estimated lesson time: 30 minutes
Using Smart Cards
Smart cards are security devices the size of a credit card (in fact, they are used as credit cards) that contain a microprocessor and an amount of permanent flash memory. When a card is inserted into a smart card reader, the card's processor and memory are powered by the reader and used to securely store information such as private keys and digital certificates, and other private information.
Smart cards come in many types, and all of them contain permanent memory, but only a few types contain the type of microprocessor needed to perform the PKI functions required by Windows 2000. Be certain that the smart cards you purchase specifically state that they are compatible with Windows 2000 logon requirements. Most smart card readers that can be attached to a PC will function correctly.
In Windows 2000, smart cards are used for three purposes:
-
To log on to a Windows computer
-
To encrypt e-mail
-
To encrypt disk files using EFS
To perform these functions, a smart card reader must be attached to the computer. Typically, you attach a smart card reader to a serial port, USB port, or PCMCIA port. All PCs have either a serial port or a USB port, and all laptop computers have a PCMCIA port, so smart card readers are available for all computers. Even PDAs have serial ports that can be used to support smart cards.
How Public and Private Keys Are Stored
When a public/private key pair is created for a smart card, the key pair is generated by the microprocessor in the card, not by the host computer. The private key is stored in a secure area of the smart card's memory that cannot be accessed from the host computer. The public key is stored in a publicly available area of memory that can be read by the host computer.
The private key is never accessible to the host computer (or any other computer) and cannot be compromised. However, if the smart card is ever lost or re-initialized, the private key and any data that has been encrypted by it is irretrievably lost.
Once a private key has been generated and stored by a smart card, it cannot be removed. The host computer sends the encrypted data to the card, and the microprocessor on board the smart card decrypts the encrypted data using the private key and then transmits the decrypted data back to the computer. Typically, the encrypted data consists of only a secret key that is used to bulk encrypt an e-mail message or a disk file. Because only the secret key is encrypted by the card, the amount of data and processing required is minimal.
Using a Personal Identification Number
Smart cards are issued to individuals who assign to the card a personal identification number (PIN), or numeric password, known only to them. The PIN is created at the time they receive the card.
The smart card's processor requires the PIN to unlock any use of the private memory on the smart card. PINs do not have to be particularly strong, because the smart card will erase itself after three or five incorrect attempts (depending on the manufacturer) to use the PIN. Most PINs are 4 to 8 characters in length, which is sufficient to protect the card from unauthorized use, because brute force attacks cannot be used to guess the PIN.
Guaranteeing Security
Smart cards use two measures to guarantee security:
-
Possession of a controlled device (the card) to authorize access
-
Knowledge of an secret (the PIN) to authenticate identity
A user can lose a password and user name but cannot lose control of a smart card by losing the PIN, because both the PIN and the device are required to gain access to the system. If the device is lost, then the user can report it, and its certification in the system can be invalidated to prevent it from being used.
Types of Smart Card Certificates
There are two types of smart card certificates that a Windows 2000 enterprise CA can issue:
-
Smart card logon certificates
-
Smart card user certificates
Stand-alone CAs cannot issue smart card certificates.
The difference between the two types of certificates is that the smart card logon certificate can only be used for logging on, whereas the smart card user certificate can be used for logging on as well as for EFS encryption and S/MIME e-mail encryption. Unless there is a reason to restrict users from using S/MIME and EFS, you will want to deploy smart card user certificates to allow their increased functionality.
The CA policy required to issue smart card certificates must be explicitly enabled. The exercises in this lesson show how to do this.
For purposes of logging on, both types of smart card certificates are identical. A computer running Windows that has a smart card reader installed will present the smart card icon in the logon prompt dialog box. When you insert a smart card, a dialog box appears, prompting you for the smart card PIN. After you enter the PIN, the logon process proceeds as usual.
Issuing Smart Cards
In contrast to most types of certificates, users cannot request smart cards and create them on their own. Smart cards must be signed by a specific type of administrative certificate to certify that they are allowed to be used in the domain. The administrator's enrollment agent certificate digitally signs the certificates stored on the smart card to prove that they were issued by a legitimate administrator on the network. The administrator who creates the smart card certificates and writes them to the smart card must have an enrollment agent certificate installed on the smart card enrollment station to deploy smart cards.
To issue certificates, an administrator can work from any smart card equipped workstation in the domain. After installing an enrollment agent certificate on the machine using the Certificates management console, the administrator can browse to the Smart Card Enrollment Station page on the CertSrv Web site on an enterprise CA (as shown in Figure 6.16) that has the policy settings required to issue smart cards and begin enrolling smart cards in bulk.

Figure 6-16. The Smart Card Enrollment Station page of the CertSrv Web site
During the enrollment process, which takes approximately one minute per card, you must physically label the smart cards with the user account for which they have been enrolled. This is most easily accomplished by either writing on the smart card with a permanent marker or affixing a label from a preprinted label sheet as you work.
You must also decide on a PIN assignment strategy. You can
-
Leave the manufacturer's default PIN in place if the card comes from the factory pre-initialized. This option is not secure and should never be used outside a test environment.
-
Randomly assign PINs as you initialize cards. While this is the fastest secure method, it requires you to securely transmit the PIN to the users and assume that they won't forget it, because if they do (and if you don't retain it), you will have to reinitialize the card. Unfortunately, this option is likely to cause you to reinitialize a large percentage of the cards you deploy. If you want to use this method to deploy smart cards, write the randomly assigned PINs on the inside flap of envelopes and then seal the smart cards in the envelopes to securely deploy them to users in large batches.
-
Create a PIN changing station at the smart card distribution location and guide users through the process of setting their PIN. This is the most reliable solution because it allows users to assign their own PINs, which they are more likely to remember. You can use this as an opportunity to explain the function of the smart card and show them the smart card removal behavior, which is covered in the next section. This option is the most secure way to deploy smart cards.
-
Leave or assign a default PIN to all cards, and have users log on with it when they receive their card. Once they've logged on with the default PIN, you can run the PIN changing application provided by the card manufacturer to assist them in changing their PIN. You must ensure that all users actually change their PIN for this method to be secure.
Caution users not to use their street addresses, telephone numbers, or social security numbers as (or as portions of) their PINs. Hackers try this publicly available information first when they try to hack smart cards.
Including PIN changing and user training, you should probably assume that it will take five minutes per user to deploy a smart card infrastructure. For a network of 100 users, it would constitute one work day for a single administrator. For a network of 10,000 users, it would take 10 administrators two weeks to deploy a smart card infrastructure to end users.
Modifying the Smart Card Removal Behavior Policy
To maintain perfect accountability in a smart card environment, users must retain control of their smart cards whenever they are logged on to the network. Otherwise, the logged on workstation card could fall into the hands of another party, and the smart card could no longer prove identity. To maintain the security concept that the smart card represents the user at all times, smart card systems usually require that the smart card be present in the smart card reader while the computer is in use.
The default behavior for removing a smart card is to force a log off. You can change this behavior by modifying the security policy setting for smart card removal in the domain GPO to which the workstation belongs. Figure 6.17 shows the Security Policy Setting dialog box.
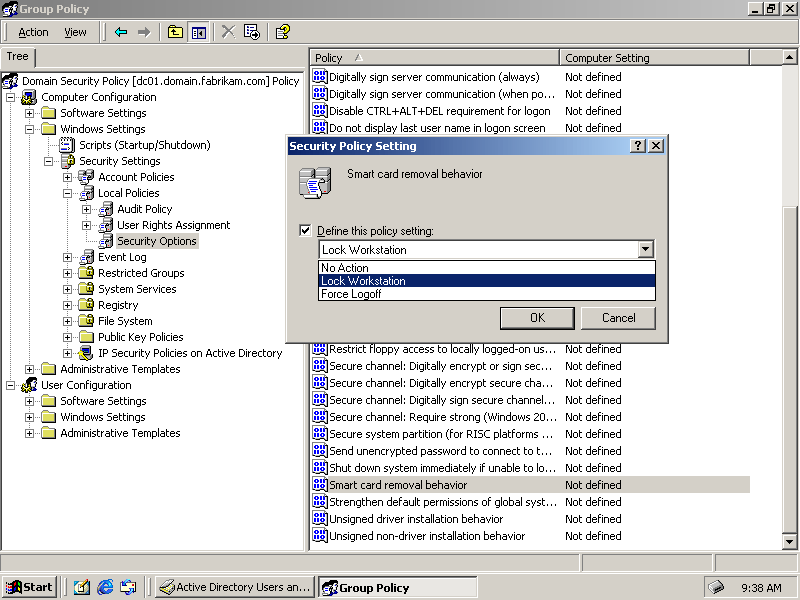
Figure 6-17. Changing the smart card removal behavior in a GPO
Carefully consider the security ramifications of these options before you choose one. Each of these actions has a dramatic effect on the behavior of the people who use smart cards and can increase or decrease the odds of losing control of a smart card or a logged on computer.
The Security Policy Setting dialog box lets you choose one of three smart card removal behavior options:
-
The No Action option creates the strong possibility that users will insert and remove their smart cards when logging on. While this reduces the odds of leaving a smart card in a reader unattended, it dramatically increases the odds that a logged on workstation will be left logged on and unattended when a user steps away from the computer. This means that other users could perform actions on the system within the security context of the smart card user. Because smart card environments require more security than typical logon environments, this is usually not acceptable.
-
The Force Logoff option is the opposite extreme from a security standpoint, but it also has unintended consequences. This option forces users to leave their smart cards inserted into the smart card readers to perform their work. The idea is that whenever the user leaves a workstation, the user will remove the smart card. The problem is that a forced log off causes the user to lose any unsaved work that is open on the desktop. In many situations, this will encourage users to leave their smart cards sitting unattended in the readers so they won't lose data when they must unexpectedly leave their workstations.
-
The Lock Workstation option is the best option in most environments. Locking a workstation prevents unauthorized users from exploiting it, but does not lose a user's work. Because users can remove their cards quickly without losing their work, locking workstations allows you to preserve the security concept that the user is present if the smart card is present, and eliminates all of the subtle reasons users might use to justify circumventing smart card security.
Select the Lock Workstation policy setting as your domain default unless you have a good reason for doing otherwise.
Troubleshooting Smart Card Enrollment
Smart cards are a mature technology, but they have only recently been introduced to PCs for use as logon and security devices. Windows 2000 provides a sophisticated environment in which to use smart cards, and as with any sophisticated environment, complex problems can occur that may be difficult to troubleshoot.
Troubleshooting Errors Attempting to Initialize Smart Cards
If you cannot select an administrator's enrollment certificate during the enrollment process, you do not have an enrollment agent certificate installed on the enrollment workstation. Using the certificate's management console, request an enrollment agent certificate and reattempt the enrollment process.
If you get an error stating that you must select a certificate type with a CA, you have not enabled the CA to issue the specific type of certificate that you are requesting. On the CA, open the Certificate Authority management console, right-click the Policies folder, and add the specific type of certificate you wish to deploy.
Troubleshooting Errors During Smart Card Initialization
When you enroll users using the Enrollment Station Web site, you might encounter an error when you insert the smart card to be written to. There are two common reasons for this error message to appear:
-
The card has not been correctly initialized and does not have a PIN assigned. Use the manufacturer's initialization software and instructions to initialize the card. Some brands of cards come pre-initialized with default PINs. If you don't know the PIN number for the smart card, it is probably not initialized.
-
The card is not compatible with Windows 2000 Logon. There are hundreds of different types of smart cards, but only a few types work correctly with Windows 2000 Logon. Obtain cards of the correct type that conform to the Windows 2000 Logon requirements for smart cards. If your smart card does not specifically state that it is compatible with Windows 2000 Logon, it probably isn't.

In this practice, you deploy a smart card to a user in the enterprise. The process remains the same no matter how many users you enroll. To complete this practice, you will need a smart card reader and at least one uninitialized smart card.
Exercise 1: Deploying Certificates for Smart Cards
In this exercise, you set the CA policy to allow for certificate deployment, create a deployment workstation, and create an enrollment agent certificate. This exercise needs to be performed only once per enrollment station to enroll any number of users.
To configure the CA to issue smart card certificates
Perform this procedure on the enterprise Root CA server.
-
Open the Certification Authority management console.
-
Expand Fabrikam Root Certifier.
-
Right-click Policy Settings, point to New, and then click Certificate To Issue. The Select Certificate Template dialog box appears.
-
Double-click Enrollment Agent. Make sure you do not click Enrollment Agent (Computer).
-
Right-click Policy Settings, point to New, and then click Certificates To Issue. The Select Certificate Template dialog box appears.
-
Double-click Smart Card User.
-
Close the Certification Authority management console. The CA is now configured to issue enrollment agent certificates to administrators and smart card user certificates to end users.
To create a Certificates management console
Perform this procedure on the workstation that you will be using as a smart card enrollment station. You can use the CA server as the enrollment workstation if you want.
If a Certificates management console for the current user account already exists because you've already added one to this computer, you do not need to perform this procedure.
-
Click Start, click Run, type mmc, and then click OK. A blank management console appears.
-
On the Console menu, choose Add/Remove Snap-in. The Add/Remove Snap-in dialog box appears.
-
Click Add. The Add Standalone Snap-in dialog box appears, displaying a list of snap-ins.
-
Double-click Certificates. The Certificates Snap-in Wizard appears with a list of the types of certificates that the snap-in can manage.
-
Select My User Account, and then click Finish.
-
Click Close to close the Add Standalone Snap-in dialog box.
-
Click OK to close the Add/Remove Snap-in dialog box.
-
From the Console menu, choose Save As.
-
In the Save As dialog box, type Certificates in the File Name box and click Save.
To obtain a smart card enrollment certificate
Perform this procedure on the workstation that you will be using as a smart card enrollment station.
-
Open the Certificates management console.
-
Expand Certificates Current User, right-click Personal, point to All Tasks, and then click Request New Certificate. The Certificate Request Wizard appears.
-
Click Next. The Certificate Template page appears, showing the types of certificates you can request.
-
Select Enrollment Agent, and then click Next.
-
If the Certification Authority page appears, select Fabrikam Enterprise Root Certifier, and click Next. The Certificate Friendly Name And Description page appears.
-
In the Friendly Name box, type Smart card enrollment.
-
In the Description box, type Allows administrators to digitally sign smart card certificates.
-
Click Next.
-
Click Finish to request the certificate. The Certificate Request Wizard displays a message box prompting you to install, view the certificate, or cancel.
-
Click Install Certificate.
-
In the message box that appears, click OK to acknowledge that the certificate request was successful.
Exercise 2: Enrolling Smart Cards
In this exercise, you enroll a smart card on behalf of a user and log on as the user. You then modify the default security policy settings for the smart card. The steps in this exercise must be repeated for every user that you enroll.
To deploy smart cards on behalf of users
Perform this procedure on the workstation that you will be using as a smart card enrollment station.
-
Open Internet Explorer, type http://dc01/certsrv in the address bar, and then press Enter. The Microsoft Certificate Services Web site appears (Figure 6.8).
-
Select Request A Certificate, and click Next. The Choose Request Type page appears (Figure 6.11).
-
Select Advanced Request, and click Next.
-
Select Request A Certificate For A Smart Card On Behalf Of Another User Using The Smart Card Enrollment Station, and click Next. The Smart Card Enrollment Station page appears, as shown in Figure 6.18.
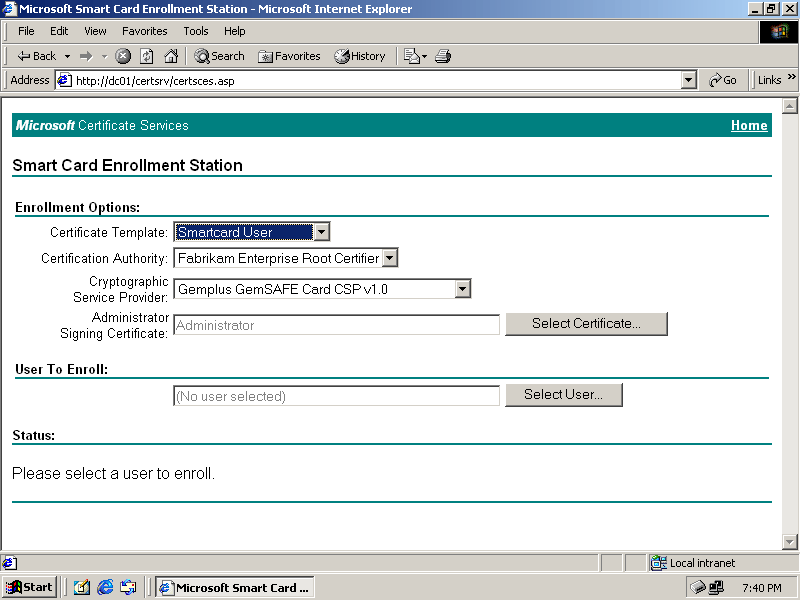
Figure 6-18. The Smart Card Enrollment Station Web site
-
If the Active X security dialog box appears prompting for permission to install Microsoft Smart Card Enrollment Station control, click Yes.
-
In the Certificate Template list on the Smart Card Enrollment Station page, select Smartcard User.
-
In the Cryptographic Service Provider list, select the CSP appropriate for your card reader. For example, if your smart card has oval contacts, select the Gem-plus CSP. If your smart card has square contacts, select the Schlumberger CSP.
-
Verify that the Administrator Signing Certificate box contains Administrator. If it does not, click Select Certificate, and select the Smart Card Enrollment Certificate.
-
Click Select User. The Select User dialog box appears.
-
Double-click Syed Abbas to identify the user you are enrolling.
-
Insert a blank smart card into the smart card reader, and click Enroll. Figure 6.19 shows the Smart Card Enrollment Station window with the message indicating that the user is being enrolled.
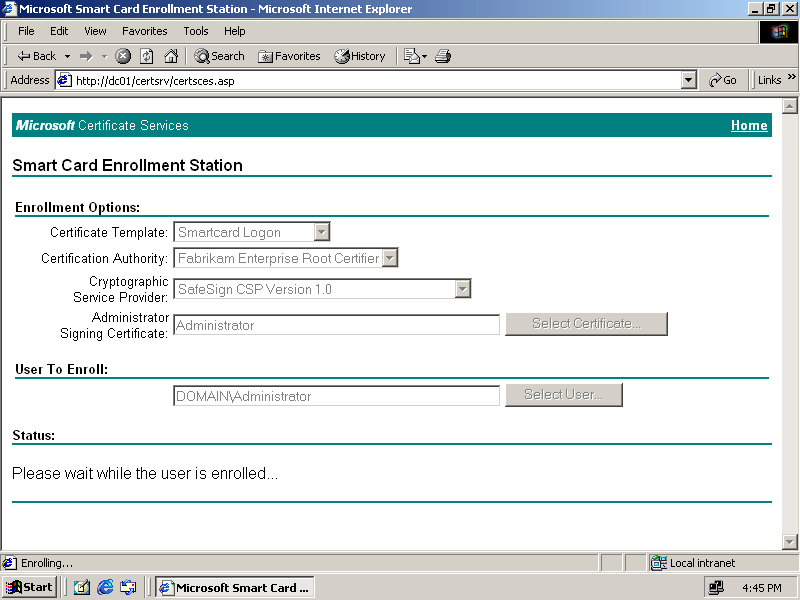
Figure 6-19. A user being enrolled on a smart card
-
When the PIN prompt appears, type the PIN for the smart card.
Check your smart card provider's documentation for the default PIN number for their smart cards or the method used to assign a PIN to a smart card.
The Smart Card Enrollment Station page reappears, as shown in Figure 6.20. The status area indicates that the smart card is ready and the user is enrolled.
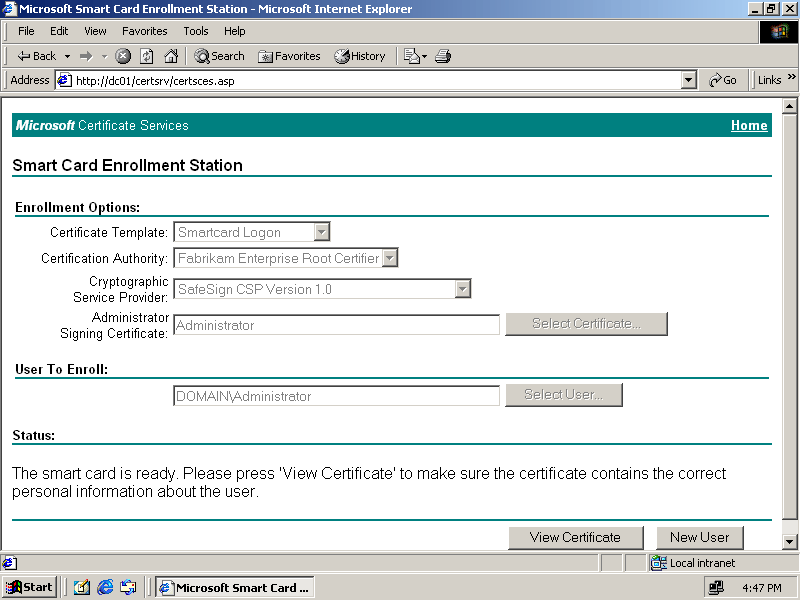
Figure 6-20. The CertSrv Web site indicates that the smart card is ready
-
When the enrollment process is completed, click View Certificates to view the certificates that have been installed on the smart card.
-
Close Internet Explorer.
If you have problems getting past this step, lower the security settings of your Web browser in the Internet Options security properties dialog box to allow you to download ActiveX controls.
If you receive an error message indicating that an unknown error has occurred, it probably means that you're using an uninitialized smart card or a smart card that is not compatible with Windows 2000.
To perform a smart card log on
Perform this procedure on the enrollment station or another workstation with a smart card reader attached. If you are currently logged on, log off before performing this procedure.
-
Ensure that the smart card icon appears in the Windows logon prompt, as shown in Figure 6.21. Insert your smart card into the attached smart card reader.
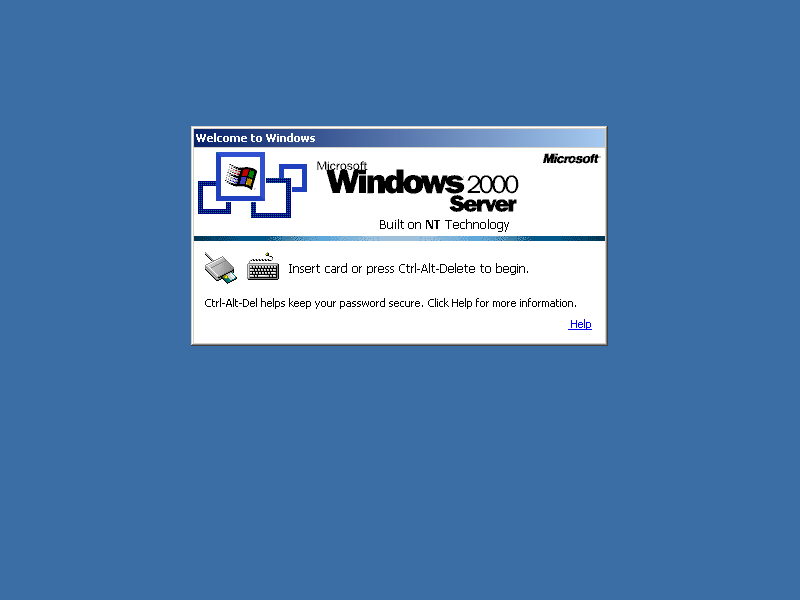
Figure 6-21. The smart card enabled logon prompt
-
When the Log On To Windows dialog box appears, as shown in Figure 6.22, type the PIN you assigned to this smart card, and click OK. Windows completes the logon process.
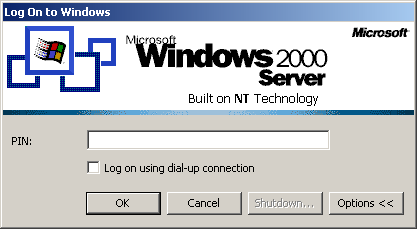
Figure 6-22. Entering a PIN to prove identity during a smart card log on
-
Remove the smart card from the smart card reader. Windows logs off the computer. The default smart card removal behavior is to log off when the smart card is removed from the reader.
To modify the domain security policy
-
Log on to the domain controller as Administrator.
-
Click Start, point to Programs, point to Administrative Tools, and then click Active Directory Users And Computers. The Active Directory Users And Computers management console appears.
-
Right-click domain.fabrikam.com in the domain tree, and click Properties. The domain.fabrikam.com Properties dialog box appears.
-
Click Group Policy.
-
Double-click Domain Security Policy. The Group Policy editor appears with the Domain Security Policy open.
-
Expand Domain Security Policy, Computer Configuration, Windows Settings, Security Settings, Local Policies, and then select Security Options. Figure 6.23 shows the Group Policy editor opened to this policy setting.
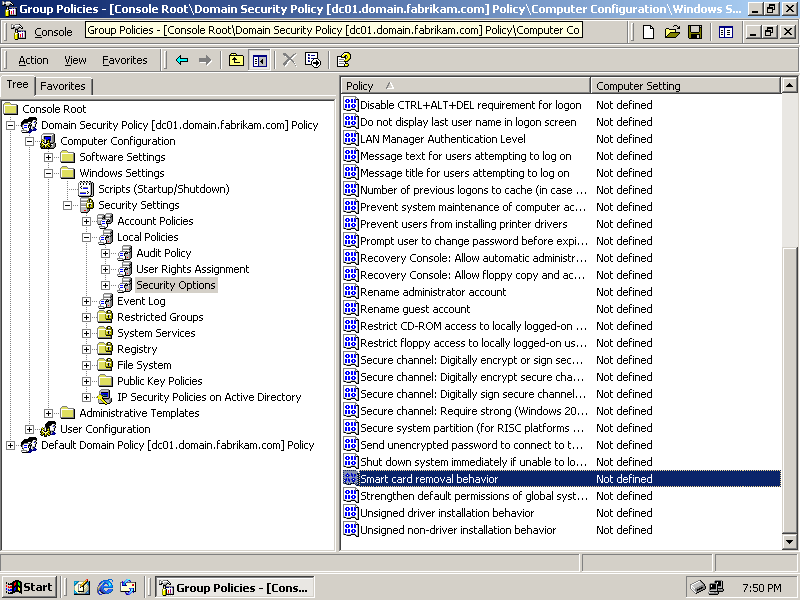
Figure 6-23. The Smart Card Removal Behavior policy setting
-
Double-click Smart Card Removal Behavior. The Security Policy Setting dialog box appears.
-
Select Define This Policy Setting.
-
Select Lock Workstation from the list, as shown in Figure 6.24.
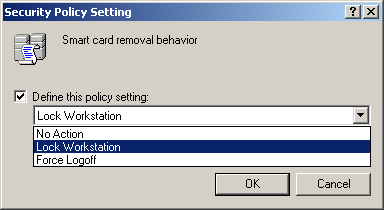
Figure 6-24. The Smart Card Removal Behavior policy options
-
Click OK.
-
Close the Group Policy editor.

The following questions are intended to reinforce key information in this lesson. If you are unable to answer a question, review the lesson and try the question again. Answers to the questions can be found in the appendix.
-
What is a smart card?
-
Are there any types of computers that cannot support smart card readers?
-
For what purposes are smart cards used in Windows 2000?
-
What does an administrator do to authorize a smart card to function in the domain?
-
What program is used to deploy smart cards?
Lesson Summary
-
Smart cards are devices that contain a microprocessor and permanent memory that can be used to securely store private keys for domain log on, e-mail signing and encryption, and file encryption. Because the keys are stored on the card, they are transported with the user wherever the user moves within the enterprise. To use a smart card, the workstation must have a smart card reader attached.
-
The major steps in deploying a smart card infrastructure: add the appropriate smart card policy to the enterprise CA, install an enrollment agent certificate on the enrollment workstation, and use the Smart Card Enrollment Station page on the CertSrv Web site to create Windows 2000 smart cards.
-
Smart cards are deployed in bulk by administrators and issued to users after they have been enrolled. Administrators can set the PIN required to use the card or allow users to set the PIN when the smart cards are deployed.
-
Users are logged off by default when their smart cards are removed from the smart card reader. You can change this default behavior by modifying the domain group policy to either lock the workstation or to take no action.
EAN: 2147483647
Pages: 82